
Spud & Chloë & Blog - StumbleUpon Hi Spud & Chloë Friends, After an overwhelmingly positive response for the Oink preview and for adding wings….. here he is! This project is so fast to work up you will barely blink an eye and a pig will be flying around your house. I promise. Oink’s body has a Hi Bounce Pink Ball inside but it is optional. Here is some information you might like to know: Finished Measurements: 3 ½ inches tall by 2 ½ inches wide Yarn: Spud & Chloë Sweater (55% superwash wool, 45% organic cotton; 160 yards/100 grams), 1 hank each in Watermelon #7512, Popsicle #7501 and Igloo #7517 (optional for the wings only) Needles: US size 5 double pointed needles, set of 4 or size to obtain gauge Tools: Yarn needle Scissors Tape measure or ruler Polyester fiberfill (small amount) Hi-Bounce Pinky Ball (optional and available on Amazon.com) Black embroidery floss Stitch marker Gauge: 6 stitches per inch in stockinette stitch Pigs really do fly! Have fun and hopefully Oink will bring some smiles to you and those around you.
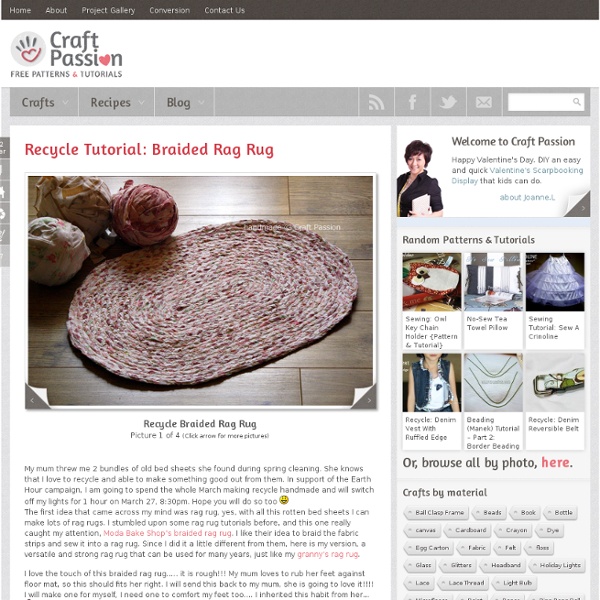
Recycle | Woven Rag Rug Thank you for all the great feedback for liking my Braided Rag Rug. I understand that not everyone has a sewing machine or/and able to sew, so I created this no-sew version for the non-sewer who like to recycle their bed sheets or de-stash their fabrics to make this feet cozy Woven Rag Rug. This tutorial doesn’t require any loom for weaving; just use a sturdy corrugated carton box from your recycle pile. I hope everyone can do their part on greening the Earth again and reduce the rubbish that loaded the landfill. {Get full details on next page.} Pages: 1 2 Get all updates via email: Highlights from Our Partners
How to Cable Without a Cable Needle | Lion Brand Notebook - StumbleUpon November 7th, 2011 by Jess Now that you’ve learned to use a cable needle, what do you do if you want to start a cabled project and don’t have a cable needle on hand? Don’t fret; you can cross your stitches without using a separate needle! Here’s how to do it. Now, a few notes on this technique. Christmas | Project | Pom-Pom Tree Pom Pom Christmas TreeTo make: 1 (multiply the quantity with the numbers of tree you would like to make)Materials: 1. Pom Pom, 1″ diameter, green = 28, red = 1 2. Wood block, square, 2 pcs. 3. Bead garland, (small bead) 4. Gather the tools and materials as listed above. which is clear in color, quick drying and tacky. Glue 3 pom-poms into a ring then glue 1 on top of it. Glue 5 and 7 pom-poms in ring respectively. Add few drops of glue at the bottom of the 7 pom-poms ring, place it on the 12 pom-poms circle. Repeat the same to add a 5 pom-poms ring on them. Finally, add the 4 pom-poms top on. Stack 2 square wood blocks together and glue them with the adhesive. Glue ribbon to embellish it. Glue the pom-pom tree on the wood stand. Lastly, add a red pom-pom on the tree top and a ribbon around it with a bow. {More photos and story on Page 1.} Pages: 1 2 Get all updates via email: Highlights from Our Partners
Easy Button Earrings Tutorial - StumbleUpon Did you know...that you can make new earrings with a button and a paperclip? True story! I've been trying to think of a way for us to make some earrings without having to buy supplies. Buying the beads and all the findings can really add up. :o( Sad. But-oh, what? That still leaves the findings. Clip the top of the paperclip off with wire cutters: Snap off the button shanks: Glue the paperclip to the back of the button. Open the loop at the bottom of your earring hook by bending it outward and hook it onto your paper clip. And...pretty new earrings! Walmart was out of gold sparkly ones (I like gold.) but here are some cute ones I found on Walmart.com(about $1-$2): And some cute ones on Etsy: This Etsy shop has infinity cute buttons, you have to see it. (click photos to see where to buy them!) Of course, you may have some on hand just waiting to use! Hope you enjoy. Have a great Sunday! Have a great Monday!! Love you, Disney
5 Minute Memory Wire Bracelets I have to say, I never used Memory Wire. Not until I stumbled upon an idea while visiting my local bead store. I saw a necklace there that looked interesting. It looked like a floating bead necklace, except I could tell it was not clear beading wire that was used, but something else, that really defined the round shape of the necklace. Simple memory wire bracelets. Here is the supplies and tool you need other than beads. Heavy duty wire cutter (yes, Memory Wire is tough to cut and you will damage your wire cutter), pick either a chain nose pliers or round nose pliers. First I cut a full circle from the Memory Wire. Then I added beads and cut the tubing. Put tubing on the exposed wire... then using pliers, I made a loop on one end and a small hook on the other. Here are the bracelets I made. linked up to
Crafty Nest - StumbleUpon resurrection fern: how to make a vintage hankie bunny All you will need for this so simple it should be illegal tutorial is a hankie, or a similar square of fabric and a little bit of stuffing (optional). Thats right, no scissors, needles, thread or anything else except your own two hands. To get started lay your hankie flat on a smooth surface. This first version is unstuffed. Next fold your hankie in half along the diagonal. Starting with the tip of the triangle start rolling the fabric ( not too tight) towards the fold. Now bend your little roll in half. Pick a spot about half way again and tie a knot ( again not too tight). Arrange the darling little ears in a pleasant manner. Wasn't that easy. If you desire your bunny a little plumper it is easy to do with a small amount of any stuffing material. Place your hankie on the surface. Now fold the hankie along the diagonal as before. Start rolling the fabric at the tip of the triangle as previously. Proceed exactly as in the unstuffed version. I bet you can't stop at making one.
Salvaged drawers = modular bookcase I picked up these drawers on Freecycle. They were salvaged from the kitchen of a 1940s house that was demolished. My original plan was to put the drawers on wheels and use them as under-bed storage. How to make a modular bookcase out of salvaged drawers Supplies primer2 coordinating paint colorsdecorative or wrapping paper. Tools paintbrushdrop clothscissors or craft knife, straight edge, and cutting mattape measure or yardsticksoft rubber brayerdrillsand papervacuum or tack cloth 1. 2. 3. 4. 5. 6. 7. 8. DIY natural orange cleaner recipe Cleaning with vinegar isn’t really a new idea – nor is this DIY orange cleaner recipe. But, I’ve been intrigued by it for a while and thought I’d give it a try. It works really well, is super easy to make and you really can’t get much cheaper than plain vinegar along with some orange peels (which would normally go in the trash around here.) Start by filling a jar with orange peels. You can also use lemon or lime or even grapefruit – any citrus peels work. Fill a jar with them (a quart jar works best, but a pint works just fine.) Next, fill it with vinegar to the top. Set it aside for at least two weeks, I put the date on mine to show when it was ready (because I’m a highly forgetful person.) After two weeks, drain the peels and pour the now orange infused vinegar into a spray bottle. But, I’ve gotta admit: It works really well for surfaces, etc – but the vinegar smell will still be rather strong when you’re using it. Want more cleaning & organizing ideas?