
iCandy Handmade Hi friends! I can't tell you how excited I am to be a creative guest on Ucreate today! I've been bubbling with excitement for weeks and have been scheming over what project would be Ucreate-worthy. I hope this one fits the bill...! First of all, I'm Autie and my friend Jen and I blog over at iCandy handmade. I'm a busy mom of 2 cute little kids and during nap time and bed time, I love to work on projects! The project that I thought I'd share with you today started out with these. The drawer does not open, but the cupboard door does...and it leaves about an inch of space to keep something in it...like art masterpieces of a few sheets of homework paper...hmmmm I bounced some ideas off of Jen, and this is what I came up with...I give you the Cupboard Door into Art Desk Tutorial I made one for each of my littles, and so far, they're totally diggin' it! If you want to know what I did, here's a quick run-down on what I did: I wanted to use the drawer as a supply holder. Here we are so far: -Autie
More Tips to Make Life Easier Liked the first set of easy household tips I posted a few days ago here? I got these in an email forward and thought they were brilliant! Here are 10 more for you! Turn your muffin pan upside down, bake cookie dough over the top and you’ve got delicious ice cream bowls! Can’t find a missing earring or other small item but terrified you’ll vacuum it up? No need to buy a custom cupcake carrier – cut crosses into a box lid and you’ve got an instant cupcake carrier. Place a magnetic strip behind your vanity or closet door in the bathroom and store tiny essentials like bobby pins, tweezers and more. I’m always saving plastic bags when traveling for my shoes. You can buy professional labels for your cords – or you can reuse bread ties and get the same results! Love this! Install a tension rod to store spray bottles under the sink! Freeze aloe vera in ice cream trays for soothing sunburn relief (isn’t this brilliant?!) (source)
Savings Experiment: New Year's Resolutions As you ring in the New Year, learn how to save money for peace of mind. Here's how to budget effectively. As you ring in the New Year, you'll probably make some personal resolutions to lose weight, volunteer more, and clean behind (and not just around) the furniture. (That last one may just be me!) These are all sound goals, but don't forget to add saving money to the list. Learning how to save money will offer you peace of mind, so you'll basically be checking off two resolutions for the price of one. Take Back Your Expenses Considering that most of us are part of the 99%, it's critical to budget. There are a number of ways to budget. Financial experts recommend creating a pie chart of your spending ratios. into a 50/30/20 budget, divvying your monthly household income into essentials, savings, and splurges. Then break down your expenses. Last, but not least, find out what the remaining twenty-percent of your total income is, and siphon off that amount for savings and emergency funds.
25 clever ideas to make life easier Via: amy-newnostalgia.blogspot.com Why didn’t I think of that?! We guarantee you’ll be uttering those words more than once at these ingenious little tips, tricks and ideas that solve everyday problems … some you never knew you had! (Above: hull strawberries easily using a straw). Via: apartmenttherapy.com Rubbing a walnut over scratches in your furniture will disguise dings and scrapes. Via: unplggd.com Remove crayon masterpieces from your TV or computer screen with WD40 (also works on walls). Via: athomewithrealfood.blogspot.com Stop cut apples browning in your child’s lunch box by securing with a rubber band. Via: marthastewart.com Overhaul your linen cupboard – store bedlinen sets inside one of their own pillowcases and there will be no more hunting through piles for a match. Via: realsimple.com Pump up the volume by placing your iPhone / iPod in a bowl – the concave shape amplifies the music. Via: savvyhousekeeping.com Re-use a wet-wipes container to store plastic bags. Via: iheartnaptime.net
Organizing Cables & Cords! - Organize With Sandy February 22, 2011 by Sandy Using Toilet Paper Rolls & Duct Tape To Organize Your Cables and Cords! I got this idea from a post that House on Ashwell Lane posted on my Organizing Mission Monday link party a few weeks back. Solution #1 Creating Sleeves for organizing the electrical cord clutter. I covered the toilet paper rolls with the duct tape. I started with the pink duct tape. Take the cord and wind it up so it is a little longer than the size of the roll. Take the toilet paper roll and thread the plug through the roll first, and then work the bulk of the cord slowly in. I realized as I put this extension cord through, that had I not used duct tape around the roll, it would have split. There you go! Next I covered a green one. I used a piece of tape to cover the ends. Do that on both ends and then you don’t have to worry about the cord falling out. My next one was the black and white one. So this is what the cords look like behind my chair now. I used the green tape to tape them together.
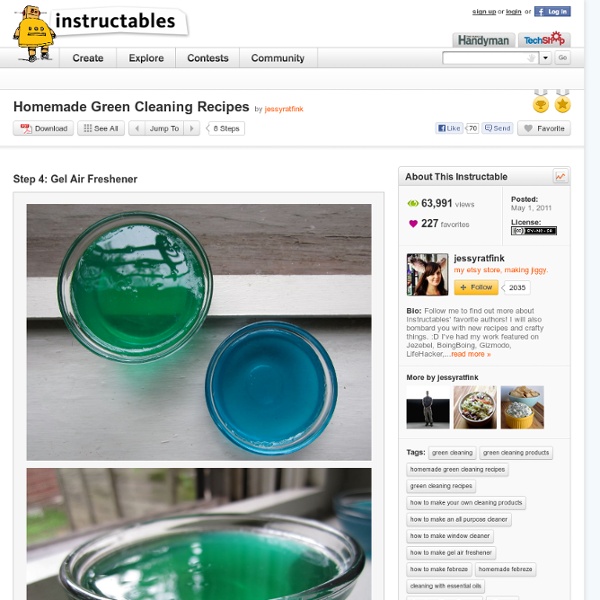
Tea light made from an orange It’s still Winter, even though the weather in Utah has been ten kinds of insane. She’s a fickle little diva, that Winter. Anyhow, since citrus is so widely available in the depths of despair December/January it’s a fun time to get your craft on and whip up a tea light made from an orange. Serious. Martha, procurer of all things beautiful, taught me how to do this little bit of magic with oranges and I’ll tell you what: it’s a super easy and totally gorgeous craft. Promise. I just don’t have time and/or energy for any drawn out nonsense, and my guess is neither do you. I’m betting on the latter. So here’s how it all breaks down, the nitty gritty details you need to know to make your own tea light. How to: tea light made from an orange: orangestea lightstea light holders or small ramekinsparing knifespoonsteel cookie cutter {optional}bowl for orange guts Step 1: Slice an orange in half right down the middle, not top down from the stem. Boom! You are a ninja made of crafty awesomeness. Allison
Holder for Charging Cell Phone (made from lotion bottle) My husband and I both have cell phones. And both of us have phone chargers. And that means lots of obnoxious cords. You never know when one of us may be moving phone cords around, to give our phones an extra charge while we’re chatting away……… or trying to charge our phones up before running errands or something. Needless to say, those phone cords seem to be everywhere…..and are generally in the way and hanging all over the floor. (Okay, and how about when you’re in a hotel or visiting family/friends. I was looking around on the internet for a solution and found this. It made the perfect little holder for my cell phone while it’s being charged. Holder for Charging Cell Phone And no more phone hanging down from the outlet while in this room or that room……..the cord and phone are now up off the ground, and tucked away into the little holder, while the phone drinks up a full charge. If you look closely, you can see that the orange print is fabric. And turns out, it’s pretty useful.
Make-up Magnet Board We all know with craft blogs that original ideas are often hard to come by, we find ideas we love and make them our own but we didn't come up with the idea ourselves. I feel like I've finally done something original here and I'm excited about it. I'll show you the finished product and then explain. Behold my Make-up Magnet Board. I have a friend who is beautiful and stylish and has always loved make-up but recently took a course that intensified her love. The basket was a mess and I was overwhelmed with all my choices never knowing what to use, digging through to see what I had and find what I wanted was a pain. I painted it (The hard way, with a brush instead of spray paint. I went to the hardware store and picked up some metal and had them cut it to fit inside my frame. Here comes the brilliant part though. Here's the stash of eye shadows we're talking about (I've even added a couple since this picture). Next I wanted a place to store my brushes and liners though.