
Soap Making Instructions | Soap Making Recipes and Tutorials | Teach Soap - StumbleUpon Making Hot Process Soap in a Crock Pot Thank you for visiting Little House in the Suburbs. Please subscribe and you'll get great simple living tips and how-to articles delivered to your inbox, for free! I made famous soap today. It is a Hot Process Crock Pot, Oatmeal & Honey Castile soap recipe, known interchangeably as Kaleb’s Oatmeal & Honey Castile or Bunny’s Castile. Soapers (people who make homemade soap) will understand what I just wrote, but for those normal folks out there who still haven’t nodded off, allow me to translate into English: In (extreme) brief, there are two basic ways to make soap at home–cold process and hot process: Cold Process: Combine oil(s) with a solution of water and sodium hydroxide (lye). Hot Process: Combine oil(s) with a solution of water and sodium hydroxide (lye) and cook. One method of hot process is the Crock Pot Method. Why one method over another? Finally, Castile soap is olive oil soap. Okay, back to the famous soap recipe. Here follows my first experience with this recipe: One more thing.
How To Make Soap At Home Here are some instructions on how to make soap at home using inexpensive ingredients, most of which are easily available in health food stores or the supermarket: 1.) Make the alkaline solution by adding 2 oz. of Red Devil lye slowly into 32 oz. of distilled cold water in a glass container, stirring slowly with a wooden spoon. The lye will react with the water, heating it and releasing fumes so be careful not inhale any. Set aside the solution to cool the lye. 2.) 3.) 4.) 5.) 6.) 7.) Mirror Image: How To Make Natural Body Moisturizer Cool Copper Projects Warm metallic hues are easy to love but often pricey. When you create the look... Easy Doily Bowl Craft a decorative bowl from a doily picked up from a flea market, antique... Camper Birdhouse Encourage birds to stay awhile with an adorable vintage birdhouse.
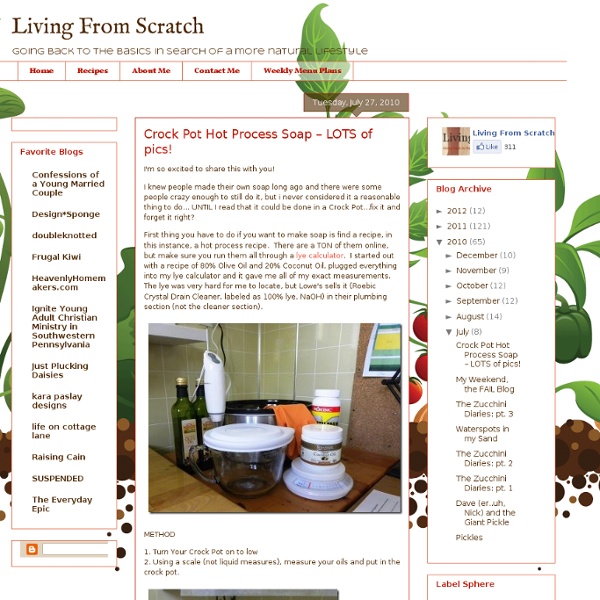
Crockpot Coffee Kitchen Soap--Tutorial This is one of my favorite handmade soaps. It works great for onion and garlic smells on your hands. You can buy most of the ingredients at your local grocery store. This process takes a while, but it is worth the end result. I got 16 slices of soap and 4 decent size (but not pretty) soap balls. Ingredients: Cold coffee Olive Oil Palm Oil Coconut Oil Ground coffee (not instant) Almond or Castor oil Lye* (see notes) Equipment: Crockpot (I use a crockpot from a garage sale that is just for soap making) Stainless steel spoon (not aluminum!) Glass jar for mixing lye Wooden skewer for mixing lye Postal or kitchen scale that weighs in 1/10th of ounce increments Phenoolphthalein or litmus strips (in the pool supply aisle) Soap Mold (I use a pringles can!) Stick blender (helpful but not necessary) Weigh 12 oz. of cold coffee into a glass jar. Weigh 18 oz. of olive oil, 8 oz. of coconut oil and 6 ounces of palm oil into your crockpot. Turn the crockpot on high to melt the oils.
How to Make Soap Petals Soap petals are simply silk flower and leaf petals dipped in soap. They are single use and look pretty sitting beside the sink. Use one to wash hands. Then discard the silk petal. Add a special touch to your bath or powder room with this super-easy project. How to Make Silk Soap Petals Materials Petals and leaves cut from silk flowers8 oz. Here are the directions for making the soap petals. Tags: soap petals, soap crafts, melt and pour soap, soap petal how-to, silk flower crafts Time for Tea Soap | Cucumbersome Drinking tea is such a lovely ceremony, what with the dainty cups and small spoons and little dishes reserved only for steeped tea bags. The aroma is such a huge part of that experience. Sadly, I’m finding that one can only drink so much tea in a day. So why not pull those luscious scents into our lives in other ways? This was my thinking when this idea popped into my head. I have included a full, rather detailed tutorial for you to make these yourself. You can buy all the materials you need here. which some may think is cheating, but I think it’s fantastic. which has more bergamot than usual. 1. 4. 8. Here are the tags that are available (click here to view and print): Now I’m off to have a cup of tea… Thanks for reading.
DIY Chalkboard Menu Board Planner Tutorial One of the most common phrases in our home is, "What's for dinner?!" I thought this menu board might solve that problem mighty quick and add a little somethin' to my kitchen! Here is how to make your own: I bought this frame at a thrift store for a few dollars. Isn't she lovely?! It measures about 1' x 3'. Step 1: Remove hanging hardware from the back and paint your frame. I used a generic brand yellow spray paint that was closest to the color I was wanting. Step 2: Take the glass out of your frame and paint with chalkboard paint. I used Krylon Chalkboard paint in black and did three coats on each side of the glass. Step 3: Antique frame. I spread some black acrylic paint on my frame, a few inches at a time, with a foam brush. After just a few seconds, I rubbed off most of the black acrylic paint with a clean rag. Step 4: Cut out a piece of cardboard or foam backing to fit your frame. Step 5: Reattach hanging hardware. Step 6: Apply vinyl. Step 7: Prime your chalkboard. You're done!
How to make natural soap Video Heidi: Interested in learning how marble soap is made? Hi, my name is Heidi, and you’re watching WatchMojo.Com. And today, we’re taking a look at how soap making meets the art of homemade. Alicia: When we’re making soap, we’re working on something called Sodium Hydroxide, that’s commonly referred to as lye or caustic soda, so we have to wear gloves and we have to wear protection for eyes as well. To make the solution, I took a measurement of water and I need the sodium hydroxide which is a powder into that water. The next one I’m measuring is castor oil which is a bean. This oil, I’m now going to pour that in the bucket. The next phase is for me to—the same thing I did with the clay and the pigment. So this is the fun part.
Glass Christmas Trees - Alderberry Hill Happy Weekend Everyone! Christmas crafting is in full swing for everyone by now and I am enjoying the crafting season as well. I love the color turquoise and am trying to work it into my Christmas decor. Here is my latest turquoise creation. Glass Christmas Trees And here is how I put them together. What you will need for the project: Styrofoam cones or stack trees.Craft paintBrushGlue gunGlue sticksGlass bowl fillers (the ones that are flat on the bottom). The process is so simple. Paint the styrofoam, let dryGlue on the glass I glued the glass on using a brick laying technique. But just go with it, it will turn out fine. Imagine, Improvise & Invent Sarah