
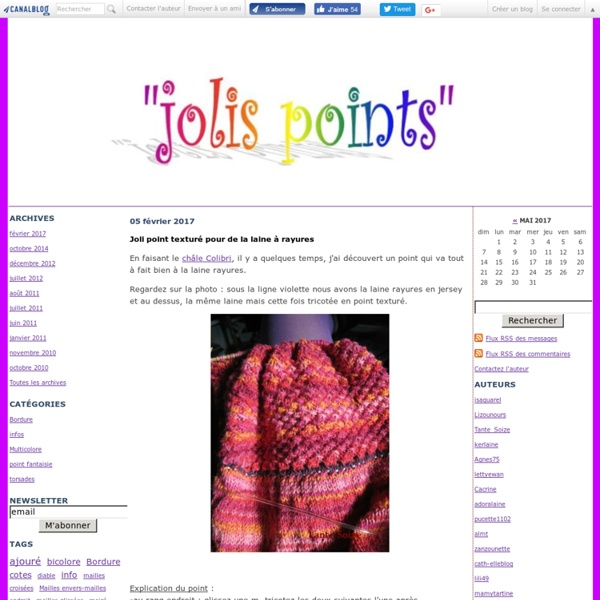
Comment faire une règle de trois - Mini calculateur crochet et tricot Comment faire une règle de trois pour adapter vos modèles au crochet et au tricot à votre échantillon. Pour les réfractaires aux maths, un mini calculteur automatique. Qu'est-ce qu'une règle de trois et comment peut elle me servir dans un ouvrage au crochet ? Grâce à cette mystérieuse règle de trois, vous allez pouvoir passer d'un nombre de centimètres en largeur sur votre patron de base à un nombre de mailles nécessaire pour la réalisation de ce patron. Ou passer d'un nombre de centimètres en hauteur sur ce même patron au nombre de rangs nécessaire. Pour mettre un lien vers cette page, à partir de votre site internet en html : <p>< a href=" règle de trois appliquée au crochet</a></p> Pour mettre un lien vers cette page à partir d'un blog ou d'un forum en BBcode : [url= la règle de trois appliquée au crochet[/url]
Combien de pelotes pour - métrage nécessaire Suite à ce fil de discussion sur le forum de tricotin, un petit tuto et des fichiers excel téléchargeables (un pour le moment) pour savoir combien de pelotes il vous faut pour tricoter tel ou tel ouvrage. Ce calcul est important car il permet d'acheter le bon nombre de pelotes, à la fois pour ne pas en avoir deux tonnes en rab (et avoir garder ses € pour d'autres achats) ou d'en manquer (et de tomber dans la galère des bains ou être en rade pur et simple quand la laine n'est plus commercialisée, ce qui arrive souvent quand on tricote avec des restes de laine ;-) ) La 2ème étape est aussi valable pour la couture, pour faire couper le métrage de tissu nécessaire. Attention : les calculs n'incluent pas le métrage de fil pour les coutures et pour les changements de pelotes. 1ère étape : calcul du métrage nécessaire pour 10cm2 => 2ème méthode : avec l'échantillon "tricoté/détricoté mesuré" : Tricotez un échantillon 12x12cm, comptez le nombre de mailles et de rangs nécessaires pour 10x10cm.
Twist Collective Knit Two Together (k2tog) This is a right-leaning decrease. It looks the same on the right side as p2tog . It mirrors with left-leaning decreases such as ssk , ssk variation , k2tog tbl , and sl1, k1, psso . Insert the right needle into two stitches at once. Wrap yarn. Knit. Decrease How Tos: Read the full article, Decoding Decreases Download a handy pdf with Decoding Decreases and instructions for all of the decreases. Sandi Rosner is a knitter who wears many hats: designer, technical editor, writer and teacher.
Lace | Knitca™ Cast on a multiple of 12 stitches. Add 2 more selvage stitches if you want to make a nice-looking edge. Row 1 (right side) : *purl 1 st, yarn over, SSK, knit 8 sts, purl 1 st*, repeat from * to * as necessary. Repeat rows 1-36 as necessary for completing your project. You can also work according to the chart below. Note: the chart depicts stitches in right side rows from right to left (that is, your first stitch in right side row will be the first stitch on the right of the chart) and stitches in wrong side row from left to right (that is, your first stitch in wrong side row will be the first stitch on the left of the chart). I’d love to know what you think. Sliding loop : an easy way to begin granny square! The double sliding loop is my favorite way to begin a granny square. I find this method fabulous as I can make the beginning ring the size I want. I worked it with a double ring as I find it more safe and easier to weave in end the tails. And here is a tutorial just to share with you my way to work : 1. Wrap your yarn 3 times around your finger 2. 3. 4. 6.And pull it through the loop on the hook 8. 9.Then pull the second tail to close the ring 10. Hope you find this helpful Happy crocheting Bien à vous Stefanina
Steeking Tutorials | Harpa The brown sweater is now a cardigan. I had of course been planning this from the beginning, hence the two purled stitches running up the front. Sure enough, I have some finishing to do, and the recipient has not decided if she wants a hood or not – but the steeking is done. I usually secure the steek with a sewing machine: I like to sew twice on each side – that is four seams in all. Not very exact as you can see, but that doesn’t really matter. What matters is that at least one seam on each side is very close (but NOT sewn into) the knit stitches.Use small stitches and go slowly. Cut slowly and carefully in between the two sets of stitches (right up the middle). And we have a cardigan! There are many other (and better) steeking tutorials out there. Hélène Magnússon Steek With Me 1 Hélène Magnússon Steek With Me 2 The Knitting Harpy – Steeking Steeking – Sewn Reinforcement Crocheted Steek Tutorial Hand Sewn Steek Crocheted Steek Steeking is easy and fun – not scary at all, once you try it.
Icelandic kintting: steek with me ! (1) On coupe les mailles! (1) Most lopi sweater instructions will ask you, before joining in the round, to cast on 1 or 2 extra stitches that will always be purled: those are the steeked stitch(es) that will be cut to open the cardigan. La plupart des instructions pour les pulls islandais lopi vous demanderont, avant de joindre en rond, de monter 1 ou 2 mailles en plus qui seront toujours tricotées à l'envers: ce sont les mailles qui seront coupées pour ouvrir le cardigan. This is what it looks like with one steeked stitch. Voici ce à quoi ça ressemble avec juste 1 m à couper. Seams can be doubled but it's not absolutely necessary. Les coutures peuvent être doublées mais ce n'est pas impératif. On the right side. Sur l'endroit du travail. Then, you simply cut in the between. Ensuite, il n'y a plus qu'à couper entre les mailles. With two steeked stitches, there is more margin for errors. Avec 2 m à couper, il a plus de marges pour des erreurs. The more stitches, the longer the ends.
steeks 2: reinforcing and cutting In this post I’m going to show you my preferred method for reinforcing a steek before cutting. My favourite method is the crocheted steek. Other methods are available, and I’m definitely not saying that this one is the “best” or the most “valid” or anything — it is simply the method that I like, and that I happen to use. I like it most because it creates a neat and flexible edge that remains at the same tension as the knitted fabric. Here’s a close-up of the swatch, which uses the Peerie Flooers motif. On the swatch above, you can see the steek stitches worked in stripes, sitting in the middle of the picture. Before you begin, weave in all your loose yarn ends to the back of the work. Here are the steek stitches again. Here are charts that show the steek in the same colour pattern as the swatch, with the stitches numbered underneath, 1 through 5. Now, make a slip-knot and place it on your hook. Pull a loop through (2 loops on hook) Now it is time to start reinforcing. . . . thus. WHOOT!
Knitting Tip - Gloves Fingered Gloves The following pattern is based on gloves (Size 7) knitted in stocking stitch using Cool Wool big with number 3.5 needles. Gloves are normally knitted pretty tightly so you should use a set of needles thinner than you would normally use for this yarn (tension: 21 stitches and 30 rows = 10 x 10 cm). Apart from the thumb gusset the right and left glove are worked in the same way. This is how it goes: *Cast on 40 stitches and divide these over 4 needles and work to a round. Knit 8 rounds with the 40 stitches of the hand, then start with the little finger. With the old yarn knit another 3 rounds with the remaining 31 stitches in the basic pattern, picking up (twisted) one stitch from every bar stitch with an extra needle. Cast on 2 stitches for the bridge between the middle and index finger. For the index finger pick up (twisted) 1 stitch from every bar stitch between the middle and index finger (=14 stitches) and divide over 3 needles.
♥♥♥ knitloop ♥♥♥ Ok, so jewelry isn’t exactly seasonal, but just look at how well Alyson Fox nails a transition-to-fall color palate. making a french sennit tutorial Cut eight pieces of cord 12 ft long and one 6 ft long. “Middle” the 12ft length. This gives us 16 strands at 72”. The single 6 ft strand will make the 17th. strand. (You want to treat the ends of the cord to keep them from fraying out while working. If using Nylon burn the loose ends. Secure the strands to a fixed object then separate the cords with a group of ten on one side and seven on the other. Be careful to keep the seven and ten groups separated or you will have to undo several plaits to figure out where you went wrong. (If you’re in the Military, active or reserve, be sure the lanyard is large enough to put on and take off without disturbing your cover! When you get to the desired length of the neckpiece of the lanyard, bring the two ends of the plaited lanyard together. Using one of the loose strands wrap the two ends together. If you don't want to make a large Turks head with several bights, use a slightly larger cord and chase it around four of five times. NOTE!
Mon sac pour la rentrée : tricoté en rangs raccourcis et points d'astrakan Contrairement à l'an passé, pas de couture pour la rentrée de Jérémy ... "Je préfère les trucs des magasins, si tu m'en fais, ça fait trop p'tit garçon à sa maman !!!" ... "bon bah, ok, message reçu (snif ...)" (et pas de rentrée avec Jérémy, j'étais en déplacement et suis revenue hier soir, resnif ...) Pour me consoler, j'ai décidé de ME faire UN sac pour MOI ! Regardez comme je me suis gâtée et après je vous explique tout : J'aime beaucoup les sacs avec les anses rondes rigides comme celles-là et en voulais un en tricot ... au début, je voulais faire simplement des rectangles mais ça ne s'ajuste pas très bien au niveau de ces fameuses anses ... Bref, voici les EXPLICATIONS (tuto) : - Avec des aiguilles n°8 (j'ai utilisé environ 300 g de laine car le point d'astrakan en consomme beaucoup), j'ai monté 38 mailles, tricoté 2 rangs de point mousse puis, j'ai tricoté en rang raccourcis sur 12 mailles : C'est quoi les rangs raccourcis ? Au 4ème rang, on tricote les 38 mailles. A bientôt
Chaussettes ou bas : patrons et trucs pratiques Partager Courriel Earn Facebook Twitter Google+ Lockerz Grab Delicious Digg Google Bookmarks MySpace StumbleUpon Reddit By Lockerz Biscotte & Cie – Le Blogue Laine teinte à la main accueil C’est nouveau..!! Patons Lace sequin - Rubis - 7.99 CAD Patons Lace sequin - Onyx - 7.99 CAD Patons Lace sequin - Cristal - 7.99 CAD Patons Lace sequin - Peridot - 7.99 CAD Patons Lace sequin - Sapphire - 7.99 CAD Patons Lace sequin - Amethyste - 7.99 CAD Le forum des tricopines ! À propos de Biscotte La petite histoire de Biscotte Mon p’tit monde Opinions d’une tricoteuse Horaire et calendrier Calendrier 07-08 2012 Calendrier 09-10-11-12 2012 Patrons gratuits Bandana (fichu) Châle Boomerang Cha-pot de fleur Chaussettes – Bas Chaussettes aux trois torsades Chaussettes « Printemps dans le vent » Chaussettes Marguerites aux quatre vents Chaussettes Stitch Surfer Chaussettes Carousel Chaussettes Tourbillon Camisole Dorothée Echarpe Tranches de melon Gilet pour chat (Log’s turtleneck version française) Larder une maille (to thrum) Concours Ma