
DIY Doily Light: Simple Suspended-Sphere Lace Lamp Shade So simple a child could make it – and have fun in the process, too. And the result? A shining example of how light and shadow can work together to brighten up a room. Swedish craftswoman Isabelle Dos started with a simple party-shop balloon, blown up big and wrapped in white lace place settings painted with wallpaper glue. The soaked material sticks readily to the sides of the inflated sphere, overlapping to form a contiguous shell, suspended and left to dry overnight like a plaster cast. Pop the balloon and presto: a little cut in the top lets you drop in a bare bulb and create your own chandelier, potentially using whatever pattern you want (if lace feels a little too old-fashioned) to frame the outside and filter the light. Children's Art Desks from Cabinet Doors Hi friends! I can't tell you how excited I am to be a creative guest on Ucreate today! I've been bubbling with excitement for weeks and have been scheming over what project would be Ucreate-worthy. First of all, I'm Autie and my friend Jen and I blog over at iCandy handmade. I'm a busy mom of 2 cute little kids and during nap time and bed time, I love to work on projects! The project that I thought I'd share with you today started out with these. The drawer does not open, but the cupboard door does...and it leaves about an inch of space to keep something in it...like art masterpieces of a few sheets of homework paper...hmmmm I bounced some ideas off of Jen, and this is what I came up with...I give you the Cupboard Door into Art Desk Tutorial I made one for each of my littles, and so far, they're totally diggin' it! If you want to know what I did, here's a quick run-down on what I did: First things first, I had to sand the suckers down to give the paint something to stick to. -Autie
Stay-at-Home Artist: stencil with freezer paper (harry potter tee)... Yes, I am a nerd. I came up with a brilliant idea for a Harry Potter t-shirt and I couldn't resist. "Expecto Patronum!" However, you can make whatever kind of design you want with a freezer paper stencil. It doesn't have to be Harry Potter related. I learned about the joys of freezer paper back in my early college days. Basically, freezer paper is backed with a plastic coating that will stick to soft surfaces when ironed, but it peels off cleanly and easily. To make a sweet t-shirt you will need: paper & pencil a t-shirt an iron a piece of cardboard or poster board fabric paint & brush Start by drawing your design on some regular old paper. My design kept getting bigger, so I taped two sheets together. Next, place your design underneath a sheet of freezer paper and trace it neatly with a sharpie. The marker gives your lines greater width making it easier to cut them out and paint them in later. Now place a piece of cardboard under your freezer paper to protect your table while you cut.
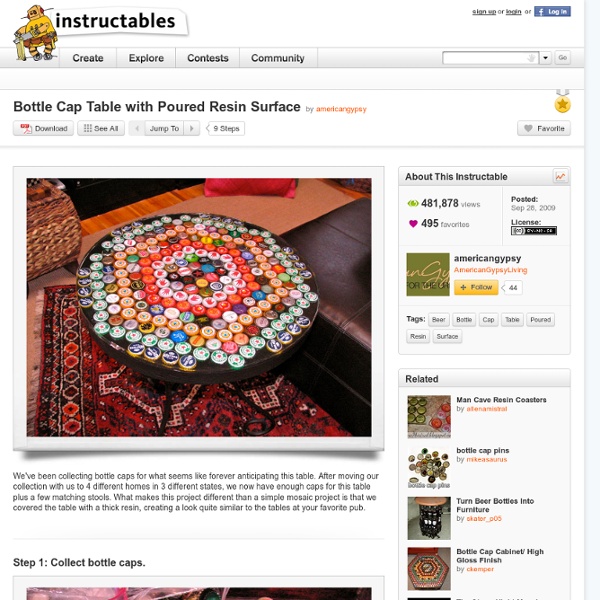
Gift Ideas for Poor Creative Souls (12) Posted by: Cathy on Jun 03, 2012 Tagged in: Untagged Summer Lights Garland I loved this idea and who would not love to receive this pretty gift. With summer around the corner this would look amazing on a terrace on a warm summer's night when socialising with friends. It is very simple to make and the materials are minimal. What you need: string of LED lights with white wire (regular lights may get too hot) plastic drinking cups patterned paper of your choice double sided tape scissors craft knife 1. 2. 3. Tutorial courtesy of HeyGorgeous For tutorials on how to market yourself online go here: 20 Cool Lego Items for the Ultimate Lego Home 20 Cool Lego Items for the Ultimate Lego Home When I was young (aka when my imagination was still vivid and Lego was still the only thing I need to be happy), I used to dream of living in a house made of Lego pieces. Things didn’t turn out very well as all pieces of furniture I made from Legos either broke down when I tried to sit on them or I hurt myself in the process. Thus, there is no need to explain how excited I was when I learned that a Lego home is quite possible. Lego Conference Room Table If you are tired of conferences with all the heated discussions and boring talks, this awesome Lego conference room table will cheer you up. LunaBlocks Table Via: Dvice Thierry Nahon and Philippe Landecker of Lunatic Construction came up with a simple yet cool idea for a Lego themed table. Lego Desk Via: Eric Harshbarger The Lego desk is not just any piece of furniture, but rather a Lego masterpiece built out of 35,000 Lego bricks and a whooping 7 pounds of glue. Lego Schou Table Via: Sean Kenney
Old T-Shirts Reincarnated as Underwear « How-To News Logan of Supernaturale has posted instructions how to make a pair of homemade undies out of your favorite old tees. Logan says, "I know you've got them, lurking in drawers, the back of the closet, in the "giveaway" pile: those T-shirts that are, for various reasons, both unwearable and indispensable. Clever idea. Patterns pictured below (women's undies + men's boxers). It’s a good idea to use free paint chips: Check out the 31 ways paint chips are used in all kinds of projects!! Some of these you may have seen around blogland others are from Etsy. 1.PaintswatchWall2.SnowmanOrnaments3.cut leaves 4. 7. 10. 13. gift boxes 14. 16. 19. 22. 24. 26. 29. 31. Hi my sweet bloggie friends!!!
Spraypainted Wheat Pillows as seen last week on sytyc...here are my wheat pillows and the easy steps on how to make them! you will need:spray paint ( i had ivy leaf, and brown)freezer paper.muslinscissorspencil first cut some muslin. next trace your own drawn pattern (or you can download my pdf here)make as many of your stencil as you need next you are going to cut out your wheat. and for the stalks you just cut long skinny strips of freezer paper. place your stalks onto your muslin...SHINY SIDE DOWN! iron on your freezer paper. next get your "wheat" part and place it on top of your stalk(shiny side down)...not overlapping too much. iron the wheat down. get your spray paint can. and evenly distribute the paint.repeat if you have any area that needs a little more paint.do not over paint! once you let your paint fully dry, peel off your freezer paper. now you are ready to trim down your fabric to desired measurement so you can make your pillow!