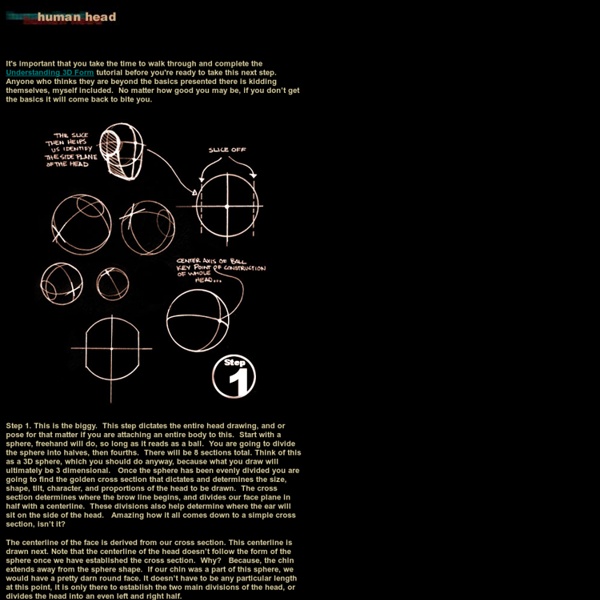
HandTut
By Ron Lemen The hands, along with the face should recieve careful attention. for one thing, aside from the head, they are usually the only other exposed part of the body. Secondly, they are equally as expressive in gesture, emotion and action. Because of the complexity of joints, masses and planes, along with their expressive nature, the hands can, and usually are, the hardest thing to learn on the entire human form. The first thing that most artists in training do wrong is they make the hands too small. Here is where the importance of head drawing comes in. I hope the importance of figure drawing is really starting to sink in now. Back to the point- Composing the hand The hand has two masses, that of the thumb part, and that of the hand proper, or, the rest of the hand. The center of the body of the hand is slightly below the body of the arm. The thumb side of the hand is larger than the side of the little finger. 1. 2. 3. 4. Memorize this stuff, get an anatomy book, and study.
onedrawingaday
Lackadaisy Expressions - StumbleUpon
Boy, I didn't know what I was getting myself into when I started this. I've had requests for some sort of expressions tutorial dating back a while now, so I figured, "Sure! I can explain expression drawing...and it'll be way better than all those tutorials out there that are nothing but charts of generic expressions. Yeah! Just give me a day or two to whip something up..." Um. Anyway, I found all I could really do was try to explain ways to teach yourself...and then add some pictures.
Réaliser un speed painting en quelques étapes. | Identitool's studio
Speedpaintquoi ? Le speed painting est une technique qui repose avant tout sur la vitesse et le rythme de réalisation. La gestion de la lumière prends une place très importante dans ce genre puisque c’est elle qui évitera de trop « détailler » certaines parties de l’image qui seront justement dans l’ombre la plus totale ou très lumineuses. Il y à plusieurs manière de concevoir un speedpaint, la technique la plus répandue consiste à travailler d’abord sur un calque en niveaux de gris (pour se concentrer sur la lumière), puis terminer par une colorisation rapide. Je ne suis pas de ceux qui considèrent que le speedpainting doit être limité à 1h30, je pense que tant que l’artiste conserve un rythme « nerveux » tout au long du processus de création il est un « speedpainter ». Généralement on utilise Adobe Photoshop, ou Corel Painter, personellement j’ai choisi Photoshop pour sa meilleure gestion des calques. Le croquis : Détaillez ! Un peu de couleur… Quelques réglages : Les indispensables :
Extraordinary
16 sites pour trouver des illustrations vectorielles gratuites - eSKUeL.net
Pour tout designer / webmaster / auto entrepreneur web qui se respecte, le problème des images pour créer un site est récurrent. Il existe une multitude de sites pour trouver des photos stock, mais beaucoup sont malheureusement payants. Il existe heureusement quelques alternatives, qui feront l'objet d'un billet ultérieur Pour ce qui est des illustrations vectorielles, ou vector files, le problème devient un peu plus épineux. Faites chauffer les bookmarks ! Snap2Objects, propose des silhouettes de personnages, ainsi que bien d'autres ressourcesLogoTemplater : des illustrations pouvant servir de base à un logoDesigners Revolution : pas mal de packs IllustratorTHePixlPusherCreatSK8Vibr8Bros : pas mal de badges / stickersFree LogoTypes, pour retrouver les logos des grandes marques en format vectoCoolVectorsVector4Free, des vectoriels dans pas mal de catégoriesGoMediaZineGarcya.usDezignus une mine d'or. J'espère que vous trouverez votre bonheur dans cette liste.
Amazingly Creative Drawing Vs Photography
This wonderful work has done by a very talented Belgian painter, illustrator, portraitist, caricaturist and photographer Ben Heine. This creative artist was born in Abidjan, Ivory Coast. He Studied graphic arts and sculpture and I also have a degree in journalism. Lets take a look at some of his awesome works that he calls “Drawing Vs Photography” or “Imagination Vs Reality”.
Thirty Second Drawing
What’s this training for? The idea of thirty seconds drawing app is tool for support gesture drawing.b You will improve in recognizing aspects of figures in a short amount of time, and be able to draw accruately with minimum lines.aking a large of number of sketches in a small amount of time may be good experience especially for begginners. This training will easily become your daily routine. Procedure Get ready in front of the screen with a pencil and a paper. Links To display log of 30 Second Drawing, check this page.For non time limit mode, use Random Pose Viewer Tips 1. Some of videos uploaded by users.
Big Doodle - artwork by Lawrence Yang - StumbleUpon
Big sharpie doodle! Big Doodle - sharpie on mat board - 40" x 32" Artwork © Lawrence Yang 2009 my blog | my site | purchase inquiries