
Marie Grace Designs: Smocking by Hand... Okay... here we go... let’s smock! This is part 2 of my pleating and smocking tutorial. Part 1, which explains how to hand-pleat fabric, can be found here. Smocking is very simple once you get a few basic rules straight. I appreciate the fact that smocking is functional and that’s really the reason that smocking was developed in the first place but my fascination is in the fact that its beautiful and so versatile and easy! First of all, use a good needle. Let’s look at a basic back stitch. Back stitching is worked from right to left and is called back stitching because it is literally stitched by backing up a step and then moving forward again. and bring the needle tip back out to the front at B... Pull the needle through until the thread sits neatly on the surface of the fabric. The differences between this kind of flat back stitching and smocking are the direction of the work and the fact that smocking is 3 dimensional. Again, we'll use a flat piece of fabric to demonstrate.
Making Things: DIY: Circle Skirts Part 1 Hurry - don't lose your domain to someone else! 2,240 Customers shopping on HugeDomains right now! 73% of all domains registered on the Web are .coms. The reason is simple: .com is the where most of Web traffic happens. The one and only .com name of it's kind Immediate ownership transfer Return it within 30 days if you're not satisfied Creates instant branding and credibility Hurry - once it's sold this opportunity will be gone! Join thousands of satisfied customers who have found the perfect domain name. What makes a domain name potentially valuable? Besides being memorable, .com domains are unique: This is the one and only .com name of it's kind. Improve your Web presence immediately Premium .coms are one-of-a-kind Web addresses. Immediate ownership transfer Upon placing order, ownership of the domain name will immediately transfer. Straight forward Terms & Conditions We want to make your shopping experience easy. Join thousands of satisfied customers © 2015 HugeDomains.com.
How to make your own dress form When starting on the wonderful and exciting journey of making your own clothes or altering old ones there is one thing you will definitely need to make your job easier...that is a dress form. There are many tutorials on the web but the best one I found is the one I am going to share with you. The source is but the tutorial is in German so I am going to make a short presentation in English, although the pictures speak pretty much for themselves. Here is what you will need: pillow filling for stuffing out your formscissorsmetal base2-3 rolls of tapecardboardan old hip-length T-shirtfoil (for the neck) take on the T-shirt and wrap your neck in foil to protect it then take the following steps one by one in wrapping the tape. and the end result is pretty good! Now you have your dress form and can start working on your most exciting sewing projects!
Imagine Fabric Blog: How To Make a FABRIC BOWL Imagine Fabric Making a Fabric Bowl is as easy as ABC and it is a lot of fun. Just follow our step-by-step instructions and within an hour, you will be awarded with your very own Fabric Bowl. Let's get started. Select your fabric of choice - I picked some beautiful Joel Dewberry Fabric for my Fabric Bowl project. Used the size of your favorite bowl. Cut two fabric circles , put the two fabric circles left side together and use a thick interfacing that has glue on both side to iron the two fabric circles together. Now draw a circle in the center of one of your fabric circles. Now divide the fabric circle into eights. Continue to do so all along the "eights" lines you have previous drawn. You should end up with 8 triangles. Now choose a zig zag stitch of your liking and stitch all along the circle in the center of your fabric circle. Now it is time to zig zag stitch the triangles you have cut. Start to zig zag stitch from the inner circle. Continue to do so with all the triangles you have cut.
DIY Skirt Getting our craft on again :) My sister Ann and I always like to do a crafty project when we get together, so this time is was a simple homemade skirt. We used this tutorial and it was really straightforward. One helpful hint: when it says to stretch the elastic while you are sewing the fabric on, do it! It will allow the skirt to fit better and more comfortably. You can also make one for a smaller cutie pie in your life or make some great baby shower gifts! How To…Make a Versatile Skirt photo credit Skirts and dresses are still hot for fall, and what could be better than a cute new skirt that you crafted yourself? This project is perfect for first-timers, it’s straight forward and pretty forgiving for those who aren’t sewing aces just yet. Materials: FabricSafety pinsSewing machine Directions: 1. If you want the skirt to be high-waisted and knee-length, measure from the top of your waist where the skirt will sit to the bottom of where you want the skirt to hit, and then add 3 or 4 inches. 2. If you want a high-waisted skirt, use a measuring tape to find out how many inches around your waist is. 3. For this skirt, it’s best to choose something swingy and light as opposed to something stiff and heavy. 4. 5. The length should remain the same! 6. 7. If you put it on now, the length will be correct, but it will be entirely too big for you. 8. Put one side of the dress on as though it fits. 9. Make sure you’ve pulled the side tight enough that it’s not going to come loose. 10.
Reversible Dress Tutorial Here are the steps I follow for making an adorable reversible dress. There's a photo for each step, and it appears above the text that describes it. Each photo is clickable to see a bigger, more detailed version. If you get stuck at any point, have suggestions or if it worked well for you, please, please, please leave a comment or e-mail me. 1. 2. 3. 4. 5. If you choose tie straps, place them inside each of the 4 shoulder pieces with only a small part of them sticking out for sewing in place. Notch around the top, especially in the armpits to allow the finished dress to move more freely. 7. Sew the inner seam together from armpit to bottom., so it's completely closed. 8. 9. 10.
HANDKERCHIEF SKIRT A handkerchief pointed-hem skirt is flattering to all, but especially for short-legged people because the points break up that horizontal hemline. No pattern is needed to make this skirt style. It is a simple block layout. One easy way to get that effect is to hem two squares of fashion fabric, each having four points (called a “handkerchief” hem) and layer them for an eight-pointed look. Experiment with swatches of opaque and transparent fabrics as you design and discover what happens when you overlap two layers of the same colour or harmonizing colours. You will need: 2 ½ yds. of fashion fabric, 45″ wide1 yd. of waist band elastic, 1″ wideCoordinating thread10 yds. of flat ribbon braid (optional) The size of the circular opening should be just big enough to pull over your hips, and can then be tightened with elastic. Cut 2 squares of fabric doubled the finished length. Place template in center of square and trace out. Like this: Like Loading...
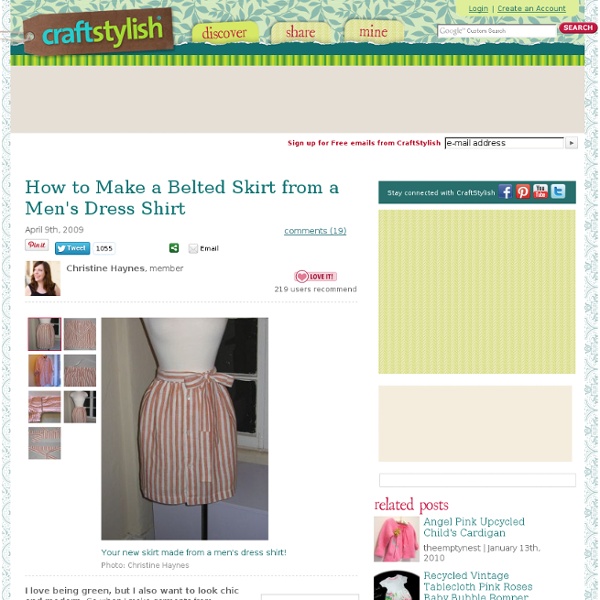
DIY Men's Shirt Into A Cut-Out Dress Do you gravitate towards amazing men’s drerss shirts when you thrift? Or do you have a whole bunch of ill-fitting ones sitting in your favourite guy’s donate pile? Somehow I’ve ended up with a few more button-ups than I really need, so I decided to tackle another reconstruction to show you how versatile these babies are! The collar and placket of a button-up are always a classic style and if you keep that portion of it in tact, you can keep a “put-together” look even if you’re wearing a totally deconstructed shirt. Today I’m going to show you how to make a large men’s shirt into a really cute summer dress with the back cut-out. WHAT YOU’LL NEED: - an oversized mens button-up shirt - a shirt that fits you well - measuring tape - scissors - sewing machine (not shown) - elastic - pins [ MEASURE ] – Put on your oversized mens shirt and measure from the collar to your underbust or high waist. [ CUT SHIRT ] – You can pin the shirt or use chalk to mark where your smaller shirt sits.
Me Sew Crazy: PR&Tutorials, Week 5 - Fishtail Circle Skirt I really hope you aren’t going to kill me…but this is probably the one week out of the whole competition where I do not have a complete tutorial. The dress was just so tailored to fit my daughter exactly, that in the time allotted to create the design, I just couldn’t do it all. But there is hope! I did manage to snap one picture, one VERY HELPFUL picture, to get you on your way to creating this look… That’s right, how to make the circle skirt portion of the dress! Normally a circle skirt’s waist would be directly in the center. It really is very simple to do this. Then you can finish any way you like! Thanks so much for stopping by, and until next time… Happy Sewing! Jess Jess Abbott the Sewing Rabbit is the founder and creative director behind the me sew crazy blog, as well as SewSet.com, 5 & 10 Designs, GNO Events, and co-editor of STYLO. Latest posts by Jess (see all)
The Super Easy Paper Bag Waist Skirt Tutorial Yesterday I posted a tutorial for how to make what I think of as the classic paper bag skirt—pleats, belt, beltloops. Today, I want to show you the easier option, for those of you who don't want to mess with zippers and pleats. Here are some inspirations for this type of more playful, basic skirt with smaller, modified paper bag top: From Banana Republic: In a crazy cute print like this cute nautical look by Lilly Pulitzer: Or an even crazier print like this Marc by Marc Jacobs: Lots of options, although I still recommend a sturdy bottom-weight material. Refer to the Classic Paper Bag Waist Skirt tutorial for cutting instructions. Grab your elastic (again, somewhere close to 2" smaller than your waist to allow for some movement but also enough tightness to stay up!) When you get all the way through, sew the ends together (again, make sure the elastic's not twisted somewhere along the way). Sew the rest of your seam closed! That's it! Super easy to make and wear!
DIY Fashion: The flapper dress DIY Christmas is approcching and we're putting together our party outfit. Last week we diy-ed a our glitter shoes and now it's time to diy our party dress. The dress I made it's a flapper dress in a blush pink color and I used a sheer crepe georgette fabric. If you saw the latest runways you maybe know that the flapper dress will be really trendy next spring, so we're making a dress we can wear a lot next season. Natale si avvicina ed è tempo di mettere insieme il nostro outfit. How to make the ruffle: I then hemmed the ruffle and then gathered it: I stitched the edge of the ruffle loosely and then I pulled the thread. (I also gathered the shoulders) Come si realizza la ruche: Qui sopra troverete il modello per la ruche, una volta tagliato, eseguite l'orlo e poi arricciatelo. (Ho anche arricciato le spalle). How to make the belt: I cut a rectangle 10cm tall and 'hips width' long, I folded it in half and I sewed on the reverse and then I turned inside out. et voilà!
XOX SKIRT & Weekend designer Featured: Victoria Secret Peasant Skirt You’ll ♥ this easy-to-sew skirt…XOX. You will need: Approx. 1 ½ to 3 yds. of fashion fabric (depends on fabric weight and width)Coordinating threadHeavy-duty topstitching/upholstery thread Waist – measure around narrowest part of torso (just above navel level) Hips – measure around the fullest part of the seat, about 8” [20cm] below the waistline. Finished Skirt Length – measure vertically from waist to desired hemline. This is a simple block draft. (This also will help you determine how much fabric to purchase.) Designer Tip: If you wish to use a printed fabric, look for a print that has been “railroaded”, that is the print runs along the fabric’s length. XOX Block Draft Measure the hip. O = (hip measurement + 2” [5cm] ) divided by 2. Next, determine the desired length of each tier; divide the finished skirt length by the number of tiers you desire. X = (finished skirt length + 2 ½ ” [6.5 cm] ) divided by 3. O = 20” [51cm] X = 8” [24 cm] Top Panel = 1 block