
The Bugbytes: Twine Flowers Hi, this is Michelle from Lady of Leisure Ink - thank you Pam for letting me come and play at your blog. Last year I did a twine exchange with a group of crafty friends here in Colorado, and ended up with some beautiful twine. We all chose a colour and dyed our own twine and enough for everyone else. You really don't need any special equipment to do this, if you have twine then I pretty sure you can find the rest of the items in your stash. Chipboard or card from cereal boxes, a circle punch (mine is 1 3/4"), a pencil, a ruler, adhesive, dressmakers pins, a large darning type needle and twine. First punch out your circles from the chipboard, take you ruler and pencil and mark one of the circles like this. I usually draw 6 lines on mine to divide it up as you would for a clock-face. Take your twine and start wrapping it around your 'loom'. When you have been around the 'loom' once, go around again - each pin should have two loops of twine around it, and should look something like this.
making chapstick « tidytipsy.photography When the weather gets cooler my mind turns not only to knitting but also to making body products. I made chapstick already last year, but wasn’t overly happy with the recipe, so I tried a different one this year. I used: 20% beeswax 25% coconut oil 15% cocoa butter 40% olive oil No coloring, no scent, no smell. The process is very simple: 1. 2. 3. Done! Like this: Like Loading... Circle Zip Earbud Pouch Tutorial - Dog Under My Desk I use a little zippered pouch to carry around my earbuds since they are the fancy microphone ones and I don’t want them to break or get tangled. Some of you have commented that you are looking for some small, simple gift ideas. This is definitely simple to make, and a little more fun than the typical rectangular zippered pouch! I can see these as the perfect gift for teenage cousins or nieces or girlfriends or even teacher gifts. Fun, quick, and cute! It doesn’t take very much fabric so you could even use scraps! UPDATE: I have completely re-written this tutorial with twice as many bright, clear photos and more detailed instructions and it is available as a pattern in my pattern shop. First, download the pattern template HERE. Cut from main fabric: 1 circle 2 half circles 1 tab Cut from lining fabric: 1 circle 2 half circles Cut from batting (or medium weight interfacing, if you prefer): 1 circle 2 half circles You will also need a 1″ wide nylon 5″ or longer zipper. Time to sew!
Tuto bracelet au crochet October 10th, 2008 Email 131 users recommend Plastic rings, covered with single crochet, make for bold, modern jewelry. Diane Gilleland Plastic rings, which are also sometimes called bone rings, are available in the home-decor or crochet section of your craft store. It's easy to join the rings together—just a couple of stitches does it. Photo: Diane Gilleland You can usually find bone rings in the home-decor or crochet section of your local craft store. What you'll need: Cloth measuring tapePlastic bone ringsUS size 8 steel crochet hookScissorsPearl cotton embroidery floss or crochet cottonCrewel needle22-gauge craft wireWire cuttersNeedle-nose pliers (optional)Begin by measuring your wrist, wrapping the measuring tape snugly. Reach the hook through the center of the ring and pull a loop back through. Yarn over and pull the first loop through the second. When you've crocheted about 10 stitches over the loose end, cut the end off close to your work. Stitch the two small rings together as shown.
Gorgeous Chiffon and Tulle Flowers - DIY: Gorgeous Chiffon and Tulle Flowers Photos By: Olivia Kanaley For this project you will need fabric - we used chiffon and tulle. Yardage needed will vary based on the number and size of flowers, as well as the fabric thickness. To make a stencil first free hand a rose petal shape and cut out. Take some fabric and fold it into a square a little larger than your flower pattern. Stack flower cut outs, alternating fabric types and staggering petals. Pinch together the center of the flower (from the bottom) and secure with stitches to create volume and give the flower and authentic shape. If desired you can sew decorative beads in the inside center of the flower. Finally, sew the flower to a hair clip or comb. You can also create a tie-on corsage or sash, by sewing one or more flowers to a length of silk ribbon.
Spring Scrapbook Paper Tree Hello fellow crafters! Tristin and I were invited to be today's featured guest blogger over at Everyday Mom Ideas! We were thrilled with this wonderful opportunity, and wanted to share with the readers over there one of our trees from the collection we're currently doing. This second tree is very similar to the first one. (Since this is a guest post on a different blog, and the concept is similar to the first tree.. Thanks, Julia, for having us on your blog!
le souffle d'inécha DIY Lip Balm | This fun recipe will give you a great organic lip balm! All you need are a few simple ingredients. You can add in more essential oils to this recipe if you want to, or other things you think would go well with the “recipe”. This will make 3 lip balms. You’ll need: 1/4 cup of beeswax3 tbs organic shea butter2 tbs organic safflower oil2 tsp essential oil (I used peppermint)3 containers Microwave the beeswax, shea butter and safflower oil until it has turned into a liquid. Once all melted, mix in your essential oils, and some food colouring if you want it. Pour all of this into your containers and let cool. Create your own little label like I did, or just leave it blank. Have fun! Like this: Like Loading...
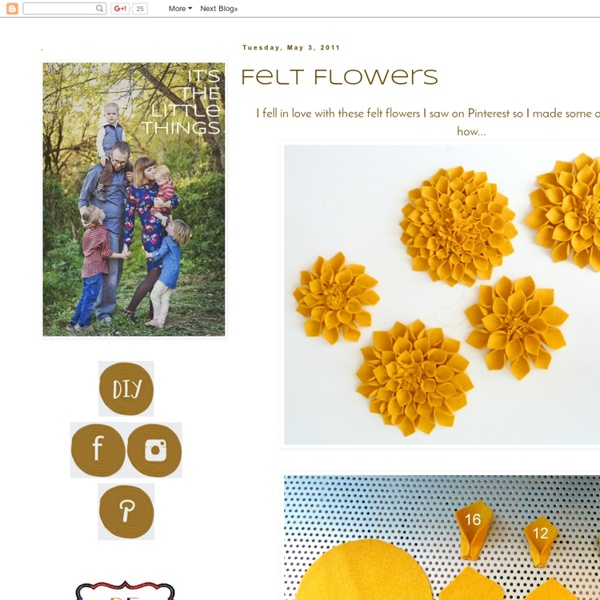
Paper Dahlia Even if it's not dahlia season just yet, you can still channel this flower's intense color and festive attitude here and now. Martha Stewart Weddings, Spring 2010 For these eye-catching favor pouches, we used bright tissue paper to create a pattern that mimics that bold beauty, then tied on a tag bearing planting instructions, and verdant ribbon to pose as leaves. At home, guests will peel back the petals to reveal a dormant dahlia bulb brimming with potential and just waiting to take root. Tools and Materials: Paper Dahlia How-To: Download the PDF of our dahlia template, and print onto standard printer paper.