Wax color explosion & The Shattered Lance
2 Sep The other day my girlfriend found this interesting blog showing what someone did with melting wax crayons. That blog was in turn inspired by this seller on Etsy. We decided to give it our own spin. We thought a color wheel would look neat, but that we’d rotate the canvas as we went to create a starburst-like explosion. Like this: Like Loading... Tags: color, crayons, melted, mirror, wax
No-Carve Stamps
By Jeromina Juan Ever wonder about the possibilities of designing your own stamps without having to carve anything? There is a simple way! You’ll need one ordinary household object – silicone caulking. Yes, the one you use on your bathtub, sinks, and windows! With no carving to do at all, this task cannot be simpler. And the result? Materials 1/8″-thick acrylic plexiglass; can be found at hardware storesX-Acto knife Metal ruler Silicone rubber caulking (clear); can be found at hardware storesWater-based paint BrayerNote: You can cut plexiglass to size by scoring a straight line several times using an X-Acto knife and metal ruler, and then placing the plexiglass on a table with the score line over the edge and snapping it in one quick motion. Directions Step 1: Sketch your designs on paper. Step 2: Hold the caulk tube vertical and tap it against a flat surface 8-10 times to remove any air bubbles. Step 3: Let the caulking cure for 24 hours, and then your stamp is ready. About the Author:
Diy Ornate frame magnets
Hey Luvs!I recently did a super easy diy and thought I would share it with you all. I wanted to think up a cute way to display Evie's art and a place to hang up the grocery list and chore chart. I immediately thought of fun frames but I had no place for them.
Hanging String Balls
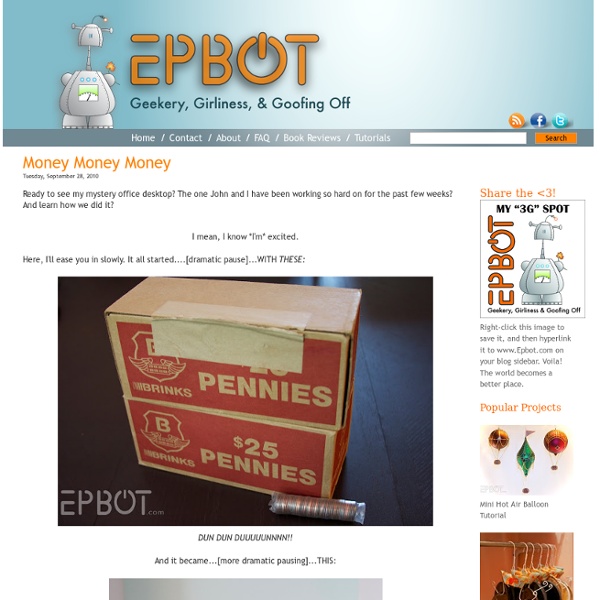
Whattya need? BalloonStringScissorsGlueJar How do I make glue string balls? Step 1: Hang inflated balloon from ceiling. Step 2: Put string and glue in the jar with a hole in the lid. Step 3: Wait until dry (try to contain yourself). Created by Dane Holweger
Water Blob: Tutorial
A few weeks ago I saw this idea for water blobs floating around online and decided to try it ourselves the next time we were having friends over to play. Can I just say that this “water blob” was amazing amounts of fun. I layed on it, the kids jumped on it, slid across it and spent the entire day doing all sorts of crazy acrobatics. We loved it so much that I almost can’t wait to do another one. And the next one will have glitter in it… tons of glitter. So what is a “water blob” and how do you make one? How do you make one? Fold the plastic sheeting in half and tape the three open sides with duct tape (it helps to have assistance) but leave open a small hole for the water hose. Put the water hose in it and let it fill. It is that simple and that fun. It did get a few small leaks on the edges throughout the day but we simply fixed them by applying more tape to the leaky spot. So go conquer the blob! Edited to Add: You MUST use heavy plastic sheeting. Bobbie Latest posts by Bobbie (see all)
Oh Lovely Day: {DIY} 10 DIY Mason Jar Wedding Ideas
Love mason jars but want a unique way to use them in your wedding? Here are 10 DIY ways to set yours apart! 1. Wrap a ribbon on them (bonus points for making it into a bow tie!) throw in a matching straw, and use them for signature cocktails! 2. {Photo by Wildflowers Photography via Ruffled} 3. 4. 5. 6. 7. 8. 9. (but make sure they aren’t the old and valuable mason jars first!) 10. Or this: So which is your favorite?
DIY
Dry shampoo has been a MUST HAVE in my daily hair care routine for the past three years. I’ve gone through countless spray cans of different brands (Psst!, Tresemme, John Frieda, Garnier, Oscar Blandi, Batiste…to name a few), spending way too much for very little product. THE RECIPE: Mix 3 parts cocoa powder and 1 part cornstarch and/or baby powder in a small container. Because this container works so well, I just hold the container in my hand and sprinkle the powder directly onto my roots and rub it in with my fingers. QUICK TIP: Did you know that the best way to use dry shampoo is to apply it BEFORE you actually need it?
How to make your own dress form
When starting on the wonderful and exciting journey of making your own clothes or altering old ones there is one thing you will definitely need to make your job easier...that is a dress form. There are many tutorials on the web but the best one I found is the one I am going to share with you. The source is but the tutorial is in German so I am going to make a short presentation in English, although the pictures speak pretty much for themselves. Here is what you will need: pillow filling for stuffing out your formscissorsmetal base2-3 rolls of tapecardboardan old hip-length T-shirtfoil (for the neck) take on the T-shirt and wrap your neck in foil to protect it then take the following steps one by one in wrapping the tape. and the end result is pretty good! Now you have your dress form and can start working on your most exciting sewing projects!
DIY | Perfume Locket
Today I have an exciting new feature we are rolling out on Glamour and Grace! I have asked my good friend Sarah Montes, illustrator and crafter extraordinaire, to come and share a fabulous new DIY idea each month! This month she is sharing something really unique that I know you all will love! I will let Sarah take it away! Greetings Glamour and Grace readers! Materials (will make 5-7 lockets, depending on size): 2 tbsp Beeswax2 tbsp Olive Oil, Sweet Almond Oil, or Jojoba OilEssential oils (Some great scents are Jasmine, Lavender, Vanilla, Ylang ylang, Citrus, etc. Making the perfume Step 1: Using a cutting board and a knife (preferably items that you don’t mind getting waxy) cut one of the beeswax blocks into shavings. Step 2: Once the beeswax is in thin shavings, put it into the jar with the olive oil. Step 3: Use the skewer or straw to stir and help break up the beeswax until it is smooth. Step 4: Measure out 20-40 drops of essential oils. Suggested Jewelry Materials: Share:
Pattern (inspiration): Its like yoga
Today, instead of the usual free or commercial pattern, I thought I'd show you guys an excellent example of how you can use things you love, such as a favourite quote from a TV show, as inspiration for your own patterns. The above quote is from a character called Ron Swanson in a show called Parks and Recreation (we don't get it here in the UK, it sounds funny though, if that quote is anything to go by!) and cauchy has blogged here about how watching the show inspired her to make this piece and how she went about finding the fish image and stitching it. She has also blogged more Swanson quotes here. So, what favourite quotes of yours would you like to stitch? As cauchy has shown with her fish pattern, using the internet, you can easily find free to use images to add to your favourite quote.