
11 Excellent Photoshop Tutorials to Boost Creativity Tutorials can often be your greatest source of inspiration. Sometimes, you may find it difficult to look for some of the highest quality Photoshop tutorials using search engines. There’s so many tutorials available, but only a handful offer inspiration along with valuable tips and techniques. Photoshop provides designers pretty much endless possibility of creating realistic effect. So here are the some cool, creative tutorials collected by us, we hope these tutorials should help sharpen your Photoshop skill-set. Don’t forget to comment and share your favorite tutorial. Design a Slick 3D Ice Text Effect Smokin’ Woman Cyborg 3D Text On Fire Dragons Flaming Photo Manipulation Bright Floral Text Effect Milk Typography Effect Making a grungy business card Hell Smashing Your Creative Block Advertisement
# 7 Best Websites to Find Free Photoshop Textures, Background Styles Textures are essential resources needed by every photoshop designer as they offer the possibility to create backgrounds, visual styles and […] Textures are essential resources needed by every photoshop designer as they offer the possibility to create backgrounds, visual styles and environments to the design work. There are many places where you can find free textures for Photoshop, however some of the best site that are interesting for different types of content are mentioned below. Have a look… Tip: Check if an Image is Photoshopped 1. It is a place where you will find all sorts of grunge textures. 2. deviantART is a platform that allows emerging and established artists to exhibit, promote, and share their digital art works within a peer community dedicated to the digital art.There you will find a wide variety of designs including photoshop textures uploaded by members. 3. It is notable for its unique textures which are really interesting and original. 4. 5. 6. 7.
55 incredible examples of photo manipulation We present collection of 55 incredible examples of photo manipulation. Some of them... you may know already, but another ones... could be new for you. What I'm sure about... all of them are simply worth of your attention. 5000+ Free Photoshop Gradients Photoshop gradients are one of the many presets that can be use to create some really creative designs and effects in your photographs or any other graphics. Before you go ahead and dive into these colorful Photoshop gradients please pop your eyes into some other nice posts on Photoshop tutorials and Photoshop resources that we have here: Have a great day, and enjoy the SuperBowl! If you get a chance to help promote this post, we’d really appreciate it. Thanks for reading! Ultimate Web2.0 Photoshop Gradients Realistic Sky Gradients Vintage Gradients by IceChicken Faded Gradient Pack Web2.0 Gradient Pack Adobe Gradients Pack The Ultimate Gradients Pack 1 Clean Gradients Set iPhone Gradation Set Smoshing Free Gradient Set Modern Photoshop Gradients Pastel Gradients Tango Gradients 156 Photoshop Gradients New Gradients 1000 Free Web 2.0 Gradients Dooffy Gradients Set PSP Gradients 3 Dark Light Styles and Gradients 400 Gradient Varities Advertisement
Adobe Photoshop: Puzzle overlay?, jigzaw puzzle, puzzle format Expert: LizaL - 9/30/2005 QuestionHey, I am trying to have an image file and chop it up into pieces like a jigzaw puzzle. then reshow the image piece by piece. when all is done this is what I want. start the image as a blank square with black borders. I thought I could find an overlay or outline of a small puzzle and go from there. I know how to gradually show the pieces. Do you have any ideas that can help? AnswerI think there are a lot of ways to go about this, one being to first draw your puzzle overlay in a vector-based drawing program like Illustrator or Freehand. Then you can arrange them (in Photoshop), and use the Bevel and Emboss effects (Layer > Layer Style > Bevel and Emboss -- and also the Drop Shadow layer effect from the same submenu) -- making sure you keep each piece on its own layer. However -- if you choose to draw the pieces in Photoshop, I'd still use a pre-drawn grid to go by. Once you have the pieces set up, you can add your actual image. Ha! Hope this helps!
Useful PSD Files For Your Creativity Mar 02 2011 PSD files can be used to create beautiful, stunning, vibrant and very creative business cards, icons, characters, website layouts, photo manipulations and much more. With Adobe Photoshop’s convenient interface, even newbies can understand how to work with some of the basic tools and options that this fantastic program has to offer. Here are 40 PSDs you may find useful for any ongoing projects you may have at the moment. Please note that all of these files listed below are free of charge, however not all of them are available to be used for both commercial as well as personal use. That’s why we strongly recommend you to check the additional information that the artists provide along with their freebie. Magnifa Pro – Zooming Glass PSD Here is a useful PSD file that could be used for peviewing images for zooming some special parts of it: Renders PSD A PSD that contains a collection of free randers that can be used for some abstract design work: (ik)
Pimp My Text: Bling Bling With Photoshop » Web Design » SitePoint Blogs Last week I was watching the opening credits of “I’m a Celebrity, Get Me Out of Here” and I noticed the titles consist of bling bling text getting dropped into the jungle. I’ve also noticed quite a few ads on TV using bling text as Christmas approaches. So today we’ll have a look at how to produce some sparkling silver and diamonds (or diamante) text in Photoshop using layer effects, blending modes and filters. 1. Start off with a new canvas (size 600 x 300 pixels in this example) with a dark gray background. 2. 3. 4. Double click on the Gradient to open the Gradient Editor, then choose Silver from the list of gradients. So that’s our silver text in place. 5. 6. 7. 8. 9. 10. Click OK and your new fancy diamonds will be added to the layer. 11. 12. (Optional). This is one way to produce the bling effect.
Photoshop Puzzle - Photoshop Jigsaw Puzzle - Photoshop Puzzle Tutorial Written by Steve Patterson. In this Photoshop Effects tutorial, we're going to look at how to easily create a Photoshop puzzle effect, allowing us to turn any photo into a jigsaw puzzle! Or at least, we'll be creating the illusion that the photo is made up of small puzzle pieces, although I suppose you could print the photo afterwards, cut around all the pieces with scissors and make an actual puzzle out of it, but as I like to say, why fumble around with reality when faking things in Photoshop is so much easier. As we'll see, much of the work for our puzzle effect has already been done for us thanks to Photoshop's Texturizer filter and a free texture that Photoshop ships with, although we'll need to load the texture in ourselves, which we'll learn how to do. Here's the photo I'll be using for this tutorial, a little guy who's obviously pretty psyched about having his photo turned into a puzzle: The original photo. And here's how it will look with our Photoshop puzzle effect applied:
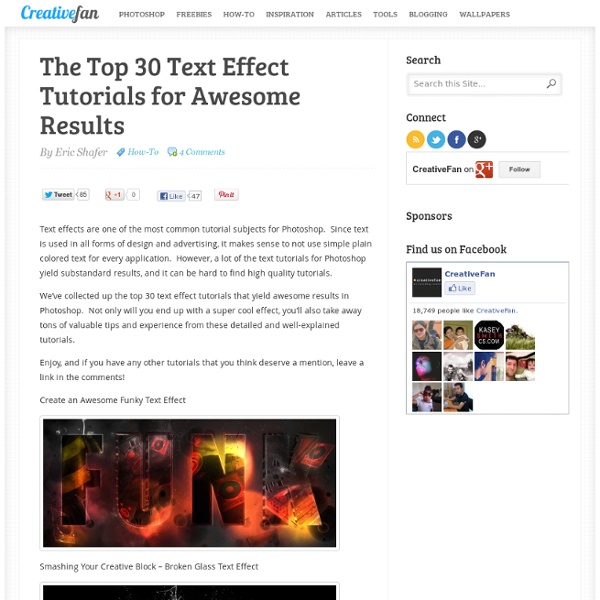
30 New Photoshop Text Effect Tutorials Typography – you use it a lot if you are a web designer. Starting with the name of your website and menu buttons to the content itself. Now one thing to consider is that there is definitely a text on a website that has to be different and stand out from the rest of the content. Of course you can find fonts that would match your desires in a way or another, but still it is hard to find one that would be convenient for the design of your website, especially if it’s something unique. One trick you can try is adding different effects to the text you would like to be different. Below you will find a collection of great tutorials that will teach you how to add different cool effects to your texts. Retro Text The Sugar Bag Effect Retro Pop Style Create a Frilly Typo Create an Awesome Grass Texture in Photoshop License Plate Text Effect A Slick Supernatural Text Effect Suspended Text Effect Text in Stitches Create A Beautiful 3D Text Composition An Awesome 3D Text Composition in Photoshop