Paper Fortune Cookie Favors by La La Laurie
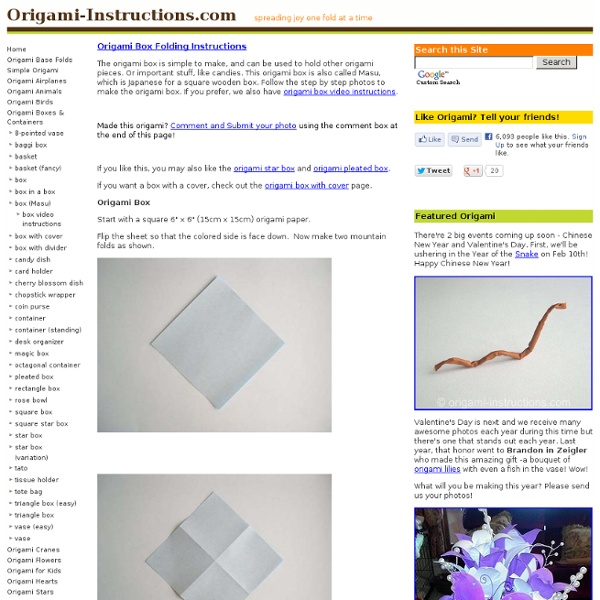
Origami Envelope
If you’d like to make these cute little “Flap Lock” Origami Envelopes–all you’ll need is a piece of square paper…any size. I used Christmas scrapbook paper. 1. Fold the paper in half to form a triangle. Make sure your edges are even. 2. 3. fold the right corner about 1/3 of the way to the left. 4. 5. 6. 6. 7. 8. 9. And there you have it! Now scurry off and make a million of these–or at least 24 if you’re using them for the Family Advent Countdown Calendar. Not in the mood to fold your own?
templates
These cute purses are so easy to make! It won't take you more than 30 minutes. Wouldn't they be a perfect gift for mom. Put a gift certificate inside to her favorite store/restaurant. And don't forget "Teacher Appreciation Day" May 5! Print out this template on a 8 1/2" x 11" cardstock. When you are done cutting you will have 4 pieces like this. Fold the sides so it looks like a "M". Put glue to both sides with fast drying adhesive. Glue the sides to the purse (after you folded the purse in half) with the narrow side down. Glue the lid to the back of the purse. Take a ribbon through one of the holes and make a little knot. On the front of the purse,add a button,brad or whatever you like. Last - put 5/8" Velcro round with sticky back to the inside of the lid and the other part of it to the purse. Inking,doodling,Stickles..it would all look good here. If you give this a try, I would love to see the result. Who knows, maybe I decide to send out some RAK's;)
DIY Faux Curled Rosewood Wreath {Made From Rolled Recycled Book Pages}
I have seen various versions of Faux Rosewood Wreaths in just about every store and catalog for the upcoming season; most with a price tag running upwards of $40 or more. Some are crafted of paper and other of real wood shavings. Last year I made a few rolled flower gift toppers from recycled book pages and they remind me so much of the curled wood roses I thought they would make a good substitute. {with a much lower price tag} Materials Needed:Foam Wreath FormRecycled Book PagesLots of Hot GlueRibbon to Hang The full step by step tutorial I posted last year can be found {here}.Basically you layer three book pages together and draw a spiral circle. Starting with the outside of the spiral, roll the paper inward to create the flower shape. Give the wreath form a light coat of white {or light color} spray paint to help camouflage any see-through spaces. It seriously takes quite a few roses to fill the entire wreath, however I think the finished project has such a unique look. {Simply Lovely}
Cake Treat Boxes
Finally, as promised, the tutorial! Yes, it really did take me two days to get this ready. I hope you enjoy it. Be sure to create a FREE studio on eWillow.com and upload photos of your cakes when you are finished. Also, to help spread the word about eWillow.com and to build our community, please link to this tutorial and share the news that eWillow.com is FREE to use. Now, on to the tutorial! Supplies Download the Template (Print the template directly onto the cardstock. If you have a Cricut machine, click HERE for the template Scissors Hole Punch Bone Folder for Scoring Double-Sided Tape Assorted Cardstock, Ribbons, Punches, & Embellishments Instructions 1) Remember, to make it easier, print templates directly onto cardstock **Please note that you need ELEVEN of each piece** 2) Cut out cake pieces on solid lines and score on dotted lines 3) Apply double-sided tape to pointy flap and adhere as shown below 4) Apply double-sided tape to side flap and adhere as shown Now, you try it!
How to make gift bags from newspaper
When I bought something at a store recently, the clerk handed me my purchase in a bag made from a newspaper. I liked it very much and had to make some more—thus today's DIY recycled newspaper project: gift bags made from the Wall Street Journal. You can vary the dimensions, of course, but here's what I used to create a bag that's 5" tall, 4.5" wide, and 3" deep. Stack two sheets of newspaper on top of each other. This will be a two-ply bag for extra sturdiness. Cut out a rectangle that's 15.5" wide and 8.25" tall. Fold a flap 1.25" down from the top. Cut two pieces of cardstock or chipboard to 4.25" x 1", then glue them on the widest two panels just under the top fold. Put glue on the outside of the 0.5" tab and bring the left-most panel over to form the body of the bag, aligning the cut edge of the panel with the folded edge of the flap. Upend the bag so the 2" flap is now up. Put glue on both flaps and fold them inward to form the bottom of the bag.
Lucky Wishing Stars
You’ve probably seen these little puffy origami stars before. They are really quick to make, and you don’t need any special materials to make them. You can buy lucky star pre-cut strips from origami stores, but you can just as easily make your own from medium weight coloured paper, e.g. scrapbooking paper, or even strips cut from magazine pages – as the strips are so narrow, the original text or image won’t be obvious in the finished star. Anti-clockwise from top left: pre-cut strips, paper cutter, scrapbook paper, magazine page. Now on to the tutorial! To give you an idea of size, I’ve made stars in 3 different sizes to show you: blue stars (from pre-cut strips): 35cm x 1.25cmpink stars (from a magazine page): 30cm x 1cmgreen stars (scrapbook paper): 15cm x 0.6cm The finished star will be approx 1.5 x the width of your strip, so pick an appropriate size for the size of star you’d like to end up with. For the rest of this tutorial, I will be using a paper strip cut from a magazine page.
Simple Winter Sewing Project: Hot Rice Bags
Warm face, warm ‘ands, warm feet Aow, wouldn’t it be loverly? –Eliza Doolittle Cloth bags of heated grain are great for warming the bed or soothing sore muscles–much cozier than hot water bottles, and a nicer quality of heat. With a piece of standard copy paper as your pattern, cut two 8 1/2 x 11″ pieces of cotton (muslin or calico works great). Clip corners, turn, and press. Add 5 cups of dry rice. Pin, and stitch 1/4″ from the edge. It’s nice to make the bag a cover–keeps it clean, and fleece feels so good. With right side in, fold the end with the wider, topstitched hem up 5 3/4″ , and the side with the narrow hem down 4 3/4 “. My mother gave me this pin cushion when I was seven. Stitch the sides, clip the corners, and turn right side out. Take the cover off to heat the bag in the microwave. Use the bag to warm the bed, snuggle it while reading on a cold winter’s night, or apply to tense, sore muscles. You may also enjoy other craft projects from The Tangled Nest: