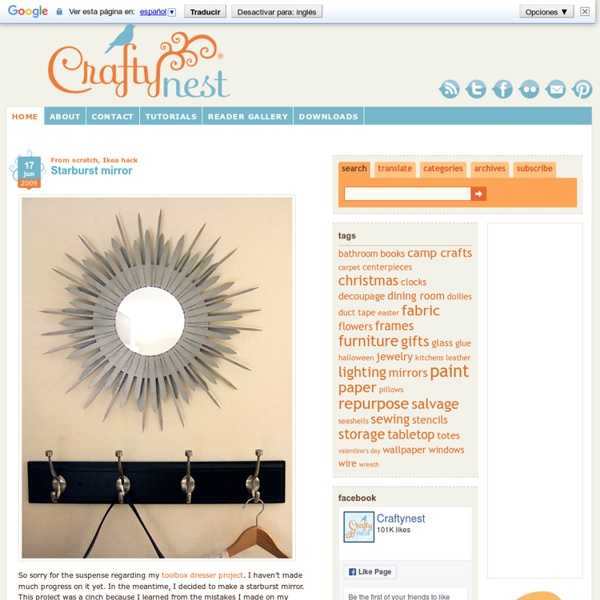
Starburst mirror
So sorry for the suspense regarding my toolbox dresser project. I haven’t made much progress on it yet. In the meantime, I decided to make a starburst mirror. How to make a starburst mirror Supplies Ikea Bjurön plant glide 2 dozen 5-inch wooden plant markers (available at nurseries) 2 dozen 5-3/4-inch wooden plant markers (available at nurseries) 2 dozen wooden skewers (with two flat sides)7-inch round mirror silver spray paintwood gluewooden tooth picksawtooth picture hangerCon-Tact paper (color doesn’t matter)newspaper or drop clothpaper towelbooks that are the same thickness as the plant glide Tools hammer & nailsmall sponge paint brushscissorswire cutterspencil & rulersanding block & fine sand papertack cloth 1. 2. 3. 4. 5. 6. 7. 8. 9. 10. 11. 12. 13.
"Stained Glass" Votive Holders
By Jenny Ryan Many times when I’m at the grocery or drug store, I can’t resist throwing a few scented votive candles in my cart. When I’m ready to burn them, it’s easy enough to sit one on a cute little vintage china saucer, but I recently decided to try and find a fancier display solution for them. I also wanted the project to be inexpensive, and the materials used to be things I already had on hand. I was inspired by memories of making faux-stained glass in elementary school and came up with these fun little glass votive holders. Materials Tissue paper in your desired colors Mod Podge (matte finish), in a pinch you can also use school gluePaintbrush Scissors Glass containers to fit your candle(s), I used thrifted vases and wine tumblers Paper punches in various shapes Q-tips, optional Directions Step 1: Figure out what colors of tissue paper you’d like to use and what paper punch shapes you want to try out. Jenny Ryan is an artist, crafter, and maker of things. More: Related
Sweetheart Tray
My honey and I aren’t big on lavish expenditures on Valentine’s Day. Usually, we spend it at home with just a few decadent treats like dark chocolate and champagne ~ a thoughtful card with a sweet sentiment is always exchanged. For the longest time, I’ve been wanting to craft something with the sheet music from our wedding song, but couldn’t decide what to do. A card? Perfect for serving chocolates and bubbly today . . We’ve been married over 11 years, and our wedding song was Harry’s version of ‘It Had to Be You’. Sing to me darling, sing to me! Where was I? *dazed by Harry* Oh yes! Making a Sheet Music Tray I started with an old melamine tray with a floral pattern I’ve had for years but wasn’t using. Next, I snagged the pages of sheet music from my stash. Knowing I’d never fit all three pages, I cut the excerpts from the stanzas into strips. You could use this same idea for a favorite poem, lullaby, quote, whatever ! . . . all while humming along with Harry Wishing all who celebrate a very:
Design*Sponge » Blog Archive » diy project: katie’s glass-jar moroccan lanterns
I’m getting a little tired of the winter weather and will take just about any opportunity to daydream about the sunny warm days ahead. These Moroccan-inspired lanterns by Ohdeedoh contributor and DIY expert Katie Steuernagle are the perfect antidote to the winter blues; I love the glow of the rich jewel tones and the intricate gold designs. If you have any old sauce jars lying around, this is the perfect way to make good use of them and get yourself psyched for spring— it will be here before we know it! —Kate CLICK HERE for the full how-to after the jump! Materials old glass jars (spaghetti jars, jam jars or any plain glass jar will work)gold dimensional puff paintglass paint (Delta or Pebeo Vitrea glass paint are great options)paintbrushwire (optional, for hanging lanterns) Instructions 1. 2. 3. 4.
karen’s mirrored planter box
this mirrored planter reminds me how much i like dollar stores, where it seems like every aisle calls out with its potential for creative projects. karen at the art of doing stuff is well aware of this goldmine; her projects often utilize inexpensive materials to create something rad. this time she managed to score these mirrored squares and turn them into modern, clean vases. i like to have a running list of quick projects to do when time is limited, or just to pick me up when i feel bored or glum. this project is a perfect solution for a rainy day, and if you fill it with a string of pearls or another draping plant, the reflection will give you two plants for one! HERE is the full set of instructions, including some more how-to images. thanks for sharing this clever project with us, karen! -kate
Related:
Related: