
felted garland « small bird blog Wednesday, December 16, 2009 by smallbirdblog I love handmade Christmas decorations, but I hardly had any that were made by my own hands…until now… I think I meant to make this felted garland last year…but I never got around to it. I used about 1.5 oz. wool roving in several colors, and got about 48 balls out of it. I arranged the various felted balls in a perfectly random pattern (I know, I have a problem), and used a natural, twine-colored worsted weight yarn to string them. I love the handmade touch they add to my mantle. Like this: Like Loading... Butteryfly Tree This craft project was inspired by something almost identical I saw in a fancy shop here in NYC. It cost almost $500, and I thought to myself, "hey, I can make that". And so I did! Start by printing out butterflies. I found mine online, simply google butterfly prints and millions comes up. Hot-glue or super-glue a small branch to a vintage saucer. Fold the butterflies a little, so they look more alive and simple hot-glue them all to the branches. Photos by Alexandra Grablewski
Peacock Feather Earrings I posted some pictures of peacock feather earrings I made a while back. I thought I would do a tutorial for how to make them so if any of you are up for a fun summer jewelry project. I saw these a while back at Anthropologie for 40.00 or so. They only cost a couple of dollars to make which is more in my price range. Materials Needed: 1. 2. 3. 4. 5. You should be able to find all of these supplies at your local bead or craft store. To start, select two feathers that have the same eye shape and color. Once you have chosen your feathers strip the feathers until they are the width you want your earrings to be. Once they look like the above picture trim the stem down to a quarter of an inch long. Place the feathers face down into the fold over crimp ends so that once you have folded down both sides of the crimp end, the flat side will be in the front. Carefully with your pliers fold down each side of the crimp end so that it firmly holds the feather. …and like this from the top.
Repurposed DIY For Everyone! I've heard it from so many different people...and I've said it myself! "I wish I could..." I'd like to showcase some repurposed DIY designs I've collected that I think anyone and everyone could do - and do well! It won't be hard to find the supplies, either. Not only will you feel the elation of creation (hey, that rhymes!), you'll also be warm and fuzzy in your heart - knowing that you're helping to save the Earth, one repurposed project at a time. spotted at Canadian House & Home So, no more "I wish I could...". Until next time... Michael Stumble this post Recycle Tutorial ? Making Of T-Shirt Yarn | craftpassion.com Another tutorial to help save our Mother Earth by turning unwanted items into something useful. This is the yarn ball I made out of an old T-shirt which I have been wearing for 10 years day-in day-out, wash-in wash-out. It finally broke down and tore at the collar and sleeves. I have finished making the drawstring bag as shown above. {CLICK HERE to get the Recycle Tutorial – Making Of T-Shirt Yarn.} Pages: 1 2 Print / Download PDF
Spring Scrapbook Paper Tree Hello fellow crafters! Tristin and I were invited to be today's featured guest blogger over at Everyday Mom Ideas! We were thrilled with this wonderful opportunity, and wanted to share with the readers over there one of our trees from the collection we're currently doing. This second tree is very similar to the first one. I'm sorry! I promise, the next ones will be more diverse. (Since this is a guest post on a different blog, and the concept is similar to the first tree.. Thanks, Julia, for having us on your blog!
Decoupage Craft Christmas Gift Ideas with Older Kids Decoupage is so fun and can do amazing things! My kids and I had fun taking some of these ordinary items and transforming them into beautiful homemade gifts that they are excited to give for Christmas. The pictures are the ones we created. Decoupage Jewelry or Desk Organizer Decoupage Christmas Candle Decoupage Paper Clock Decoupage a Glass Plate Decoupage Votive Candle Holder Need more ideas for Christmas crafts with kids? (Visited 48 time, 2 visit today) Never Lose Those Keys Again! That is right… I said it. Who knew key holders could be so functional. And so pretty! I needed these clever ideas about a week ago! Do you lose yours too?? Fabric, Picture Frame, Fiberboard, Nail Hook, Label Frame. Love the hanging tags! Repurposing Silverware: I think this is my favorite!!! It’s a cloud, magnet AND key holder: This is so neat for the “bachelor” pad! Mason jar, Hook, Wood: Newspaper Flower. OK, I lied above! Even The Lover seen it and said “THAT’S FREAKIN SWEET” # kristanlynn xoxo
Screen Printing your own T shirts with Freezer Paper You've probably seen this sprinkled around the web on various blogs and how-to sites. But, Meg and I thought we'd try our hand at it. What's so nice about this project is, you can make just about any image you want (depending on what you want to tackle), its cheap and even kids can get involved. Come along for the ride, there are tons of photos to help you if you decide to make your own t shirt. What you'll need... ~freezer paper (not wax paper or parchment) cut into 8.5x11" to fit into your printer ~fabric paint (got mine at Joann's Fabric store, they were 50% off...woo!) for the first step, you'll need to find an image you'd like to use. With an X acto knife, cut out the part of the image that you want to become the painted part...in a sense, turn it into a stencil. Place your cut out onto your t shirt wherever you'd like it to be. Now, with a dry iron (heated up to the highest setting for the type of fabric your t shirt is), iron your image down. And finished!
Coffee Stirrer DIY Wall Art Last week, I posted a preview of the simple, inexpensive wall art my mom and I created. Now I’m excited to show you how you can make a one-of-a-kind coffee stirrer masterpieces too! I’m big on projects that anyone can do. And this is one of those projects. Here’s all you need to get started: 1. Additional Supplies: 5. Okay, first things first. So, once you’ve got your palette, it’s time to paint your frames and your coffee stirrers! My mom and I did our painting as the sun was setting, which is always a questionable decision. I was going for the reclaimed driftwood sort of look. Once your coffee stirrers are painted, it’s time to trim them to fit into the frame(s) you’ve chosen. I found the quickest way to do this is to measure one stick to be the length you need it and then use it as the guide for trimming all the others. This next part is fun because you’ll start to see your piece come together fairly quickly. What’s left?
Hexagonal Stacking Boxes - Evil Mad Scientist Laboratories The inspiration for this week’s project comes from the Japanese stacking octagonal box kit shown above. We previously used a similar technique to demonstrate a business card box with traditional elegance. We now present a surreal modern makeover for Japanese papercraft boxes by using (recycling) paperboard packaging. We follow the same basic construction techniques, but simplify it by eliminating the paper coverings and decorations. In their place, we use paperboard from cereal, cracker and cookie packaging. These cheerful boxes are easier and less expensive to make and have a surreal quality to them. They are great for storage, gift giving, and decorative use. The abstraction created from taking the package out of its context can be wonderfully fun. To get started, download the pattern here (18K pdf). This is an ideal project for a laser cutter, but can also be made by printing out the pattern and tracing or gluing it onto your material to cut with a hobby knife.
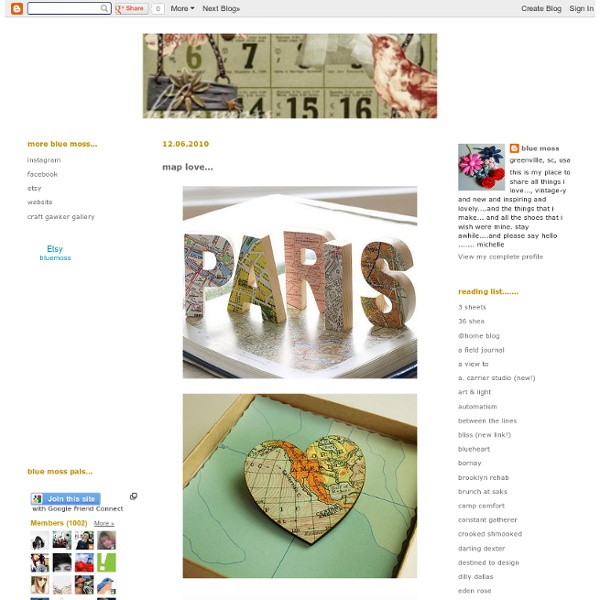
Get Crafty With Maps | The New Home Ec By craftyamy | Are you a map junkie? Me too. nggallery id=’125515′ Traveling as a family? 18 creative family picture poses21 paint chip craft ideas10 awesomely altered t-shirts25 ways to reuse old sweatersAmazing DIY wallpaper installations About craftyamy craftyamy Amy Anderson is a crafty, DIY kind of girl who lives in Atlanta with her pug. Summer bracelets DIY When M. came home from her camp with school, she showed me this yellow bracelet she made with 'scoubidoo' strings. One of her friends taught her how to make these and of course I wanted to have a go at it too. Instead of scoubidou string I used strips of fabric for one and leather - what did you think?! So, in case you 're in need of a fun summer project here's a how-to in 16 pictures with a short description below. This is what you'll need for an adult size leather bracelet. - a 52cm long strip of fabric or leather shoe lace - a second strip of fabric or leather shoe lace of approximately 95 cm - a big-eyed needle - a cylindrical object to hold the loop so your project stays put while braiding (the neck of an Elmer's glue bottle works just fine; when out on the beach, the finger of a helper's hand might do the trick as well) Steps: 1. With special thanks to my little girl M. for teaching me how to make these...
City Map Paper Cut Out It’s rare you find someone who doesn’t at least find fascination with, if not flat out love, a map. They’re so informative; they’re proof of where we’ve been and where we’re going. More than that, they’re pretty good-looking! When we came across this DIY project on how to cut out a city map out of paper, we knew we had to share. Would you do this project? Images: Just Crafty Enough via Apartment Therapy