Lace Stenciled Framed Song Lyrics! (+our wedding music)
If you’ve been following my blog, you know how I made 60 of these painted frames with song lyrics for our wedding decorations /favors… Well, a lot of wedding guests loved them and took one home, but we had a ton left at the end of the night, which we boxed back up and took home with us… So we now have 30 of them hanging on our big white living room wall! So, hey, you want to know how to make these yourself? I made 2 different types of painted frames: textured frames that were just plain spray painted, and smooth(ish) frames that were painted with lace used as stencils. Your first step is to take a trip to your local thrift store (or several of them) and find frames – whatever sizes you want (mine were 3×5, 4×6, and 5×7), either textured to do the simple version, or plain untextured frames to do the lace stenciling. I did them in batches of 6-10 at a time – sprayed 1 coat over them all, then went back with a 2nd coat over them all. Let dry completely as the spray paint can instructs.
Whirl-it lampshade - free DIY tutorial
We really needed a new lamp, and we´ve planned to make one for months. This week we finally got around to it. It takes a bit of different materials, but it´s really easy when you´ve started. We recommend making it outdoors, as it gets quite messy. We planned to make the lamp using the yarn Garnstudio Ice, but it ran out really quickly, and we had to improvise by using a thinner yarn to complete it. What we used One big, round balloon. How we did itGather all the materials.Put the yarn into the glue and mix properly. Fill the balloon to a desireable size. Hang it and start whirling. Whirl pretty tightly.
fabric flower ring
here's the post i was too sick to do last week. i'm feeling better. thank you for your kind words. and no i didn't burn the toast on purpose, that actually happened (a few days earlier...i just thought it was funny and so i took a picture.) who knew that it was a perfect picture for how i would feel a few days later. but yes, a little better on the sickness...not all better. but good enough. ;) hope your weekend was nice a lovely.okay...now onto our regularly scheduled post: here's a perfect ring to give to a friend, mother, daughter, wife, or yourself.with a few and easy steps you can make this lovely little (okay kinda big) fabric flower ring for whoever you chose!supplies:*one strip of fabric measuring at 1 inch by 10 inches. the kits come in three colors for now but if you are interested in another color just contact me either through email or through my "contact" in my shop and we'll see what i can do for you! first you will need to get your fabric cut to 1 inch by 10 inches.
DIY: Wine Bottle Light
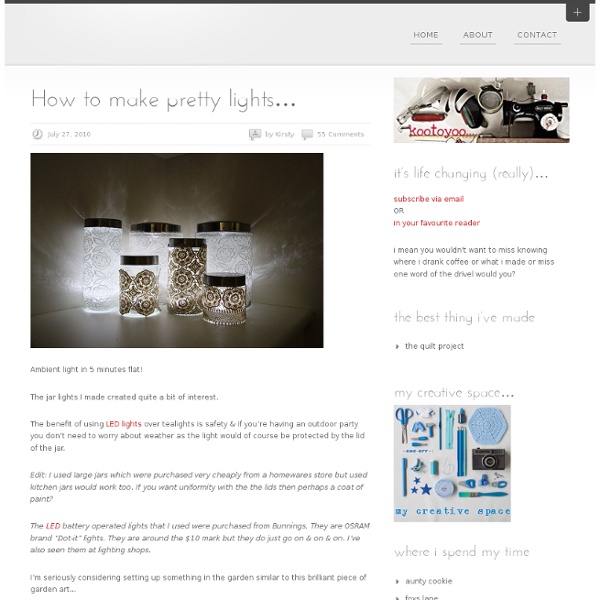
November 3rd, 2009 This past spring Daniel and I went on a road trip from San Francisco to the Grand Canyon. Along the way we stopped at Chateau Julien for a wine tasting. I wanted to do something with the empty bottle instead of throwing it in the recycling bin. You’ll need: an empty wine bottle a drill safety glasses and gloves (just in case the bottle breaks) 1/2″ glass drill bit masking tape short strand of Christmas lights (with a plug only on one end) How to: 1. 2. 3. 4. 5. 6.
Flashback: Woven Map Basket
Maps can be amazing design elements, with all their intricately drawn lines and minute details. But what do you do with a regular paper map that is starting to fall apart from use? In CRAFT Volume 05, crafter Jane Patrick suggested we weave maps into baskets, a fun and interesting way to reuse castoffs and weave a little memory into a functional item. Check out her full tutorial here and pick up a back issue of CRAFT Volume 05, the Paper issue, in the Maker Shed.Woven Memory Basket Weave your vacation road maps into an attractive souvenir. Materials 2-3 large road maps Contrasting string or thread Clothespins Cutting mat Rotary cutter Awl or tapestry needle Scissors Small tweezers White glue (optional) to further stiffen the basket Directions Step 1: Prepare the strips. Fold each strip in half lengthwise. Step 2: Weave over, under, over, under (plain weave) for a square base, 10 weavers in both directions. Step 3: Using string or thread, mark the base by twining around the edges.
DIY Trendy Hanging Lamp
Home design DIY Kids Weddings Fashion and Style FOOD Cool stuff DIY Trendy Hanging Lamp As I mentioned before, honeysuckle is a color of this year so why not to make something trendy for your interior? Materials and tools Sheet of colored PlexiglasCord setPlastic cupDecorative metal chainPink spray paintQuick-setting gluePensilElectric jigsawDrillScrewdriverLightbulb Instructions Find some nice neo-baroque template and print it.Transfer it on the Plexiglas sheet using pencil.Saw the sheet using a jigsaw.Repeat first three steps to get the second piece of the lamp.Carefully remove the protective film from the Plexiglas. share More about creative lamps, diy hanging lamps, diy lamps, diy modern lamps, diy pendant lamps, hanging lamps, lamps, pendant lamps, suspended lamps 12 Comments elsa Says: April 24th, 2011 at 8:05 pm this is wonderful, so creative! 4 Trackbacks For This Post DIY Cute Flowers Lampshade | Shelterness Says: April 23rd, 2011 at 2:41 am [...] Leave a Reply Related stuff Popular:
House of Smith's: Hanging Roses Flower Ball Tutorial
I was browsing blogs a couple weeks back and found a post about these great hand made crepe paper roses on this cute scrapbooking blog! Homespun with Heart The second I saw them I KNEW what I was gonna do! I have had these Styrofoam ball forms for a while now, and thought I would do cute flowers all over them, and hang them in the twins' room. But sadly, the flower idea was pretty expensive. Especially because I wanted to do three of them. SO I thought this was a great, thrifty alternative! And I LOVE how they turned out! Here's what you'll need: Styrofoam ball forms Crepe paper streamers in whatever colors you choose LOTS of hot glue sticks and a glue gun a roll of tape and a measuring stick I measured my crepe paper strips at 24 inches, and ripped a BUNCH at that length, so I wouldn't have to keep stopping, to rip more Once that was done... and my glue gun was nice and hot, I started in on my flower makin'! First I crumpled the strips up, to make them softer and more fabric looking... Easy-peezy!
Lacy Luminarias
Give the decorations at your wedding reception the romantic look of lace. The intricate patterns shining through these luminarias (paper-bag lanterns illuminated by votive candles) are courtesy of doilies glued inside. Place a grouping of the lanterns in different sizes on the guest-book table or dinner tables for a beautiful, glowing display. We chose ivory paper bags for an understated look, but you can use thin paper bags in any light color. Tools and MaterialsLight-colored paper lunch bags in various sizesRulerScalloped rotary cutter12-inch gold-colored doilies (white ones won't show through as well)Utility knifeScissorsGlue stick or Xyron sticker-making machineVotive candles in glass holdersUtility lighter Luminarias How-To1. 2. 3. 4.