
DIY Faux Curled Rosewood Wreath {Made From Rolled Recycled Book Pages} I have seen various versions of Faux Rosewood Wreaths in just about every store and catalog for the upcoming season; most with a price tag running upwards of $40 or more. Some are crafted of paper and other of real wood shavings. Last year I made a few rolled flower gift toppers from recycled book pages and they remind me so much of the curled wood roses I thought they would make a good substitute. {with a much lower price tag} Materials Needed:Foam Wreath FormRecycled Book PagesLots of Hot GlueRibbon to Hang The full step by step tutorial I posted last year can be found {here}.Basically you layer three book pages together and draw a spiral circle. Starting with the outside of the spiral, roll the paper inward to create the flower shape. Give the wreath form a light coat of white {or light color} spray paint to help camouflage any see-through spaces. It seriously takes quite a few roses to fill the entire wreath, however I think the finished project has such a unique look. {Simply Lovely}
wednes-diy | Free People Clothing Boutique Blog UPDATE: This post originally ran on March 23 2011, but with summer winding down we wanted to bring it back up for some late summer inspiration! a fellow fp girl sent this to me a couple weeks back and i’ve been thinking about it ever since! i can think of a million reasons why these would be awesome… as apartment décor, as outdoor party décor, and – wouldn’t they be the best thing EVER for camping in general or at a festival? just let them sit in the sun all day, and they’ll last all night! i am absolutely going to make some to bring with me to bonnaroo this year. you can buy a sun jar here, but you can make your own for much cheaper! what you need: a mason jar with a clear glass lid like this one from ikea, a solar garden light like the ones pictured above, which i found here, adhesive and glass frosting spray. start by spraying the inside of the jar with the frosting spray – this will help diffuse the light and give it a warm glow. don’t spray the lid though! last image.
Paper Flowers - Anyone Can Do That | FindInspirations.com Japanese Kusudama, this tutorial is featured on Craftuts Anyone can do that, I assure you. The proof: I can, just take a quick look at my result below. And, believe me, I am neither meticulous nor particularly patient. You could even say I’m the opposite. Below you can see my very first attempt to create paper flowers. What you will need to make your own Kusudama paper ball? 1. 3. 4. (optionally) I prefer torn paper instead of cut. You have to start with a single petal. Now you have to glue your 5 petals into a flower. Apply the glue to only one side of each petal, except for the last one, in this case cover both sides with glue. Your first flower is done. Don’t glue every petal right after you make it. When all 12 flowers are finished you have to glue them together. When two halves of Kusudama Flower Ball are ready you have to glue them together.
Design*Sponge » Blog Archive » diy wednesdays: mini mosaic tray during these chilly winter months, we always like to have a hot beverage close at hand. whether we’re eating at the dining room table, or responding to emails from the couch, or even reading in bed, having a little heat-proof tray we can bring from room to room is a big help. this project is also a great way to try your hand at creating a very basic mosaic. it’s a fun process that requires very few tools and materials to achieve a beautiful and functional result. click here for the full instructions or just click “read more” below. have fun!derek & lauren here’s what you’ll need: -a shallow display box or tray (we got ours at ikea) -mosaic tiles -tacky glue -grout (we got a 1lb container of ‘non-sanded’ grout and mixed about 1/4 of it) -putty knife -sponge -cloth -paint (optional) 1. decide on an arrangement for your tiles.
Homemade Snow Globes Brighten Any Home! – Elfster Blog Photo courtesy of Anthropologie Whether or not you get to experience a white Christmas this year, these glittery snow globes can bring a piece of festive weather to you! There are beautiful examples out there, but they can run up a hefty price tag, especially if you’re into collecting. This DIY version costs next to nothing, and lets you personalize to your heart’s content! You choose everything from the jar to the trinkets inside, making this the perfect gift for loved ones. Materials A jar of your choice (with a lid) Figurines or jewellery Anti-rust sealant for metal pieces Clear-drying epoxy Distilled water Dash of glycerin Large silver or white glitter (smaller versions will float at the top) Instructions Use clear-drying epoxy to adhere your piece to the inside of the lid.
Anthro-Inspired Serving Tower There are some beautiful serving pieces cropping up around blogland, using all sorts of great materials, and I’ve been wanting to do something similar. In browsing Anthro a couple of weeks ago (I know I know, I actually went in the store – but I had a good friend on speed dial in case I succumbed to anything too crazy) I came across a serving tower made from beautiful white dishes and cups, stacked on top of each other. Now because I was in an Anthro-high-price stupor, I did not take a picture of this lovely item. I wanted mine to be a bit more colorful though . . . I scoured our local thrift store and found a great selection of pretty plates and cups. In trying to decide what would be best to glue these dishes together I came across the DIY Club Challenge – which requires you to use certain projects to participate. To start I wanted the bottom plate raised just a bit, so I used an upside down dessert plate as the base. I added the glue to the base plate. Pretty easy right? And again. . .
Wax On, Wax Off - Homemade Hair Removal part 1 Unfortunately sisters Rebecca and Maggie come from a very hairy family. So when we saw recipes for homemade waxing we said, "OW!!" and then, "We gotta try this!" We spent Tuesday morning trying a couple different recipes with great results. We liked them so much we decided to do two posts on them. If you have ever tried products like Nads, this recipe is just like that. Here's What You Need: 1 cup of sugar1/4 cup of honey1 ounce of lemon juicea drizzle of molasses (optional) You Will Also Need: cotton fabric strips (we used an old bed sheet) 3 in. x 10 in.popsicle stick or butter knife In a microwave safe bowl, mix all the ingredients together. Make sure the area you are going to wax is clean and dry. Now, using your Popsicle stick spread a very thin layer down your leg in the direction of the hair growth. Press your strip of into the sugar. Pull your skin taught. We did find that it took a little practice getting this technique down, but once we did we found it worked really well.
Silk Color Block Pillows - Standing Crane: Cascading Bottom Pleats with Bow Accent Did anyone ever try to teach you origami? I'll wager a paper crane was your first, and maybe your only, project. So here's your little known fact for the day: is Japanese paper folding; its predecessor is the Chinese paper art called . The graceful crane is revered in China as the symbol for longevity. Although often depicted in flight, the four pleats of our , the last project in our week, simulates the beautiful folded wings of a crane at rest. Thanks to the great folks at Fabric.com for providing all of the beautiful silk dupioni for our silk pillows as well as the unique buttons. Any Sewing Machine (we recommend the Janome DC2011 ) ½ yard of 44-45" wide fabric for the upper sections on both the front and back of the pillow: ½ yard of 44-45" wide fabric for the pleated bottom section on both the front and back of the pillow: Scrap or 1/8 yard of 44-45" wide fabric for the pillow ties: 9" invisible zipper for pillow opening: All purpose thread: 12" x 12" square pillow insert Straight pins
How to make gift bags from newspaper When I bought something at a store recently, the clerk handed me my purchase in a bag made from a newspaper. I liked it very much and had to make some more—thus today's DIY recycled newspaper project: gift bags made from the Wall Street Journal. You can vary the dimensions, of course, but here's what I used to create a bag that's 5" tall, 4.5" wide, and 3" deep. Stack two sheets of newspaper on top of each other. Cut out a rectangle that's 15.5" wide and 8.25" tall. Fold a flap 1.25" down from the top. Cut two pieces of cardstock or chipboard to 4.25" x 1", then glue them on the widest two panels just under the top fold. Put glue on the outside of the 0.5" tab and bring the left-most panel over to form the body of the bag, aligning the cut edge of the panel with the folded edge of the flap. Upend the bag so the 2" flap is now up. Put glue on both flaps and fold them inward to form the bottom of the bag.
Wipe Off Weekly Menu Board I am a meal planner. I refuse to go grocery shopping without my week’s worth of meals planned out and list made. (It’s either that or wander aimlessly around the grocery store for two hours and then make ten more trips back during the week to get things I forgot.) Wipe-Off Menu Board Tutorial Supplies: Picture frame with glass front (I love these 12×12 frames I found at Ben Franklin for only $7!) 1. 2. 3. 4. Now everyone in the family knows what’s for dinner each week! I decided my frame would look better black in my kitchen, so I spray painted it black. Little Birdie Secrets are regular contributors to Make and Takes and was born from the crafting obsession of three friends living in the Pacific Northwest.
3D Valentines Day Card Tutorial | Paper Kawaii Origami Cherry Blossom Tutorial ⬇⬇Expand for more info! ⬇⬇ Hi people! Origami Pentagon Hey all, I have made a new pentagon video, hopefully this will be clearer and I am beginning to speak in my videos. Origami Star Flower Tutorial Here is a quite short video on how to make a great origami star flower, it was originally requested by someone on facebook ^_^ You will need a pentagon shape to begin with, so first go here: Then come back :P You can download the diagram for this model at my website here: Enjoy! Triangular Origami box (non modular) This triangular origami box is made using one piece of paper for the lid, and one piece for the base. Origami Pikachu (Advanced) This origami model is pretty advanced, so if you don't really get what a squash fold is, try a simpler model. Origami Easter Basket Please make sure the annotations are turned on for more descriptions!
Hot Piping There are currently no images from other crafters. close Terms & Conditions You must enter into this Agreement if you want to submit digital images or other content to Prime Publishing through Sharing Customer Images (the "Service"). As used in this Agreement, "we" or "Prime Publishing" means Prime Publishing, LLC. and "you" means the individual or entity submitting materials to Prime Publishing. 1) Eligibility. 2) Definitions. 3) License Grant for Materials. 4) Removal of Materials. 5) License for Name, Trademarks and Likenesses. 6) Specifications and Guidelines. 7) Representations, Warranties and Indemnities. 8) Restrictions. 9) No Obligation. 10) Changes to Agreement. 11) Prime Publishing Intellectual Property. 12) Communications. 13) Waiver. 14) Disclaimer. 15) Miscellaneous. Sharing Your Own Images Who can share images? You! What should I share? Please share images that will help other visitors. Do include captions for your images. What shouldn't I share? Where will my image appear?
Wire & Paper marble magnets I finally gave in and made marble magnets. Not surprisingly they are quite fun, smooshing the glue out to make a perfect little magnified image is very satisfying. Here, in order of appearance, are the places I referenced: paper candy instructions with pictures (this is the first place I saw this project) dogmestic with instructions and pictures photogeek pictures ugly green chair cute ladybug magnets – pictures with packaging threads at Glitter:onetwothree I bought all of these supplies at Michael’s, including the glue I went back for since I got the wrong kind to start with. I bought 1/2″ and 3/4″ round (strong) magnets (in with the frames, near the corks); 1/2″ and 3/4″ clear flat glass marbles (in the fake flowers aisle, check the mosaics section too); silicon sealer made by the Crazy Glue people (in the glue aisle). These are great packaged in those Altoid-sized tins, I’ve seen them in office/gift shops like that.
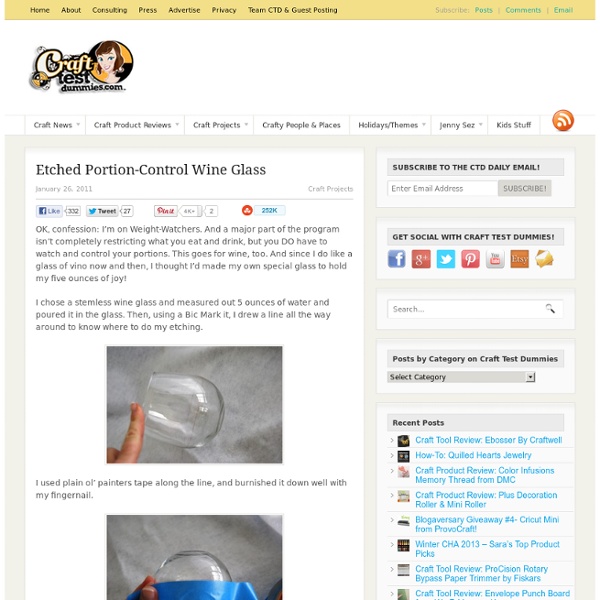
Thankyou for this idea, I'm also following weight watchers & find measuring each glass of wine tedious, I will definitely be doing this. X by mariebutcher Apr 16