
Woven Rag Rug. Thank you for all the great feedback for liking my Braided Rag Rug.
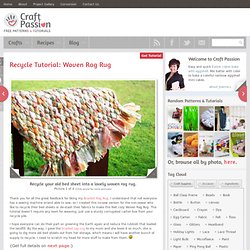
I understand that not everyone has a sewing machine or/and able to sew, so I created this no-sew version for the non-sewer who like to recycle their bed sheets or de-stash their fabrics to make this feet cozy Woven Rag Rug. This tutorial doesn’t require any loom for weaving; just use a sturdy corrugated carton box from your recycle pile. I hope everyone can do their part on greening the Earth again and reduce the rubbish that loaded the landfill. By the way, I gave the braided rag rug to my mum and she loves it so much, she is going to dig more old bed sheets out from her storage, which means I will have another bunch of supply to recycle. Design. Fem un concert 2010-11. PARADOX, and then some. A Tutorial. Here are Zentangle's instructions for the tangle Paradox, from the February 2008 newsletter.
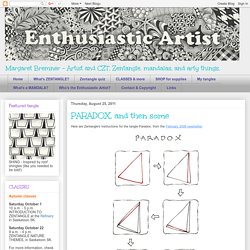
Paradox is one of my favorite tangles and I seem to do it rather well. Perhaps those two things are related! :-) I've been asked about it occasionally, how did I do this or that. I thought about doing a video but that's just a bit more than I can take on right now. So I decided to post some tips and ideas here, and hope to make them clear enough. The elegant curves show best if the lines are close together. Agh! Then again, never say never. Paradox works best in triangles or squares. There are two looks that can be achieved with Paradox. Paradox is essentially a square or triangular spiral.
TWISTS: Regardless of whether you spiral clockwise or counter-clockwise, if you spiral in the same direction in every section you'll end up with twists. FANS: To get the fans you need to spiral in the opposite direction from section to section. Paradox also makes a nice border design. Never say never, right? Fuzzy Felty Flex Frame Purses. So the flex frames have been a bit of a hit... but the most commonly asked question is "How do you use them?

".... This afternoon I pulled out a scrap of pattern card and did this. The bottom shape was just drawn freehand. You could make it any shape you want - oblong, square, completely abstract... as long as the top section is 4.5 x 8.4mm (give or take a mm).Fold the card in half and cut the shape out. Flex Frame Purse Tutorial. Hi, I'm Juliet and its an honour to be visiting from Tartankiwi. Firstly can I say a huge thank you to Nin, for inviting me to share this tutorial on her blog. I'm fairly new to writing sewing tutorials, so if anything is unclear please do not hesitate to ask. A few wee notes before we get started: Several people have asked me where I bought my flex frames.
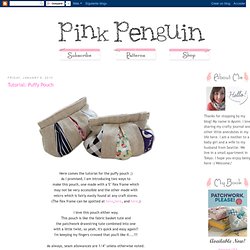
These came from an Etsy store. This tutorial is for the basic purse, I have not included instructions on how to appliqué the bird outline, but I have included the template with the pattern if you wish to use it. Unless otherwise stated, all seams in this tutorial are 1/4 inch. To make a Flex Frame Purse, you will need: Take the small rectangles which will form the sleeve for the flex frame. Ensure that all the short ends are lined up and sew the other end. Slowpony on Artfire. Tutorial: Puffy Pouch. Here comes the tutorial for the puffy pouch ;)As I promised, I am introducing two ways to make this pouch, one made with a 5" flex frame which may not be very accessible and the other made withvelcro which is fairly easily found at any craft stores.
(The flex frame can be spotted at here,here, and here.) I love this pouch either way.This pouch is like the fabric basket tute andthe patchwork drawstring tute combined into onewith a little twist, so yeah, it's quick and easy again!! I'm keeping my fingers crossed that you'll like it....!!! As always, seam allowances are 1/4" unless otherwise noted. First off, pick out linen (or medium to heavy fabric)and three different print cotton fabrics that contrasteach other for the external shell. Open wide zippered pouch tutorial size chart.
Please refer to the full tutorial HERE for step-by-step instructions and pictures.
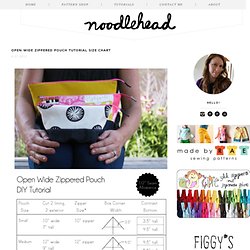
For the contrast bottom style pouches, simply cut two pieces of each measurement listed in the chart by the width of the pouch, and sew together using a 1/2" seam allowance. So for the medium size pouch you'll cut two pieces 4.5" tall by 12" wide and two pieces 5.5" tall (the contrast bottom) by 12" wide, sew them together using a 1/2" seam allowance, thus making the front and back exterior pieces.Approximate Finished Dimensions:Small // 4.5" H x 5" W x 3.5" DMedium // 6" H x 6.5" W x 4.5" DLarge // 8.5" H x 8" W x 5" D Fabrics: The Hello Kitty fabrics from the first post were purchased at fabric.com, seems like Hello Kitty is popping up a lot, so keep your eye open if you're a fan (yip yip!)
Bags and pouches.