
Technickety: How to unvent a simple cable. I had a heap of messages asking where the cable for Jeff's glove came from.
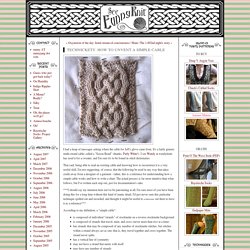
It's a fairly generic multi-strand cable; called a "Saxon Braid" (thanks, Purly White!). I see Wendy at wendyknits has used it for a sweater, and I'm sure it's to be found in stitch dictionaries. That said, being able to read an existing cable and knowing how to reconstruct it is a very useful skill. I'm not suggesting, of course, that the following be used in any way that takes credit away from a designer of a garment - rather, this is a reference for understanding how a simple cable works and how to write a chart. The actual process is far more intuitive than what follows, but I've written each step out, just for documentation's sake. ***I should say my intention here isn't to be patronizing at all; I'm sure most of you have been doing this for a long time without this kind of manic detail.
According to my definition, a "simple cable": Step by step 9) Add your WS row with strands as established. See? How To Knit The Purl Stitch (Knitting) This VideoJug video is designed to show you how to knit the purl stitch.
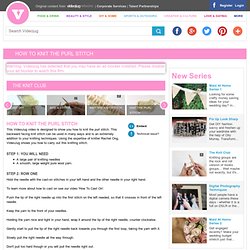
This backward facing knit stitch can be used in many ways and is an extremely addition to your knitting techniques. Using the expertise of knitter Rachel Ong, VideoJug shows you how to carry out this knitting stitch. Step 1: You will need A large pair of knitting needles A smooth, large weight pure wool yarn. Step 2: Row one Hold the needle with the cast-on stitches in your left hand and the other needle in your right hand. To learn more about how to cast on see our video 'How To Cast On'. Push the tip of the right needle up into the first stitch on the left needed, so that it crosses in front of the left needle. Keep the yarn to the front of your needles. Holding the yarn nice and tight in your hand, wrap it around the tip of the right needle, counter clockwise. How To Videos &Articles - StumbleUpon. Interlock Bindoff. After the publication of Jeny’s Surprisingly Stretchy Bindoff, I began a quest to find a bindoff that would stretch out just as far as JSSBO, snap back in just as well, and also be invisible (or close to it).
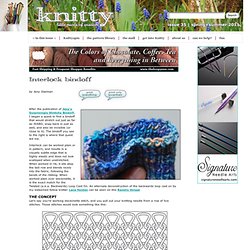
The bindoff you see to the right is where that quest led me. Interlock can be worked plain or in pattern, and results in a visually subtle edge that is highly elastic and does not look scalloped when unstretched. When worked in rib, it sits atop the last row and blends nicely into the fabric, following the bends of the ribbing. When worked plain over stockinette, it is the exact match for the Twisted (a.k.a. Backwards) Loop Cast On. THE CONCEPT Let’s say you’re working stockinette stitch, and you pull out your knitting needle from a row of live stitches. Now, if each stitch were interlocked with its neighboring stitches, it would look like something like this: This is the end result of the Interlock Bindoff worked plain (see Part 1 below). Note: your working yarn is now in front. Circular Tubular Cast On Awesomeness! If you're new here, you may want to subscribe to my RSS feed.
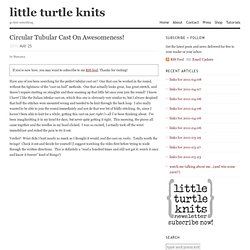
Thanks for visiting! Have any of you been searching for the perfect tubular cast on? One that can be worked in the round, without the tightness of the “cast on half” methods. One that actually looks great, has great stretch, and doesn’t require starting on straights and then seaming up that little bit once your join the round? I know I have! Verdict? For your wordy learners, here’s the written directions! Make a slip knot, with long tail (roughly equal to the tail length if you were doing a regular long-tail cast on) and place it on your circular needle with the working yarn (attached to ball) over left index finger, tail hanging between index and middle finger.
Step 1 Bringing ndl clockwise over the index yarn, under both, and up counterclockwise to catch the thumb yarn (forming a loop over the ndl with the thumb yarn), then under the index yarn counterclockwise, return to base position (one “purl” stitch made)