
How to Print on Fabric - 6 Easy Ways. 20+ DIY Sharpie Projects. By poppytalk | I’m a little late to the Sharpie DIY world, I’ve been seeing bits and pieces here and there, even went on a hunt for a “ceramic” one – one day in Michael’s.
Even they didn’t know what I was talking about (now I’m thinking there probably isn’t one – and people just use the regular type). But whatever the case, I’m kind of liking all the sharpie DIY’s out there. Like who knew. For someone who thinks they have a huge radar scanner, these ones sort of were in stealth mode. Nggallery id=’122842′ Lace Votives Make these beautiful votives using lace doilies and a sharpie.From blog.sharpie.com. Looking for more Sharpie projects? Read my other posts on Babble here! Jan is the co-founder of Poppytalk, a blog about the beautiful, the decayed and the handmade and Poppytalk Handmade, an online curated marketplace. 25 clever, space-saving storage tricks 18 creative family picture poses 25 ways to create your own outdoor movie theater 20 outrageous, over-the-top kids’ rooms.
DIY Stamp / Sello. I keep on with crafts made for the birthday party.

A simple way to give a personal touch is to use stamps! I made two differents, always on the princess theme, and I used them to decorate candy's bags! Material:Foam (5mm)Wood piecesspongeplastic plateacrylic paintscissors / cutterglueInstructions:Draw a pattern on the foam and cut it with cutter or scissors. Glue the pieces on the wood. Put a sponge on a plastic plate and deposit acrylic paint on top. Sigo con las manualidades que hice para la fiesta de cumpleaños. Material:Fomi (5mm)piezas de maderaesponjaplato de plásticopintura acrílicatijeras/cutterpegamentoInstrucciones:Dibujar un patrón sobre el fomi y recortar con el cutter o las tijeras. Stamping 101 - About Stamps. Stamps fall into two categories: Acrylic and Wood What’s an acrylic stamp?

Acrylic stamps come on a clear plastic liner, so you peel the stamp off the liner, then place it onto a clear acrylic block. It will cling, so there’s no need for adhesive or a cushion. Press to make sure it’s well adhered, ink it up and stamp away. DIY Easy Custom No-Carve Stamps. By Jeromina Juan Ever wonder about the possibilities of designing your own stamps without having to carve anything?

There is a simple way! You’ll need one ordinary household object – silicone caulking. Yes, the one you use on your bathtub, sinks, and windows! With no carving to do at all, this task cannot be simpler. And the result? Materials 1/8″-thick acrylic plexiglass; can be found at hardware storesX-Acto knife Metal ruler Silicone rubber caulking (clear); can be found at hardware storesWater-based paint BrayerNote: You can cut plexiglass to size by scoring a straight line several times using an X-Acto knife and metal ruler, and then placing the plexiglass on a table with the score line over the edge and snapping it in one quick motion. Directions Step 1: Sketch your designs on paper. Step 2: Hold the caulk tube vertical and tap it against a flat surface 8-10 times to remove any air bubbles. Step 3: Let the caulking cure for 24 hours, and then your stamp is ready. About the Author: Fun with Foam Printing - Easy Tutorial.
I loved this idea because not only can you recycle these horrid polystyrene containers, but the process is really simple.
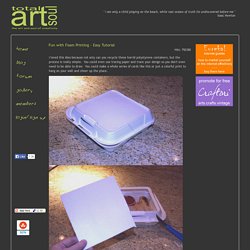
You could even use tracing paper and trace your design so you don't even need to be able to draw. You could make a whole series of cards like this or just a colorful print to hang on your wall and cheer up the place. Materials needed: Foam or polystyrene container pencil paint or ink small roller 1. 2. 3. 4. 5. Happy printing! Original image courtesy of themetapicture. Easy Yarn Block Printing. Steph is the founder/managing editor of Modern Parents Messy Kids and mom to a 2 year old son and 1 year old daughter. She started MPMK as a resource for helping parents to engage their kids, organize their life, and add a little style to their home.
For more inspiration on things to make and do, check out MPMK’s newest feature – The Make & Play Vault . Hello there Whip Up readers, thank so much for having me today! I’m excited to be here sharing with you a new technique I recently discovered via (where else) pinterest . Once I discovered this method, I was immediately drawn to it.
It’s a very easy way to produce the type of modern prints you might find in my favorite stores (West Elm, Anthropolgie, Crate and Barrel, etc.). Check out the example above here (also seen on the set of the Nate Berkus Show ). Options really start to open up when you apply this method to fabric. What I love most about this project is that it can be easily adapted to kids of all ages.