background preloader

Teepees

Facebook Twitter

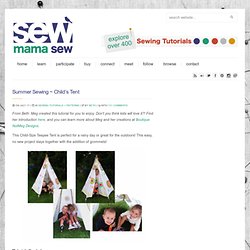
Child’s Tent. From Beth: Meg created this tutorial for you to enjoy. Don’t you think kids will love it?! Find her introduction here, and you can learn more about Meg and her creations at Boutique NutMeg Designs. This Child-Size Teepee Tent is perfect for a rainy day or great for the outdoors! This easy, no sew project stays together with the addition of grommets! Materials Needed: 6- 6ft bamboo garden post (can be purchased at Home and Garden Centers)3 yards of 60 inch wide white painter’s canvasScissorsPenCraft paint & brushes3 Strong rubber bands6 plastic 1 ½ inch ringsEmbroidery floss or strong threadSewing needle with large eye12 Large Grommets & grommet setting kit (I used 1/4”)HammerRibbon approximately 3 yards for lacing (additional ribbon for decorating is optional)Straight pins Step 1 Hold all 6 bamboo post in your hands wrapping the 3 rubber bands tightly around the posts leaving about 4 inches at the top. Step 2 (Steps shown in diagram above) Step 5 Grommet time!
Step 9 Have lots of fun! LoLo's Teepee - tutorial. When I was growing up, my favorite thing was to run to the corn field that was behind my godmother's house, take a blanket, put the blanket on the top of the tall corn stalks and make a pretend house. My friends and I would then bring plastic bottles and cups, snacks, dolls, trucks and more blankets and pillows and spend a day playing house.

Well, we don't have a field behind our house and unfortunately even our deck is at the sad state of repair at the moment, so I thought I'll re-create the atmosphere in the park and instead of blankets-over-corn I'll make a teepee for LoLo's birthday. Some of my inspirations: After many searches, I finally found a page with Teepee I loved and instructions that even I could follow :) HERE.

I really wanted bamboo pillars, but all the garden centers we went to had only the thin, flimsy kind. Home Depot had some wooden dowels, but they were only 4 feet long and I needed at least 6 feet long dowels. The fabric came from Ikea. Well, firstly .. Side view. Fabric Pup Tent. In the Backyard. Our backyard backs up to a cornfield. Each spring I eagerly anticipate the big, green tractor rolling by, turning the dark soil for planting. It’s probably the closest I’ll ever get to living in the country or being on a farm.

Dividing my yard and the cornfield are giant mulberry trees. Their branches and big green leaves provide shade and make our small backyard feel even more cozy. A few years ago, despite my protest, my husband cut off a lot of the branches from the tree that were hanging in our yard. Forts being one of them. I have been wanting to make this fort for awhile, but was unsure how to make it sturdy enough for the fun I knew would ensue. All it took was 4 yards of cheap fabric, some string, a few clothes pins, tea towels and an old quilt. They hung out back there all morning…reading, talking, giggling, using their imaginations. ‘Mom, look at all the shapes and shades of green in the tree. Priceless. Alison. Dreamy Teepee Tutorial. I love love love over the top dramatic things… um, well except for when my two year old goes that way, although sometimes that can be funny.

But, when it comes to photo shoots and said two year old’s room the more over the top the better. I have been wanting one of the ruffle teepees that I have seen online and in gorgeous boutiques for a while but had yet to find one for under 200 dollars. Since I don’t have that kind of mola, I decided I would have to try making my own. While it isn’t “difficult” per-say it is time consuming, and a bit of an exercise trying to harangue all that fabric while sewing ha! The secret to keeping this affordable is sheets. Um, cheap Pottery Barn sheets you say? As I mentioned before this is not technically advanced sewing but it does take a good chunk of time to do.

What you will need: One King Sized sheet or two twin sheets sewn together.Several twin flat sheets (the number depends on how fluffy you want your ruffles and how many layers you think looks good. Build Your Own Beehive-Inspired Playhouse. Build your own beehive-inspired back­yard play­house with these instruc­tions from Thought­barn. Related. DIY Hula Hoop Gnome Home Playhouse How To. Tent Week, Day Two -- Hula Hoop Dome Tent! Today's tent tutorial is by my amazingly talented sister Elizabeth.
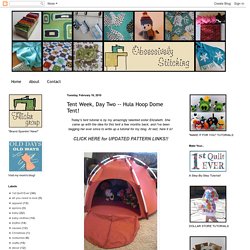
She came up with the idea for this tent a few months back, and I've been begging her ever since to write up a tutorial for my blog. At last, here it is! CLICK HERE for UPDATED PATTERN LINKS!! This adorable kid-size dome tent was made from hula hoops and bed sheets. The whole project cost less than $10! Materials: * 5 large hula hoops (84" - 90" circumference) * King size flat or fitted sheet or a twin sheet set. . * Pattern (see end of post) If using fitted sheets, cut along the seams that make the corners, and remove the elastic so the sheet lays flat.

Cut out the following pieces: 6 wedges, 1 circle with a diameter of 50", 1 door flap (three inches larger on the curved edges than the shape on the pattern, which is for the opening), 30 small tabs (4 3/4" x 3"), 6 large tabs (4 3/4" square). Trace the pattern pieces onto the sheet and cut out each piece. I used the leftover scraps to cut out the door flap. You're done! The TeePee! Last year I promised Elsie a teepee for Christmas but with more on my plate than I anticipated (duh!

This happens EVERY year) she and Jeremy had to settle for an embroidered teepee! This year I was scheming to get it done before Christmas so she could enjoy the twinkly lights and coziness a little early. There were many occasions when I had to bite my tongue so I wouldn't let my excitement slip and I didn't want to let her know I was hoping to make one in case something else came up and I couldn't finish in time. The evening before I knew I'd have it finished for sure, I had Brett call Jeremy to make sure it didn't look suspicious in case Elsie were around. Once the coast was clear I took the phone and we arranged for him to take her out to dinner and for me to get the key to the loft from Erin who would be at work in the store below.

I decided on the 8' poles because I knew I wanted a large teepee but you can always cut them down. Your front panel will have a different measurement. DIY: A-frame tent. A bit late in sharing this, but I did a guest post over at Grosgrain to celebrate Kathleen's coming patterns. For a whole month, she has a whole bunch of tutorials and patterns from talented people from all over the blogosphere. I am honored that she has asked me to be one of them.

So for you (and her readers), I made this tutorial of a fun little hideaway (see guest post here) for your little ones or maybe for you. I am sure after you make this and call your kids over to show them, they will be over the moon and will be thanking you like crazy! Drawn pattern for reference: Materials for the A-frame: 4- 1'' x 2'' x 48'' whitewood moulding 1- 3/4'' x 48'' poplar dowel drill with a 3/4'' spade bit measuring tape pencil (marker) (I was going to use the twine to make sure the mouldings stayed in place, but I no longer needed to because the hole already had such a tight grip on the dowel). 1. 2. 3. 4. 5. Materials for tent cover: - coordinating thread - elastic - scissors 1. 2. 3. 4. 5. 6. De leukste tafeltent maak je zelf of vind je via 101 woonideeën. Waarom cookies? Cookies zorgen er bijvoorbeeld voor dat je ingelogd kan blijven op een website of dat bijvoorbeeld je locatie- en taalinstellingen worden onthouden.

Daarnaast houden ze bij het online winkelen je digitale winkelwagentje bij. Ook kunnen websitehouders dankzij cookies zien hoe vaak hun sites - en welke pagina's - door bezoekers worden bekeken. Sommige cookies maken het mogelijk om je surfgedrag te volgen. Zo kunnen sites en adverteerders mogelijk iets zeggen over je voorkeuren, waardoor ze relevantere advertenties kunnen laten zien. Meer informatie over de cookies die worden gebruikt en de partijen die deze cookies plaatsen. Cookie instellingen aanpassen Je kan deze instellingen te allen tijde wijzigen. Cookie instellingen aanpassen Belangrijk om te weten: Het gebruik van cookies is veilig. Aan de lijst hiernaast kunnen de komende weken nog enkele websites van de Sanoma Media Netherlands groep worden toegevoegd. Beperkte toestemming of cookies weigeren? Waarom cookies? Sew Liberated: finnian and lachlan's studio. Oh, I love this room. I want to spend all day in it. I love the way the sunlight enters in the afternoons, making rainbows dance on the walls as it passes through a prism in the window, eliciting squeals from the toddler as he runs around trying to "catch wainbow.

" As with everything, Finn and Lachlan's studio/play room/art room is a work in progress. I'm constantly tweaking this arrangement or that activity on the shelf, like any Montessori-teacher-at-heart would. With Finn as my guide, the set-up gets more efficient, more user-friendly with each passing day. I see this room in a state of constant evolution. Here you can see the playmat with a mirror for Lachlan, along with a mobile hanger where we will rotate mobiles to maintain his interest. Currently, the toy shelf houses a few of Finn's things. You can also see that I've reserved some shelf space for my stuff. Here's the art area, which deserves a post of its own later in the week. Chalkboard: Handmade by Patrick. That should do it! "super hero' Fort Kit.

I was so thrilled when i came across this great birthday gift idea a few months ago. When Will got invited to a "Super Hero" birthday party this last weekend i knew we had to make one for his friend. It was pretty easy to put together once i located the right places to get all the stuff and thrifty too! Here's a run down of what's included: -2 Twin sheets: ARC for about $2 each -Ties on the Sheet: old XL T-shirt -Rope: Hobby lobby for about $2 -Flash Light: Dollar Store $1 -Clamps: Dollar Store $1 -Glow Sticks: Dollar Store $1 -Clothes Pins: Dollar Store $1 -Suction Cups: Dollar Store $1 -Lightening Bolt bag: Some cheap gray fabric, yellow felt $2 And thanks to SISTER who printed out this tag for me. Linking to: Skip to My Lou and SugarBee. Justina’s valentine’s day fort. There are so many different ways to express feelings of love on Valentine’s Day: some are sweet and sentimental, others are bold and celebratory.
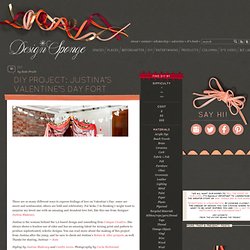
For kicks, I’m thinking I might want to surprise my loved one with an amazing and decadent love fort, like this one from designer Justina Blakeney. Justina is the woman behind the LA-based design and consulting firm Compai Creative. She always shows a fearless use of color and has an amazing talent for mixing print and pattern to produce sophisticated, eclectic designs. You can read more about the making of this project from Justina after the jump, and be sure to check out Justina’s Before & After projects, as well. Thanks for sharing, Justina!

— Kate Styling by Justina Blakeney and Caitlin Levin. CLICK HERE for the full how-to after the jump! In my family, building indoor forts was a weekly enterprise. Materials Instructions For the Fort: 1. 2. 3. 4. 5. 6. For the Newspaper Heart Garland: 1. 2. 3. For the Pom-Pom Garland: 1. 2.