
DIY Braided Hex Nut Bracelet. We’re nuts for nuts.

Is there a more versatile and inexpensive DIY component than a hex nut from the hardware store? You can imagine our excitement when we first discovered Philip Crangi’s Giles & Brother Hex Collection. Honestly, nuts braided into jewelry is WTF genius! With a few items that we always seem to have lying around, we tackled the technique and made our own spine-like braided hex nut wrap bracelet. You’ll need:3 strands of cotton butcher’s twine cut into one yard pieces18 small brass hex nutsa bit of dexterity! Gather the 3 strands of twine and tie a knot at the top, leaving about 2 inches of slack. Keep your thumb at the base of the braid, holding the nut in its place. Repeat the steps, by threading the rest of the nuts to the outer pieces of twine before they are crossed over. The bracelet should wrap around your wrist at least two or three times.
Good luck!! (top image from here, rest of images by Honestly…WTF) DIY Rope Bracelet. Climbing rope?
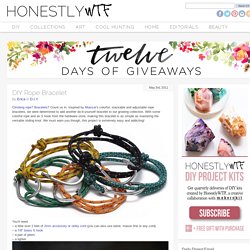
Bracelets? Count us in. Inspired by Miansai‘s colorful, stackable and adjustable rope bracelets, we were determined to add another do-it-yourself bracelet to our growing collection. With some colorful rope and an S hook from the hardware store, making this bracelet is as simple as mastering the versatile sliding knot. We must warn you though, this project is extremely easy and addicting! Before you begin, seal the tips of the cord by burning them with a lighter. Coil the cord twice around towards the left loop. Repeat the same steps on the other side. Trim and re-burn the tips if necessary. Try making the bracelets with leather cord too. (top image from here; rest of images from Honestly…WTF) DIY Wrap Bracelet. You should all know by now that we are all about stacking bracelets on our wrists.

The more, the better. In fact . . . the most, the best! With that being said, we’ll show you how to master a version of the ever so popular wrap bracelet. It’s so simple and addicting, you’ll soon be churning out these wristlets with your eyes closed. Clearly this arm party train isn’t stopping and it’s about time you get on board! You’ll need (for a double wrapped bracelet) :* Lengths will vary depending on the size of your wrist (see comments for suggestions). Fold the length of leather cording in half to form a loop. Place the ball chain along the leather cording with the end of the chain meeting the end of the wrap. Continue wrapping while checking it for fit around the wrist.
When you have reached the end of the ball chain wrap the linen cording around the leather strands 2-3 more times. Thread the hex nut through the strands and tie a second knot. Trim with scissors and your wrap bracelet is finished!! DIY Embellished Friendship Bracelets. The weather is warming up and my wrists are feeling rather lonely and bare after hiding under long sleeves all season long.

But after digging up last year’s DIY friendship bracelets, I realized they desperately needed sparkly and shiny upgrades. Today we’re showing you three easy ways to embellish your friendship bracelets, making them all grown up . . . To add rhinestones, you’ll need:a chevron friendship bracelet (tutorial found here)5-6” crystal rhinestone chain (last used here)1 yard of embroidery flossan embroidery needlea pair of scissors Thread the needle with embroidery floss and tie the end into a double knot.
Push the needle through the back of bracelet. Stitch the floss between the first two rhinestone links, pushing needle out the middle of the bracelet. Continue stitching between the rhinestone links. Your friendship bracelet is sparkling and finished! Use a Sharpie or marker to make 5 evenly spaced marks along the middle of the friendship bracelet. Keep stitching. Welcome to SaiFou – Inspiring images.