
Arduino vs. Raspberry Pi vs. CubieBoard vs. Gooseberry vs. APC Rock vs. OLinuXino vs. Hackberry A10. A long time ago, Earth was ruled by dinosaurs. Then they died and we began to play with Motorola HC11. These were prehistoric times, when debugging involved an oscilloscope. (Yes, I am that old.) Then Massimo Banzi invented a new single board: Arduino. And everyone was happy. Then the unexpected happened: David Braben invented the Raspberry Pi. The story does not end here: now we have CubieBoard, Gooseberry, APC Rock, OLinuXino, Hackberry A10, et caetera. Each one of them is different. PDF file If you see any error in this, please feel free to leave a comment below.
If you want to play it safe, you should probably go with an Arduino or a Raspberry Pi. Berryboot_a10 [BerryTerminal] Beta version for A10 devices If your A10 device comes with Android, simply point the Android webbrowser to: Download and install the .apk file found there Insert an empty SD card into your device In the Berryboot installer app: press the “write image” button and follow instructions.
![berryboot_a10 [BerryTerminal]](http://cdn.pearltrees.com/s/pic/th/berryboot-bootloader-installer-49979733)
Note: the manual installation files below are for the specific boards listed, and might not work properly on other A10 devices. The Android installer is universal and automatically patches the image with the hardware settings copied from Android (script.bin and u-boot SPL memory settings). Image files for manual installation: Cubieboard. Un article de Wikipédia, l'encyclopédie libre.
La Cubieboard est un nano-ordinateur sous forme d'ordinateur monocarte à bas prix (49 US$), basé sur des logiciels libres (mais ça n'est pas un matériel libre), permettant de faire tourner Android 4 ICS, ainsi que le système de bureau Ubuntu et d'autres distributions GNU/Linux, ou bien d'être utilisé comme un NAS. Cette carte utilise le SoC d'architecture ARM AllWinner A10 déjà populaire sur les tablettes tactiles, téléphones et PC média à faible coût. La 2e version la Cubieboard2 est équipée d'un SoC AllWinner A20 plus puissant. Le Cubietruck a suivi rapidement, la première série étant produite en septembre 2013 et la version finale fin octobre 2013.
Il s'agit d'une amélioration du Cubieboard2, avec 2 Go de RAM et un port ethernet Gigabit, une sortie VGA et une sortie SPDIF en plus. Présentation[modifier | modifier le code] Elle a été commercialisé à partir du 10 septembre 2012[2]. Spécifications[modifier | modifier le code] Arch Linux ARM. Cubieboard2 - Allwinner A20 dev board – Cubiestore. DIY NAS Enclosure for The Cubieboard. The Cubieboard with a 1GHz processor, 1GB RAM, a SATA port and its low price ($49) is probably one the best available options if you want to make your own ARM based NAS.
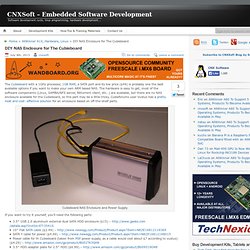
The hardware is easy to get, most of the software components (Linux, SAMBA/NFS server, Bittorrent client, etc…) are available, but there are no NAS enclosure available for the Cubieboard, so this part may be a little tricky. Cubieforums user Vustus has a pretty neat and cost- effective solution for an enclosure based on off-the-shelf parts. Cubieboard NAS Enclosure and Power Supply If you want to try it yourself, you’ll need the following parts: 3.5″ USB 2.0 aluminum external dual SATA HDD enclosure ($15) – Flat SATA cable ($2.49) – Y cable for power ($4.99) – cable for th Cubieboard (taken from PSP power supply, as a cable would cost about $7 according to vustus) ($4.29) – HDD adapter plate for 2.5″ HDD ($6.99) –
Installing Ubuntu on the Cubieboard with Berryboot. Maison du Libre Brest - projets:systemesreseaux:cubieboard. Je remercie grandement pour leur contribution : Guillaume (guillaumeplayground.net), ainsi que (les ?)
L'Inconnu(s) qui a (ont) rédigé(s) la page sur linux-sunxi.org. Vous pourrez utiliser les raccourcis copier/coller du terminal en suivant le tutoriel : copier du texte sélectionné: CTRL + Maj + C coller du texte: CTRL + Maj + V Une alimentation qui délivre au minimum 2 Ampères (+ est préférable), une carte micro-SDHC 2 Go minimum, adaptateur micro-SD/SD + lecteur carte SD, de préférence un disque dur externe 2,5” auto-alimenté d'où l'importance d'avoir une alimentation de 2A minimum, du temps devant vous (beaucoup)!!! La carte mémoire Connecter la carte mémoire et la formater avec Gparted, en FAT16. Les fichiers Récupérer : Décompresser l'image Debian Wheezy dans votre dossier /home/Downloads.
Reconstruction image Debian Le but est de reconstruire l'image Debian Wheezy sur la carte mémoire. En ligne de commande $> sudo dd if=~/Downloads/debian_wheezy_armhf_v1_mele.img of=/dev/diskX.