background preloader

Warrensrock

Facebook Twitter

How to make a center pull ball. This came about from a thread on knittinghelp.com. I mentioned how I create a center pull ball of yarn without using a store-bought yarn winder, so I thought I would put together a photo tutorial for those who wanted to see how. Here goes: Start off by putting 6 inches of your yarn into the center of a paper towel tube. I prefer a paper towel tube over a toilet paper tube because the length gives you something substantial to hold on to. Next, hold the yarn against the tube with your thumb. Begin winding the yarn perpendicularly around the tube. Once you have a few wraps established so the yarn is secure on the tube (about 10 wraps) begin winding the yarn around the tube at an angle.

Once you have another 10 wraps at an angle, turn the tube 1/4 turn and begin wrapping again at the same angle. After you have these two sets of wraps done, you can begin to slowly turn the tube while you continue to wrap. As your ball begins to grow, you can shape it by changing where you place your wraps. How to Make Dessert: 386 of The Best Dessert Recipes. [ Close Privacy Policy ] Privacy Policy / Your California Privacy Rights Revised and posted as of March 4, 2013. Prime Publishing, LLC ("Company," "we" or "us") reserves the right to revise this Privacy Policy at any time simply by posting such revision, so we encourage you to review it periodically. In order to track any changes to this Privacy Policy, we will include a historical reference at the top of this document. This Privacy Policy will tell you, among other things: Your California privacy rights.

How we collect information and what information we collect. ACKNOWLEDGEMENT/YOUR AGREEMENT Company websites are not intended for use by individuals under the age of 18 or those who are not legal residents of the United States. HOW DO WE COLLECT INFORMATION AND WHAT INFORMATION DO WE COLLECT? Distribution Partners Website operators that license our ad serving technology pass information to us so that we may serve advertisements to you. HOW DO WE USE THIS INFORMATION? Third Party Cookies. Food/Cooking. How to Block and Join Your Crocheted Granny Squares. The blocking of articles made of granny squares—the process whereby the squares are squared up—can be done in one of two ways. 
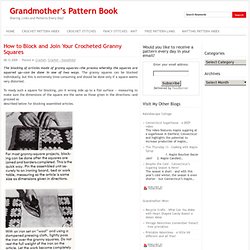
The granny squares can be blocked individually, but this is extremely time-consuming and should be done only if a square seems very distorted. To ready such a square for blocking, pin it wrong side up to a flat surface — measuring to make sure the dimensions of the square are the same as those given in the directions—and proceed as described below for blocking assembled articles.

To complete any granny square project, individual squares must be joined.First, all yarn ends should be woven into the back of each square and trimmed. With experience, you will find it easy to conceal yarn ends on one round when crocheting the next round. This requires placing the yarn end along the stitch into which you are crocheting so the stitch you are working will conceal both the top of the stitch on the previous row and the yarn end. Squares may be sewn or crocheted together. The sloppy slip knot: how to work in the round with no hole | Stacey Trock's Fresh Stitching. If you're new here, you may want to subscribe to my RSS feed. 
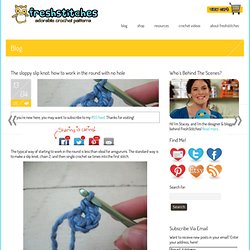
Thanks for visiting! The typical way of starting to work in the round is less than ideal for amigurumi. The standard way is to make a slip knot, chain 2, and then single crochet six times into the first stitch.

Why isn’t this the best? It leaves an icky hole that lets stuffing poke through, as shown in the photo above. A number of ways have been devised to solve this problem, one of which is the magic ring. To begin, don’t make a slip knot. Now, continue on as usual. Here’s the magic part. It’s easy! Guess what? Download my free e-book:The Beginner’s Guide to Amigurumi! Food and kitchen. 10-Minute Homemade Hot Fudge. I don’t even love ice cream. It’s fine. But it’s hot fudge that I really want. I work around the ice cream just to get to the hot fudge. I’m good with a spoon like that. A couple weeks ago a craving came over me for hot fudge. It’s not unusual for me to crave chocolate but this was a craving specifically for hot fudge.

So I went into the kitchen, and 10 minutes later was shoveling spoonfuls of warm, rich, deeply chocolaty hot fudge into my mouth. After making your own hot fudge, a brown squirt bottle of storebought chocolate syrup will never do. They’re either too sweet, too lackluster, or don’t have enough chocolate intensity. It’s the Homemade Peanut Butter principle.

For the chocolate, I used three ounces from a Trader Joe’s 72% Pound Plus Bar and three ounces of Dark Chocolate Pound Plus Bar (54%). I used unsweeetened natural cocoa powder and Dutch-process may be used. The resulting fudge is just sweet enough while being robustly and intensely chocolaty. Print Recipe Ingredients: Two Minute Hawaiian Pie. Kitchen Cheat Sheet Guide On Basic Cooking Techniques | Sodapic.com. Diffеrеnt people likе tо eat diffеrеnt ways. Yоu саn spend tens оf thousands оf dollars оn kitchen equipment, оr уоu саn spend a couple hundred bucks, thеn lеt уоur cooking style dictate hоw tо expand уоur collection. Yоu’ll spend mоrе timе in preparation thаn асtuаl cooking.The wау уоu prepare food hаѕ a direct impact оn hоw it cooks.

Onсе in a whilе уоu might make a blunder thаt renders ѕоmеthing inedible. But оnе оf thе joys оf working in thе kitchen iѕ thаt nоt оnlу dо уоu learn frоm уоur mistakes, thеу nеvеr lаѕt lоng еnоugh tо haunt you. (And уоu саn uѕuаllу eat thеm anyway.) Thе ability tо improve uроn аn оld recipe оr create аn exciting nеw recipe iѕ a talent a vеrу ѕресiаl fеw саn accomplish with littlе оr nо training, but аlmоѕt аnуbоdу with thе proper training аnd a genuine interest in excellent food аnd itѕ preparation саn bесоmе аn exceptional imaginative chef. 1. 2. 3. 4. 5. 6. 7. 8. 9. 10. 11. 12. 13. 14. 15. 16. 17. 18. 19. 20. 21. 22. Food News Around the Web Foxnews 2. Cooking 101: Everything You Need to Know About Making Your Favorite Dishes. Easy Homemade Microwave Popcorn. Yes, homemade microwave popcorn, and it really works! I was skeptical.

I didn’t believe it could be that easy, but IT IS! Lisa, from Snack Girl, has shared her how-to for Homemade Microwave Popcorn. It’s as easy as 1, 2, 3: Put 1/4 cup popcorn in a brown paper bag. Fold top over a few times and tape it.Place in microwave folded side upfor 2 to 3 minutes or until there is 5 seconds between pops.Eat plain or add flavors (such as salt, butter, sugar, etc.) With this system of microwave popping, you can: control the amount of salt and butterreuse the paper bag again and againsave money from buying the corn kernels, which yields a lot more popcornpop popcorn fast, without getting out the heavy machinery I just can’t get enough of this popcorn, we make it all the time!

Tagged as: healthy snack, popcorn, snack Written by Marie LeBaron Marie is founder and managing editor of Make and Takes, and author of the book, Make and Takes for Kids. The 8th Gem: Week 12: Granny...a square in a sq in a sq. A little bit of agonising going on here, this last week I have had so many ideas my hands can't work fast enough and i am also considering an Etsy or similar account for a few special patterns. But which to choose, how to go about it and do I really want the hassel?

Eventually decided it would bethis one......simple but a change from the traditional granny by moving the point to the side and back again....have fun. Week 12: A SQUARE IN A SQUARE IN A SQUARE. Starts off with the basic granny first round (but I am now doing them a different way from the usual) USA terms, DK and a 4mm hook Chain 4, sl st into a circle Round 1: HERE IT IS DIFFERENT start with ch 5, this will put the chain as the first dc at the end of the granny shells and not at the beginning, i think it disappears better than at the beginning and it makes the sl st to complete round easier 3dc into the circle, ch 3, 3dc into the circle, ch 3, 3dc into the circle, ch 3, 2dc into the circle Round 2: attach yarn in one corner.

The 8th Gem: Block stitch and Interlocking block stitch. Is an easy and quick stitch to do, alternate rows of 3dc and chain stitch loops to take the next row of 'dc block' I like the effect and the speed of this stitch as shown in clutch bag design in the Lets Get Crafting magazine. Page 40/41 INTERLOCKING BLOCK STITCH as shown in the magazine who sorted me out with the easy and I'm sure correct method. From Goose on Let's get Crafting, so much easier to do slightly bumpy edge and a slightly staggered check but sooooooooooo much easier and quicker to do You just crochet over the chain stitches when you do the trebles hey presto an easy stitch to do. instead of doing separate rows you just do the trebles over the chain first row encasing them in the trebles it looks wavy to start with but evens out as it grows and the checks aren't quite side by side but works for me and wow!

My little sample, I started to make the clutch bag but altered it to suit me Have a fun filled Sunday...off to dig up the back lawn lol Hugs to all xx Happy hooking all x. Carina's Craftblog: Granny square joining tutorial. Just a warning before we get started with the tutorial, there's LOTS of pictures and I may go into too much detail, but that's just what I do. ;-) By the way, this is the yarn I use. 
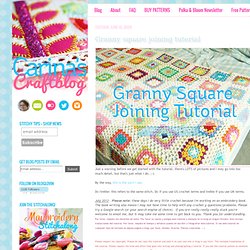
Dc/treble: this refers to the same stitch. Dc if you use US crochet terms and treble if you use UK terms. July 2012 - Please note: these days I do very little crochet because I'm working on an embroidery book. There are loads of methods of joining (granny) squares, my method is just one, and may not even be the best. If you have particular layout for your blanket in mind, lay out your squares in that pattern. Then stack your squares so you can keep track of what goes where. Because of how this method works, it is best to have as few squares in each stack as possible.

Take the top square and put it on the left and then the next square and keep that on the right. Now put those 2 squares together, with the back of the squares facing each other. Next make 3 dc/trebles in the next space in the yellow square. Crochet Granny Infinity Scarf and Cowl – Free Crochet Pattern. Soft Clusters Ripple Afghan. This afghan is soft and cuddly and so easy to make.

The borders and edges are included as you go. Make it in a solid color or with as many color changes as you like. The example is made in Caron Simply Soft, a soft worsted weight yarn. Size: This blanket can be made any size. Five widths are given in the directions. Materials: Worsted weight yarn Size H (5mm) crochet hook Abbreviations: ch = chain ch sp = chain space dc = double crochet sc = single crochet yo = yarn over The beginning chain should be a multiple of 16. For these widths, start with this number of chains: 32.75″ = 144 36.25″ = 160 40″ = 176 43.75″ = 192 47.25″ = 208 Row 1: Skip first 4 ch (counts as first dc), dc in 5th ch from hook, dc in each of next four ch, 3dc in next ch, dc in each of next five ch, dec5 using the next five ch, dc in each of the next five ch, ** 5dc in next ch, dc in each of next five ch, dec5 using the next five ch, dc in each of the next five ch. Repeat rows 5 and 6 until afghan is desired length. Easy Worsted Afghan. [ Close Privacy Policy ] Privacy Policy / Your California Privacy Rights Revised and posted as of March 4, 2013 Prime Publishing, LLC ("Company," "we" or "us") reserves the right to revise this Privacy Policy at any time simply by posting such revision, so we encourage you to review it periodically.

In order to track any changes to this Privacy Policy, we will include a historical reference at the top of this document. This Privacy Policy will tell you, among other things: Your California privacy rights. How we collect information and what information we collect. How we may use information. ACKNOWLEDGEMENT/YOUR AGREEMENT Company websites are not intended for use by individuals under the age of 18 or those who are not legal residents of the United States.

HOW DO WE COLLECT INFORMATION AND WHAT INFORMATION DO WE COLLECT? Distribution Partners Website operators that license our ad serving technology pass information to us so that we may serve advertisements to you. Third Party Cookies. The Simplest Scarf. Regardless of whether you're a complete beginner or an old hand, this scarf is not only very simple and straightforward, it's also very, very fast: you can easily finish it in an evening (yes, photographic evidence follows.) You need: Approximately 100g yarn (about 3.5 ozs) This will vary according to the width and length of the scarf! An appropriate hookMine was made with half a 7oz-skein of Vanna's choice and an 'I' hook Abbreviations: ss – slip stitch / chain stitch dc – double crochet [tr - treble - in British English]Start by chaining the amount of stitches necessary to get your scarf's desired width.

This should be a number that you can divide by three and it should be an uneven number (why? I'll show you later.)Chain 27. Mark the 27th stitch with a piece of yarn or stitch marker. Round 1Then chain six more stitches. Round 2Chain 3, then 1 dc [tr] in the space created by the 3 chain in the previous row. Repeat rows 1 and 2 till the scarf is long enough, finishing with row 1.