
Lego Gift Boxes (With Free Templates) 53K+ These lego gift boxes are really simple to make.
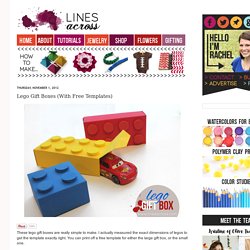
I actually measured the exact dimensions of legos to get the template exactly right. You can print off a free template for either the large gift box, or the small one. Large Lego Gift Box (8 Dots) Small Lego Gift Box (4 Dots) What you need: 1. Ribbon Gift Bows. I recently saw this wonderful gift bow tutorial from The Container Store.

(Open the PDF called Guide to Gorgeous Gift Presentation). When I tried making these bows myself, I found that it was a little bit difficult to keep all of the layers together, so I made a couple of slight changes. You can use many different kinds of ribbon and make different variations (check out the original link for some great ideas). I used 1 inch wide sheer organza ribbon. I am also a huge fan of Christmas turquoise. 1. 2. 3. 4. 5. Turn baby scribbles into bows (Gift Bow Tutorial) Benjamin and Lyla both love to color, but right now all they do is scribble.

I have stacks of sheets that Benjamin has colored all over and I was hoping to do something fun with them. I saw this tutorial at Smile Monsters for making your own paper gift bows and I immediately wanted to turn the scribbles into bows. These are such a great idea for wrapping presents (especially for the grandparents). Lyla helped color with markers. She loves the little (very washable) markers and gets them all over her face and hands. How to Have a Happy Easter! Happy Easter weekend!

Whether you're religious or not, it's a great time for friends, family, food and FUN. And if you're still looking for a few last-minute creative ideas, we've rounded up all of our Easter-inspired posts from the past couple of weeks. Try a few for yourself this weekend and let us know how it goes! The 8 Best Virtual Easter Eggs Online Tie Dye Cake Pops 9 Ways to Play With Peeps Easter Egg Pops Colorful Coconut Nests Peep Krispie Treat Baskets Dress Like a Bunny! 12 Days Of Wrapping: Pom Poms. We know.

Pom poms are one of those crafts that have been around for years and years, and we simply can’t get enough of them. They are great to add to scarves, make wreaths out of, hang from the ceiling, and today, they are picture-perfect present toppers. We’ve seen dozens of tutorials involving cardboard circles, popsicle sticks, extensive exacto-work, pom pom makers, and more but at Brit we’re all about simplicity. We scoured around the studio for a few string-like things and came out with a pretty adorable quintet of gift-ready pom poms using yarn, dry cleaning bags, a t-shirt, tights and string.
For wrapping, we used recycled packaging paper that came in a recent Christmas shopping session on Amazon. Materials: – yarn – 1 leg of colorful tights (you know we love them) – white string – dry cleaning bags (those clear plastic bags that aren’t really bags) – t-shirt If you’re using plastic bags, tights or a t-shirt, you’ll have to cut the item into long strips first. We tried two methods. DIY Mini Christmas Tree Paper Ornaments. Happy Holidays, all!

It’s Chelsea here, ready to deck the halls and all that jazz! Don’t you just love the holidays? That little extra excitement in the air just does me good. So let’s get down to business. Today we’re working on a little project that you can use to decorate just your tree, or your whole house if you like! Supplies - printed paper (vintage books, used newspaper, old magazines all work. First, print out the tree template. Gently, start creasing the pages right at the base of the staples, so that they fan out. For bonus DIY points, spray a very small amount of glue over the tops of your trees, and then lightly sprinkle with some fine glitter.
Then just add your choice of hanging device! Now display them however you like! {Photos by Lovely Indeed for The Sweetest Occasion.} DIY Mini Christmas Tree Paper Ornaments. Holiday DIY Projects [continued] Hello hello. i am back with more cute DIYs for Holiday gift giving!
![Holiday DIY Projects [continued]](http://cdn.pearltrees.com/s/pic/th/projects-continued-beautiful-33432956)
If you missed project one you can see it right here. 2. Laptop Sleeve and Sash [a gift for guys] by Katie supplies needed: cotton fabric [i had one print and a coordinating solid], felt, double sided fusible interfacing, elastic, measuring tape, straight edge, scissors/rotary cutter, pins, pen, paper, sewing machine, thread. 1.