
Thread sketching on fabric: techniques and tips. Recently I've done a little free motion machine embroidery, or thread sketching.
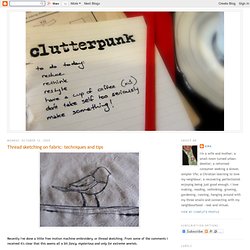
From some of the comments I received it's clear that this seems all a bit fancy, mysterious and only for extreme sewists. It's not. So I've written this post to demystify the process of 'thread sketching', and hopefully some of you will be encouraged to give it a go. Disclaimer: I am no expert. I do not hold a degree in thread sketching. Tools: FABRIC & NOTIONS- A piece of plain, preferably medium-weight cotton or linen (i.e. woven) material.
. - Just your regular sewing machine, set up with your regular sewing foot and a universal needle. - No, you do not need a special foot, or to lower your feed-dogs. That's right, 'free motion' does not mean '100% improvised'. Stuck for a design? Techniques 1. Using an air-soluble marker, draw your design on. 2. Now you want to 'draw' over the outline with thread, just once, to make it clear on the fabric: When negotiating turns and curves, just go slowly. Installing an Invisible Zipper. Zippers can be daunting even for experienced sewers.

The reason? Zippers are often installed the wrong way. Lots of seam ripping and swearing ensues, especially when it’s a simple mistake. There’s no need to be scared of zippers anymore! We’re here to help. With this tutorial we cover how to install an invisible zipper. Items Needed: invisible zipperthreadscissorspinsinvisible zipper footzipper footgarment Before we start, take a look at the back of your invisible zipper. 1. Zipper tape is usually smaller than 5/8″ 2. Place the pins parallel to the zipper 3. 4. Sewing slowly helps prevent the fabric from puckering 5. 6. Double check your zipper before sewing. How to Fix a Broken Zipper - Zipper Repair. Sew Serendipity: Don't Fear the (invisible) Zipper. Today I am going to talk about the dreaded zipper.
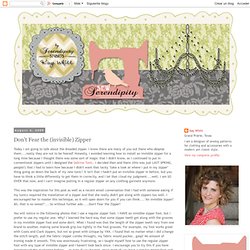
I know there are many of you out there who despise them....really they are not to be feared! Honestly, I avoided learning how to install an invisible zipper for a long time because I thought there was some sort of magic that I didn't know, so I continued to put in conventional zippers until I designed the Sabrina Tunic. I decided then and there (this was just LAST SPRING, people!) That I had to learn how because I didn't want that tacky "take a look at where I put in my zipper" thing going on down the back of my new tunic!
It isn't that I hadn't put an invisible zipper in before, but you have to think a little differently to get them in correctly, and I let that cloud my judgment....well, I am SO OVER that now, and I can't imagine putting in a regular zipper on any clothing garment anymore. You will notice in the following photos that I use a regular zipper foot. Here goes: Tutorial: Invisible Seams, The Hidden Stitch. To close up a seam without showing any stitches you can use the hidden stitch, sometimes it is also called a ladder stitch.

This is a really useful stitch to use when you are closing up stuffies, a turning hole or binding the edge of a quilt. 1. Thread your needle and tie a knot on the end (I’m using red thread in this tutorial just so it will show up better) 2. Insert the needle from the inside out and pull it through until the knot catches. All in the Details.