
Customizable Paint Deck. Do you ever find yourself shopping for furniture or textiles for your home and wish that you had a your paint colors with you to refer to?
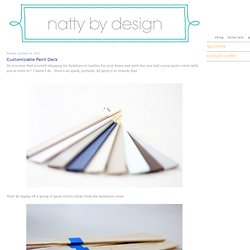
I know I do. Here's an quick, portable, $2 project to remedy that. Start by taping off a group of paint stirrer sticks from the hardware store. Grab your different wall colors. I keep a little of each one in labeled mason jars above my microwave. Paint the bottom portion of the stirrer sticks. Add a metal ring. Write the names and brand of your paint on the backside of each stick. Now you have your own customizable paint deck to refer to. Aging is so Distressing – Techniques for Antiquing Furniture. Well, despite the fact that I am starting to feel my age, this post is actually about achieving that well worn, loved, aged and antique look on furniture and decor items.

Aren’t these layers of paint, scratches and wear marks art to your eyes? Nothing shows character like chipping paint and multiple revealed layers on metal. Weathered paint worn thin and rubbed off. or paint splotches on an old ladder. And you can’t forget rust, love that beautiful brown patina! I have been experimenting with several techniques to add age to “newer” pieces of furniture. Throwing the chain in: These are a few of my favorite distressing tools: Throwing a chain at wood gives you those elliptical dents. Sanding through the years: The easiest way to add some age and expose layers of paint is to pull out a power sander. A table that was previously painted white received a beachy blue layer of paint on top of the white. Darker wood showing through adds instant age. It is important to use a old shaggy brush. Silver Leaf Dressers. I love the glam factor that mirrored furniture can bring to a room!
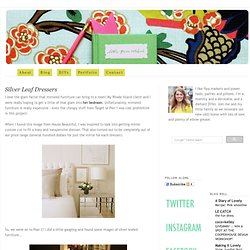
My Rhode Island client and I were really hoping to get a little of that glam into her bedroom. Unfortunately, mirrored furniture is really expensive - even the cheapy stuff from Target or Pier 1 was cost prohibitive in this project. When I found this image from House Beautiful, I was inspired to look into getting mirror custom cut to fit a boxy and inexpensive dresser. That also turned out to be completely out of our price range (several hundred dollars for just the mirror for each dresser). So, we were on to Plan C! We both thought the silver leaf was a good alternative and decided to take the plunge.
Once home, each dresser was lightly sanded over the chipped parts and then given a coat of chocolate brown paint (Ralph Lauren's 'Galvenized'). The gilding size acts as the glue that holds on the leaf. There are many types of metal leaf. Here are my best tips for gilding: Furniture Painting Tutorial and Tips! « The Cerniks. Over that past year, I have tackled several painting projects.
Some have gone well…and other terribly wrong. I spent so much time online searching for tutorials and trying what each recommended. We have finally mastered our technique and I wanted to share what we find the best. P.S. We are lazy and impatient DIYers….so trust me, this really is the easiest and quickest way to get a great finish! As newlyweds and new home owners, we have an empty house that needs A LOT of furniture. 4 steps and you are done!
Step 1. Every piece of furniture must be prepped. We needed to get rid of the pre-loving on our tabletop, so I sanded it with our orbital sander. For pieces with deep ruts or dents, I suggest Elmers wood filler with a little sanding after it dries. If you have a piece that doesn’t require sanding (or if you just don’t want to), give the furniture a good cleaning with a TSP product. Step 2. Priming is very important…don’t skip it! Everything can go wrong at this step…so listen carefully!