
Hokuri Nails Are The Most Kawaii Form Of Nail Art Ever. It's So Easy Nails. My first time using nail foils - Its so easy! Tutorials. For an excellent video tutorial check out NailsKathy’s video.
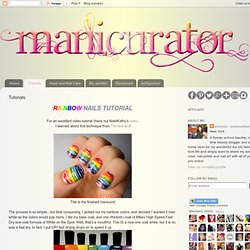
This is the finished manicure! The process is so simple...but time consuming. I picked out my rainbow colors, and decided I wanted it over white so the colors would pop more. I did my base coat, and one (thickish) coat of Milani High Speed Fast Dry one coat formula of White on the Spot. Well, that's a mouthful. Zoya: America, Lianne, Creamy, Midori, Yummy, Ibiza and Zara To make the Rainbows: 1. 3. 5. 6. And that's it!! Just snapped some pics to help you see how I apply loose glitter, which I purchased from Michael's craft store. Start with your usual base coat and first coat of polish. I use the smallest dotting tool I have, it's almost needle like. Paint your second coat on one nail at a time.
Just touch the dampened tool to a glitter and it will usually stick onto the end. The finished look. Hope this was helpful!! Tutorials. We get a lot of emails asking how to use brushes correctly so I hope this helps you out a little!

A brow brush is designed to be stiff and angled for a reason. And we use the slanted edge to shade and the tip of the edge to outline. 5 EASY Halloween nail designs. Halloween Nail Tutorial (Bats!) Easy Galaxy Nail Art. How to Paint Nails With Your Left Hand (with pictures) Snoopy Nail Tutorial. NAIL ART TUTORIAL: WRAPPED WITH A BOW « polishyoupretty. Posted by polishyoupretty on 05/06/2012 · 5 Comments We at PYP are getting out girl on & what better way than with bows! We are constantly inspired by Wah Nails & they always have these adorable nails with polka dot bows so we thought we would give them a try! Step 1: After applying a base coat, paint nails with 2 coats of Misa – Pay Days are Happy Days. This shade is one of our favourite neutrals & we use it all the time as a base for nail art design – it has a dried clay look that works perfect. Step 2: Using a dotting tool in Essie – Red-y Set Ex, begin by dotting one big polka dot at the base of the nail for the middle of the bow.
Step 3: Once the base of your bow has dried, dot tiny white dots over the bow using China Glaze White On White. These are too adorable – we love how they turned out! How To Do A Reverse French Manicure. Cute and easy Snoopy nail art tutorial. SNOOPY AND WOODSTOCK spring design: robin moses nail art tutorial. Peanuts Characters Nail Design + tutorial. 27 Nail Hacks For The Perfect DIY Manicure.
* Nail Art Ideas - Tutorials. Nail art tutorial. Nail art Nail art is everywhere right now, from the pages of top fashion magazines to the nails of that cool girl who works at the coffee shop on the corner.
It’s even popping up on the red carpet (did you catch Zooey Deschanel’s tuxedo nail design at the Golden Globes this year?). Nail art can be intimidating at first, but don’t worry, you can totally do this! You don’t need an artistic background or a particularly steady hand – all you need is creativity and a touch of patience. We’ve put together three nail art designs that anyone can rock, whether you’re a nail art newbie or a manicure master. You don’t need to buy expensive nail art tools – almost all of the supplies we use can be found around the house, like Scotch tape, bobby pins and Q-tips. QUICK EASY TO DO FLOWER NAIL ART DESIGN. EASY TO DO NAIL ART DESIGN TUTORIAL BLACK WHITE PINK. BLACK AND GOLD HALF MOON NAIL POLISH TUTORIAL. Vintage Roses Nails. ๑۩๑ Nail art, made simple! ๑۩๑. #74 DIY: How to Make 5 Different DottingTools. ♥♦APRIL SHOWERS BRING MAY FLOWERS NAIL TUTORIAL- Monarch Butterly Nails ♦♥
EASY CUTE FRENCH TIP TWIST TUTORIAL (My Birthday/ Easter nails) Monarch Butterfly Water Marble. Rockabilly polka dots and roses nail art 668 gatorade. Dry Water Marble Nail Tutorial. Bumblebee Water Marble Nail Art Tutorial (Water Marble March #8) How To: Border Nail Manicure. Splatter Nails Tutorial! Nail Art Alert! How To Get Ombre Nails At Home : Girls in the Beauty Department: Beauty.
Here's my step-by-step guide to getting the fun and fabulous ombre nail art look at home.
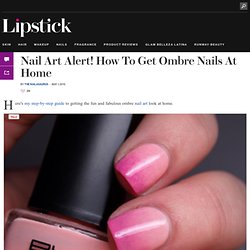
Before you start, make sure you have everything you need and that it's easy to reach from wherever you're sitting. It's also a good idea to make a quick trip to the bathroom. There's nothing worse than creating an awesome mani and then ruining it because you didn't plan ahead! What you'll need: Two color polishes and a topcoat. A sponge, a plastic sheet and toothpicks. If you don't have any of these plastic wallets in the house, raid the kitchen cupboards for some foil or baking paper. The Fun Part! Step 1: Using the lightest of the two colors, paint your nails and wait for it to dry completely. Step 2: On a flat surface, paint a generous amount of the colors right next to each other on to the plastic. Step 3: Using a toothpick, swirl the two colors together in where they meet. Step 4: Take your sponge and dab it directly down on to the polish a few times. Penguin Nails. Nemene: panlovespolish: Penguin nail...
Leopard Accent Nail Tutorial. Sugar skull nail tutorial. "For Audrey" French Tip Tutorial. Nail art "pink bow" polka dot design step bt step tutorial. Watermelon nails tutorial. Pointy Moon Manicure (First Attempt) This weekend, I tried a moon manicure for the first time... well, something that resembles a moon manicure, that is.
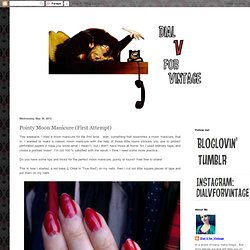
I wanted to make a classic moon manicure with the help of those little round stickers you use to protect perforated papers (I hope you know what I mean?) But I didn't have those at home. So I used ordinary tape, and chose a pointed 'moon'. I'm not 100 % satisfied with the result, I think I need some more practice... Do you have some tips and tricks for the perfect moon manicure, pointy or round? This is how I started: a red base (L'Oréal in 'True Red') on my nails, then I cut out little square pieces of tape and put them on my nails. Then I applied a black polish (LA Colors in 'Circuits') on top of the red polish and over the tape.
I removed the tape, very gently, when it was still wet. The edges aren't perfect, which annoys me, but overall it's okay for a first attempt. Bobby Pin Paint Splatters Nail Tutorial! Nail Tutorial: Spring Time Strawberries. How to Paint Your Nails With Newspaper: 6 steps. Edit Article Edited by Elyne, Flickety, Emma, Theburn7 and 101 others Nail art might seem difficult but it's not and you can create some incredible effects yourself at home. In this tutorial, you'll learn how to make newspaper nails, which gives new meaning to having the latest information at your fingertips!
Ad Steps Newspaper Nails Step 1.360p.mp4 00:00 00:08 00:08 spaceplay / pauseescstopffullscreenshift + ←→slower / faster (latest Chrome and Safari)←→seek . seek to previous 12…6 seek to 10%, 20%, …60% Make Newspaper Nails Step 1.gif1Assemble all the items needed for preparing your nails. Video Tips Warnings Be careful, and consider doing your nails over a newspaper, sink, or even towel.Fingernail Polish remover will not work in place of alcohol, but it has been used in a different version for newspaper nails.Press the newspaper firmly on to your nail; otherwise, the transferring ink will be incomplete on your nails.
Sources and Citations Article inspired by the Cute Polish video on YouTube. Chalkboard Nails: Valentine's Owl Nail Art Tutorial. So, it has become pretty clear that you guys really liked my Valentine's owl design!
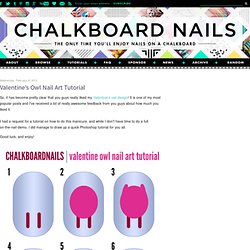
It is one of my most popular posts and I've received a lot of really awesome feedback from you guys about how much you liked it. I had a request for a tutorial on how to do this manicure, and while I don't have time to do a full on-the-nail demo, I did manage to draw up a quick Photoshop tutorial for you all. Good luck, and enjoy! Using a striper brush, paint on two small lines for legs.Grab a nail art brush and paint a fat circle on top of the legs. I used a flat ended brush.In the same color and with the same brush you used for step 2, paint on two tufts at the top of the head.Take the large end of a dotting tool and put on two dots of white for the eyes.
By the way, feel free to replace "nail art brush" with small paintbrushes or whatever you can get your hands on. How to Master the Art of Ombré Nails. Nail czarinas, because y'all regularly demonstrate how (scarily) well you know your shit, I come to you with a question: my gf loves doing her nails and hates when they start to chip, stripping the polish when it starts to get even a little rough (in stark contrast to my own patented 'leave single toenail painted for like a year' method).
However she has both sensitive skin and brittle, fragile nails, and the polish and remover do neither any favors—the remover seemed to weaken her nails, actually. It got so bad she stopped using polish altogether: obviously a shame as it's something she loves.