
Coffee Filter Flowers Hello lovely readers, Apologies for the delayed post today. This post was originally one sweet little DIY tutorial all set to go live at 9am this morning then I got immersed in the intoxicating world of coffee filter flowers and ended up adding another and another until I was up to my eyeballs in coffee filter tutorials and inspiration! So it took waaay longer than expected but I do hope you’ll find it useful. If you’re looking for a cheap, simple and pretty DIY project for your wedding, coffee filter flowers could be just the thing! photo via Just Simple Designs Who knew coffee filters could look so pretty? The great thing about coffee filter flowers is that they can be used in so many different ways, from decor (they’d make a mean ceremony backdrop) to centerpieces, place settings, wreaths and, if done in miniature, they’d look so sweet attached to escort cards or favor boxes! You could even create a bunch of them, attach them to ribbon wrapped florist’s wire et voila! Dying Coffee Filters
paper cut project | The Neo-Trad I stumbled across these paper cut wigs last night and can’t stop thinking about them and all their intricacy. Aren’t they so very sculptural and fabulous? Yes, I would like one for display in my apartment. Tissue Paper Carnations Today is the start of Flower Week on Folding Trees. Every weekday, I will be showcasing different types of paper flowers. You may be surprised at the variety of flowers you can make using different paper craft techniques! If you know of any amazing flower tutorials I should include in my round-up, let me know! When I had the idea for Flower Week, I thought I would kick off the week with some flowers that I made myself. A vase of pretty tissue paper carnations! Want to make your own? This tutorial is Donationware – the instructions are available for free, but if you like it please consider sending me a donation (via my other website, PlanetJune) to show your appreciation: Send me a donation and receive the easy-to-print PDF version of the tutorial as a thank you! Donations of any size are much appreciated. The complete instructions are available below, regardless of whether or not you choose to pay for them You will need: Continue to colour around the edge. ..Erm, yes.
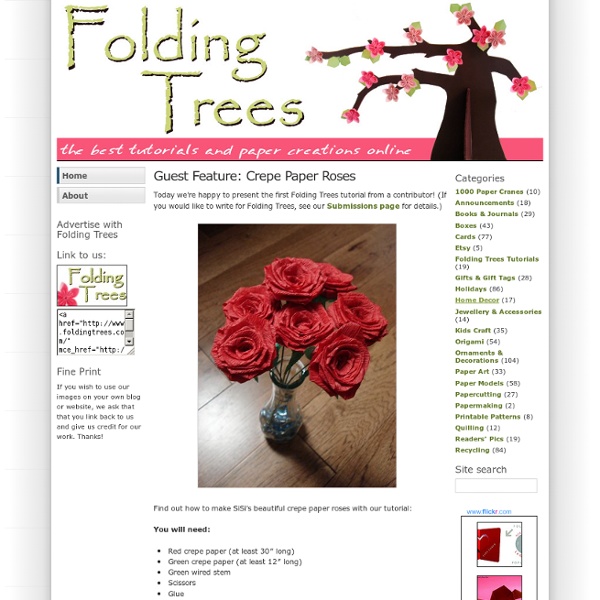
Decorate Flowers Hey all! Here's a fantastic set of ideas from our own Nancy Doren to help you have more fun and get more bang for your buck! Altering Prima Flowersby Nancy Doren The February Passion kit contains beautiful Alabaster Roses from Prima Marketing. They’re the perfect canvas to try out some fun techniques to make your layouts a little more special! Start by separating the flowers into layers. You can try... Stamping Ink your stamp with dye or chalk ink (pigment ink will not dry sufficiently) Press the stamp over the paper flower. Spray Ink Did you know you can make your own spray ink? Spray your flower (make sure you use something to cover your work surface... after it dries, acrylic paint is hard to remove!). Watercolor + Glitter I love to use my Prang watercolors on my scrapbooking projects. Dip a paintbrush in water, then in the paint. Add a sparkly finish by applying Stickles glitter glue (I used the green Ice Stickles from the Renewal kit) along the edges of the flower’s petals. Cutting Love,
untitled 26 Iteresting DIY Ideas How To Make Bows Home > DIY > 26 Iteresting DIY Ideas How To Make Bows By Fashion Diva on April 12, 2013 Hey fashion lovers! Take a look around you and I bet you can notice bows everywhere and on anything. From our partners Origami Roses The sight of these classy chocolate roses got me into a serious mood to make roses, paperwise that is. And I ended up making 3 different kinds cos’ they look so beautiful that I couldn’t wait to learn to make them all! 1. Kawasaki rose I first tried the Kawasaki rose, named after its creator Toshikazu Kawasaki, by following this demo and cross referenced with another demo [part 2|3]. Notes: There were several steps I had no idea what to do, so after some struggling and hair-pulling, I finally figured out what was going on EXACTLY! 1. 2. 3. 4. 5. 6. 7. 8. 9. 10. 11. 12. 13. 14. 2. I watched this demo to make the Bird base rose created by James Sakoda. 3. 3. Followed this demo to make this rose bud. Both centre creases must be well-creased mountain folds, so that the folding up of each quarter will be easier. The real beauty of all these three roses is they are not too complicated to make once every step is laid out clearly and every intended fold well-creased.
Duct Tape Flower What up duct tape? Did you miss us?! For today’s bit of DIY accessory magic, we’ve figured out how to turn 3M’s Scotch Color & Patterns Duct Tape into gloriously neon rosettes. Materials: - duct tape - scissors - ruler - accessories: earring backs, barrettes, comb clip, pin We used an array of neon duct tape as well as a fun snakeskin pattern as an accent for the hair accessory. We’ll start by showing you the step by step for our turquoise rosette ring. Repeat until you’ve folded all 20 pieces. Twist the first one into itself so it looks like the photo above. Cut off the bottom of the rosette so that you have a flat surface to attach your ring. Don’t worry about being gentle – duct tape is ridiculously durable! To make a ring, simply fold a piece of duct tape over itself lengthwise, roll into a ring and tape. For the hair piece, do the same thing as above but leave the pieces at 1 1/2 inches. To attach the hair comb, use skinny strips of duct tape.
flower wallpapers beautiful flower petals wallpaper 34189 10868004 1394578214172012 773888827157522283 n Toilet Roll Easter Chicks for Kids If you’re looking to make some easy Easter Crafts for Kids, you’ve come to the right place! We have Easter Finger Puppets, Easter Napkin Rings, and everything in between! Today, we’re making these adorable Toilet Roll Easter Chicks in nests made of shredded paper. The supply list is short and sweet, and you’ll be using materials that you likely already have around your home. What you’ll need to make your Toilet Roll Chicks: toilet rollsgoogly eyesyellow tissue paper (or fabric scraps if you’d rather)yellow paint (2 or 3 shades if you have them)orange foam or paper (beak)shredded brown papercardboard (cereal box weight) I was kind of “winging it” (pardon the pun) as we went along, so some of the materials that you see on the tray got swapped out for different things as we went along. To make your toilet roll Easter chicks: I cut the toilet rolls down a bit to make the chicks shorter, and the Hooligans painted them with two shades of yellow paint. Making our shredded paper nests:
Autumn Flower Wreath Today I have a tutorial of sorts to share. It is not a full tutorial because 1. I learned to make the flowers from an already pretty amazing tutorial and 2. I left my camera in Ryan’s truck and was too impatient to wait to put it together until he came home so I don’t have photos of the actual attaching to the wreath phase of the project. This wreath is a combination of a regular grape vine wreath you can purchase at the craft store, lots of coffee filter flowers and a few acorn and berry sprigs. Okay, so on with the tutorial. I wanted fall-ish colors for my flowers, so I used yellow, pink, red and orange paint. Mix your paint with water, stir well, scrunch in a stack of coffee filters and let them soak up the paint. I dried some flat on paper towels, but then ran out of room and made a clothes line to dry the rest. Okay, now on to the flower making part. For flower #1, fold three coffee filters into quarters, cut a scalloped edge along the top and then a scalloped center.