
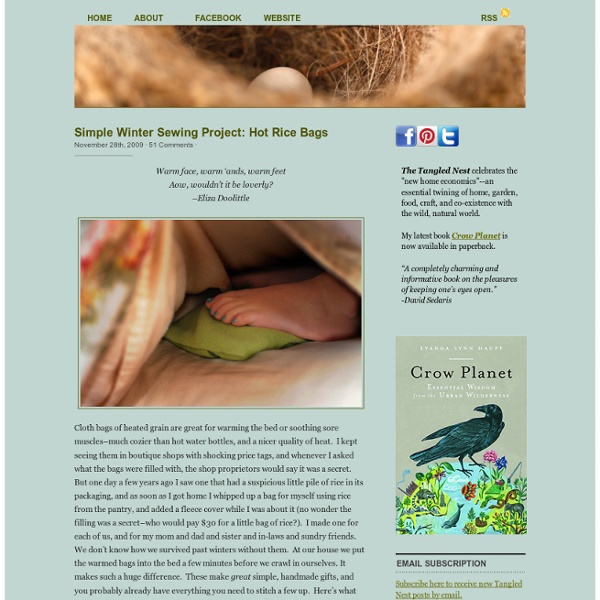
Snow-Globe Soap Dec19 by Brenda Ponnay Stuff their stockings with something they can wash their hands with!By Brenda Ponnay What’s cuter than a button, small enough to fit in a stocking, won’t rot your teeth and leaves you squeaky clean? This is technically just “melt and pour” soap so it might be considered cheating to some hard-core soap enthusiasts but I’m not about to mess with lye or distilling vodka when I’ve got a small child acting as my personal assistant. First you’ll cut up the glycerine into 1-inch chunks. Don’t be fooled by the picture above. After you’ve poured the glycerine, let it cool just enough to form a thin skin on the top. After all your toys are arranged, you can add your snow. Next you’ll pop it in the freezer for about twenty minutes or until the cubes are cool to touch from the underside of the ice cube tray (be sure to check the middle). I used a small paring knife to shave off some of the irregularities on the bottom but that was purely aesthetic.
Saltwater Kids: RETRO DUFFEL bag TUTORIAL Boys, boys, boys. The silly things they say and do keep me laughing all the time. In fact, as I was working on this post my three year-old came blasting by, one arm outstretched, clutching his toothbrush, shouting (in a deep manly voice) "Oh, Mr. My favorite part of making this tutorial, by far, was the photo shoot. I am so excited to share this project with you because it is as fun as my two silly boys. The design of the RETRO DUFFEL is based on the original Duffel Bag - the manliest of all the bags in the luggage family. This is a miniature version of the typical duffel bag, perfect for an overnight stay at Grandma's, hauling gear to the big game, or for storing my all-time favorite gift - the FORT KIT! OK, lets get started! Materials: 1/2 yard Fashion Denim (or similar fabric) 16” SEPARATING zipper* (the key to this project is the separating zipper)Jean/denim sewing machine needle 76” of 1½” wide webbing OR make your own (77” X 6” white fashion denim, or similar fabric) Cut: Pin and sew.
- StumbleUpon we blessing sisters have loved notepads, notebooks and all things paper since our first wide-rule pads we bought in gradeschool. we have trouble letting go of even a single sheet of paper, lest we find a use to reuse or recycle it in the craft room! this time, we repurposed our old faxes and paper scraps into notebooks and made them useful again. we pulled out old wrapping paper, books we didn’t mind ripping pages out of, and other odds and ends to make the covers pretty. this is quick and easy to do with what you already have at home, and you end up with a stack of handy, useful pads that might even give you a tinge of back-to-school nostalgia. –bbbcraft sisters CLICK HERE for the full how-to after the jump! Materials: - 8 ½” x 11” scrap paper (from faxes, printing mishaps and mail) - binder clips - scraps of cardboard cut into 1” inch strips OR 2 wood paint mixers cut to size -elmers glue, pvc or a glue gun - paint brush - decorative scrap paper - masking tape and/or decorative tape
Circle Zip Earbud Pouch Tutorial | Dog Under My Desk I use a little zippered pouch to carry around my earbuds since they are the fancy microphone ones and I don’t want them to break or get tangled. Some of you have commented that you are looking for some small, simple gift ideas. This is definitely simple to make, and a little more fun than the typical rectangular zippered pouch! I can see these as the perfect gift for teenage cousins or nieces or girlfriends or even teacher gifts. Fun, quick, and cute! UPDATE: I have completely re-written this tutorial with twice as many bright, clear photos and more detailed instructions and it is available as a pattern in my pattern shop. First, download the pattern template HERE. Cut from main fabric: 1 circle 2 half circles 1 tab Cut from lining fabric: 1 circle 2 half circles Cut from batting (or medium weight interfacing, if you prefer): 1 circle 2 half circles You will also need a 1″ wide nylon 5″ or longer zipper. Place one lining half circle right side up and place the zipper right side up on top.
delightful country cookin': homemade air freshener "Don't you get fresh with me, ya hear!" Oh, I love it when adults (especially grandparents) say that to little kids. What does it mean exactly? Does it mean we'd rather children get dirty with us? Haha...who knows? Today, I'm going to ask you to actually get fresh with me. I digress. I was roaming around on Tasty Kitchen one day when I came across a recipe for homemade air freshener. To make these little beauties, you first need a heat-proof jars (I found mine for $0.99 each at Michael's), food coloring colors of your choice, and essential oil. Into each jar, drop a few drops (I repeat...a few...it doesn't take more than 2 or 3) of food coloring. Now for the fun part. Why salt? Get one cup of water boiling on the stove. Then, pour in the other cup of cold water and the salt, stirring until the salt is dissolved. Quickly pour the hot gelatin mixture in each of your jars, and then use a disposable stick or spoon to stir it into the oil and food coloring.
Mega&8226;Crafty: Woven Flower Pot- Part 2 Today I finished my woven pot project. I haven't done much weaving but it was kind of relaxing once I got into a groove. (It was the perfect TV watching project). To recap, I started with a pot that I painted a creamy yellow. Then I used an all purpose craft glue to attach some of my favorite ribbons onto the bottom of the pot. My first idea was to weave wide ribbon around the pot too- but soon realized I couldn't get the ribbon to lay flat on the tapered shape of the pot. After experimenting with a few different ribbons and strings I settled on using jute. I continued weaving the jute over and under the ribbon, pulling it tight and adding a tiny dot of hot glue every so often. Marking my starting point ribbon by putting a small arrow on the bottom of the pot helped me keep track of each round. I only glued the jute down when I was going under a ribbon, never over, and I tried to keep the glue off the ribbon so I could pull it left and right to straighten it as I wove. 1. And 2. So I wove,
Simple Ideas That Are Borderline Genius - 43 Pics Click Here For More Genius Ideas how to transfer a photo to fabric Did you know you can transfer photos to fabric without using iron-on sheets? I love this technique. It's simple to execute and the end results are really pretty. It's another method for hand printing! Supplies Needed: Fabric (I used white quilting cotton), Gel Medium (I used this kind from Liquidex), Paint Brush and the image you want to transfer. How to transfer a photo to fabric: 1. Note: Don't be alarmed if your transfer isn't completely perfect. Well there you go!
DIY - Snow Globe Postcards - giddygiddy What are DIY Snow Globe Postcards, you ask? Mailable art that will "SNOW" when shaken or flipped over. (Please scroll down for the tutorial). This one is an invitation for Grandma to visit us! How can she resist this???? Kremlin in Winter. This gnome brings its recipient good luck! 100% recycled & reused parts making this ballerina the greenest postcard yet. Bunny Farm is made from bunny stickers and glitter. This picture represents some of my girls' designs!! Although I know I ALWAYS say " there are endless possibilities" with all the craft projects I've blogged about ....really, truly there are endless possibilities here! 1. - colorful card stock paper, transparent plastic film, scissors, glue or glue stick, tape or double stick tape, and your preference of fake snow (confetti, glitter, plastic snow, etc.) and xacto knife for adults only. - Cut out an 8" x 6" piece of card stock that will be folded in half. - On one side, cut out the dome shaped window with xacto knife. - You are done!
t-shirt latch hook rug tutorial I really love flokati rugs. I have two that are safely tucked away in my parents basement awaiting our reunion. When I learned that I would be having a child and building a nursery for him, I wanted a flokati. I’m going to show you how it’s done, but let me warn you- while this rug was super inexpensive to make with the resource of money- it was very costly in the resource of time. And now, this is how to make your very own latch hook rug. Supplies: Latch hook canvas latch hook tool old t-shirts scissors or rotary cutting tool/mat seam binding masking tape dye (optional) All of these things should be available at your local craft store, with the exception of the old t-shirts. On to the making! Once you’ve gathered all of your shirts, use a rotary cutting tool and mat (you can certainly use scissors but the results are less precise) to cut the shirts into 1 inch strips. Once you have all of the strips cut, it’s time to dye them if you’d like. Now you’re ready to hook! xo elle
{every}nothing wonderful: Tutorial: Repurposed Envelopes (From Magazines to Mailing) Note: If you like this idea, be sure to check out how to make paper ruffles to add to your envelopes! Super quick and easy tutorial for you today. I have a drawer full of these and use them for everything - bills, letters, you name it...my mom does too, actually! I recently received an oversized catalog for baby strollers (why? To start just pull pages out of your catalog or magazine with images you love. Other supplies you'll need: Pencil Glue - glue stick or craft glue - whichever you prefer Old envelope or envelope template. If this is a project you see yourself recreating in the future or with other papers you could invest in an envelope template kit, or you can print templates (you'll need to print at 100% on a larger format printer) from Designer's Toolbox on a heavy stock (mount to board for a longer lasting template). Trace the shape of your envelope onto the page, finding the position that you prefer on the image/page. Next, cut out along the lines. Happy re-purposing!
Rollie Pollie! Looking for hours of entertainment? Meet, The Rollie Pollie bean bag chair. It’s a chair, it’s a toy, it’s your favorite pillow. Made of durable cotton twill or soft vinyl, each bag is actually a slip cover (with another Rollie Pollie inside) then filled with mounds and mounds of soft cluster stuffing. Now, pick your favorite…. Drag it around, Dive right in! Or take a little nap. Build a Rollie-Pollie-man: kick off your shoes: Or do what I love best….find a yummy treat, and just relax, watching your favorite show. Who said you were a couch potato? {Tutorial} Color Your World with Handmade Watercolors « oh my! handmade goodness by Michelle Vackar of Hi Mamma With all of the daily activities of running your business it can be difficult at times to relax, decompress and enjoy life. Some people will find their escape in cooking, walking, yoga, reading a good book …really the list can go on and on because we each enjoy different forms of relaxation. Back in my mid-to late twenties, I was working at an advertising/public relations agency and putting in an average of 50-60 hour work weeks. I was not married, no children and my career was my life, but one thing was missing: a time where I pampered myself, doing something that I enjoyed. As a birthday gift, my parents surprised me with a watercolor class at our local art center. So I was rather quite excited to take the class, although I must admit, at first, it seemed a little odd to be leaving work at 6 p.m. to go take a watercolor class, when I was so much in the habit of working late or taking work home to do. Instructions