
Build a Dinosaur! 188K+Save Our recent theme for Preschool@Home was DINOSAURS! One of LB's favorite activities was this one. And best of all, it was easy as pie to put together! Supplies: Green craft-foam (Or you can use construction paper. Prep Work: Using the craft foam, cut out the following shapes: 1 big half-circle1 medium triangle1 medium square1 medium circle3 small rectangles3 small long triangles3 small squares4 small triangles3 small circles How to Play: Lay out all the shapes and show your child how to build a dinosaur. LB(3) had so much fun with this, and it was also a good review of shapes. LL(1) also had fun playing with the shapes, and the craft foam shapes held up under her squishing and squashing. And when LM(6) got home from school he created some great prehistoric creatures too. Fun for kids of all ages! Now that's what I'm talkin' about.Do you like this idea? Need some Craft Foam? (This post contains affiliate links)
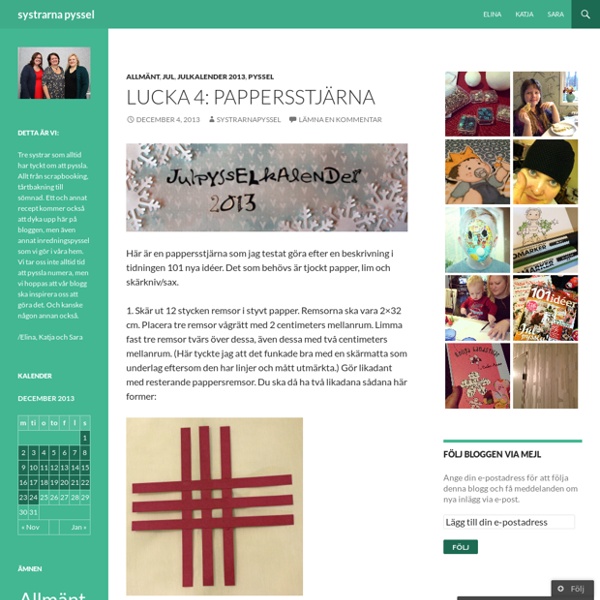
Pysselbolaget – Enkla roliga pyssel för barn och vuxna Ladybugs from Egg Cartons Ladybugs! I love ladybug crafts because they are really easy for kids to make, teenagers think they are cute, and you can vary the colors to make just about anyone smile. As you already know, using recycled items in my craft tutorials is a big thing with me, so it should be no surprise that these little sweeties are made from painted recycled egg cartons. I actually made these several years ago for the website I used to own, FamilyCorner.com. I’m afraid I don’t have any step by step photos since I did make this a while ago. Ladybugs from Egg Cartons What you need: empty egg carton cup skinny black chenille, 2″ piece 2 small wiggle eyes 1 medium black pom pom colorful acrylic paint black acrylic paint paintbrush *white craft glue hot glue gun scissors What you do: Use scissors to separate egg carton cups, trim the edges. Copyright CraftsbyAmanda.com Amanda Formaro
page corner bookmarks This project comes to you at the request of Twitterer @GCcapitalM. I used to believe that a person could never have too many books, or too many bookmarks. Then I moved into an apartment slightly larger than some people’s closets (and much smaller than many people’s garages) and all these beliefs got turned on their naïeve little heads. But what a person can always look for more of is really cool unique bookmarks. Page corner bookmarks are cute, practical and deeply under-represented in the world.* They’re easy to make, easy to customize, and will set you apart from all those same-same flat rectangular bookmarks. If you like this tutorial, here are a couple others that might be up your alley. If you’re loving the toothy monster vibe, check out these simple monster heating bags, filled with rice or wheat and entirely microwavable, to keep toes or fingers or tummies warm during the chilly winter months. What you’ll need: Putting it all together: 1) Follow steps 2 and 3 from above.
Kids Crafts - Inspiration for Children of all Ages Bunting is a quick and fun way to decorate the house or classroom for any occasion. It also... It is amazing what fun can be had and what can be created from a few basic ingredients. We have... Decorating lanterns and candles is great fun for older children. They make lovely gifts or... There is something very therapeutic about playing with clay even as an adult. Collages are an excellent way to fill a wet afternoon and use up the odds and ends in your craft... We all know that kids love to dress up - whether on a rainy afternoon, with a gang of friends, or... Crafting with craft foam is safe for even the youngest children, and cutting and sticking the foam... Here are all of Activity Village's felt crafts for kids. We have recently had lots of fun making felt - felt pictures, felt beads and felt balls - and,... Fuse beads are not only fun to do, but they provide children an opportunity to be creative while... Explore our collection of jewellery crafts for kids!
LimpAn | Hej Världen Busor! En trevlig liten bilduppgift som passar liten som stor. Från början skall eleverna inte veta vad det skall bli utan får i uppgift att göra ett antal färgpluttar på ett papper. När färgen torkat ger man dem var sin penna - helst en tunn svart penna, men det går med blyerts också. Sedan skall de göra karaktärer av sina färgpluttar. Såhär la jag upp min lektion i åk 4: Tillfälle 1: Eleverna får i uppgift att göra 12 tumavtryck på ett ritpapper. Tillfälle 2: Jag ritar ett stort tumavtryck på tavlan. Elevernas förslag lät inte vänta på sig. Vi gjorde också en lycklig busa tillsammans, innan de själva fick göra sina tumavtryck till busor. Det blev livliga diskussioner runt borden. Lektionen avrundades med en diskussion om att ge uttryck och karaktär åt ett tumavtryck.
Learn to Draw Animals Print and enjoy our Learn to Draw Animals pages for kids of all ages. Kids can use our step by step illustrations to discover how to draw all sorts of animals and build up their skills and confidence in the process...plus they are just good fun! You could build up a whole folder of these printable pages for rainy days - teachers might even want to laminate them and keep them ready as a time-filler or reward. And of course many of them tie into classroom themes, too. We have over 80 of these animal drawing pages so you are sure to find one that appeals! Explore our learn to draw animals printables below... By special request, save yourself a lot of clicking and grab all our learn to draw animals, birds, bugs and sea creatures in one easy download! Learn to draw this cute chimpanzee just by following the steps and copying carefully. Whether you are looking at African animals, primates or even Ancient Egyptian Gods, use our learn to draw a baboon guide to add some fun. Kids love meerkats!
2 Easter Paper Crafts 1. Big paper eggs - easy to cut off and assemble, suitable for Easter decoration. We cut 4-5 green printer sheets into thin strips to make the grass on the photos. After that we crumpled it well and it turned into fresh spring grass. We used paper in different colors and it turned out well. You can also decorate the eggs with pencils or felt-tip pens before assembling them. Print out our paper egg template on colored A4 sheets. 2. Color the legs, the beak and the comb after cutting out and folding the template. See more Easter ideas:
25 Easy Art Techniques for Preschoolers It’s no secret – my daycare hooligans love creating art! For me, the funnest thing about art for kids, is finding unique and interesting ways for my toddlers and preschoolers to get creative. The kids and I have tried a lot of creative processes over the years, and today, I’m sharing with you, 25 easy art techniques for kids! They’re easy, inexpensive, super-cool, and each of these projects can be done using things you have in your kitchen cupboards and around your home! Put away those paints and paintbrushes! This round-up of creative art processes will have your kids exploring and experimenting with all kinds of different materials, substances and tools! Each of the activities described here contains a click-able link which will take you to the step-by-step instructions. 25 Unique and Easy Art Techniques for Kids Make a gorgeous “tie-dyed” bookmark with Sharpies and rubbing alcohol! Sharpies are the star again in this simple “stained-glass” art project. One of our absolute favourites!
Foliegubbar De här foliegubbarna var riktigt roliga att göra. Med relativt enkla medel kan man få till figurer som kan vara utgångspunkt till diskussioner i många olika riktningar. När man gör gubbarna är det lätt att tankarna går till Giacomettis verk. Hans verk kan vara en utgångspunkt för arbetet. Själva "skulpterandet" - att skapa och få fram olika uttryck kan vara ett annat. Att studera skuggor kan vara ett mål i sig. Gubbarna gör man i helt vanlig aluminiumfolie. Armarna sätts fast genom att en remsa av folie surras ett varv runt kroppen: När man sedan har stommen är det bara att bygga på med folie och forma gubben på det sätt man vill. Sedan är det dags för skuggan. Ett annat alternativ (som jag gjort på gubben med blått papper) är att låta skuggan falla på ett svart papper.
20:e december Gör så här: Högerklicka på mallen här och välja Spara bild som.... eller Spara mål som... Spara ner den till din dator och skriv ut den. (Den blir dubbelt så stor som på den här bilden.) Klipp ut tre likadana äppelformer efter mallen. Om du inte använder guld- eller silverpapper kan du måla äpplena, men då måste du måla alla bitarna på båda sidorna. Du kan också använda rött papper och bara måla kvisten och löven. Lägg alla tre äpplena på varandra så att de passar precis, och häfta eller sy sedan längs mitten. Vik sedan ut äpplena från varandra så att din julgransprydnad får en rund form. Grottmålning Grottmålning Det här behöver du:- Pappersark- Vattenfärg- Tandborste- En hand eller andra saker att måla av Tillsammans med grottmålningar av olika djur så har man också hittat handavtryck på grottväggar. Du kan göra din egna handavtryck på papper med en liknande metod. Doppa en tandborste i vatten, och gnugga den mot en färgkaka av vattenfärg. Lägg din hand mot ett pappersark. Håll den ungefär 5 cm ovanför handen och dra med tummen eller pekfingret genom borsten. När du har fått ett bra färgmönster runt handen är du färdig. Du kan också prova att spraya över saker som hör till vår tid som till exempel en sax, en penna eller en flaska.
Skapligt Enkelt