
Safe Automated Mains Sockets What's this all about? This page describes how to turn mains powered appliances on and off under computer control without risking killing yourself. That last part is kind of important. Links for source code downloads Switch.cppWeb Interface More Detail For the project I used a Raspberry PI computer to control three mains sockets. Parts Status Remote Control Power Sockets. These came from Morrisons supermarket. Raspberry PI Computer. This is ideal for this kind of project for lots of reasons. A Floppy Disk Drive Cable. 433MHz Transmitter and Receiver Modules This may look complicated but it isn't as bad as it seems. 1M Ohm Resistor That's just a random picture of a resistor, not the actual 1M one I used. Optional Items. One IC socket. One piece of stripboard 3 x 2 holes with the strips going the short way. One Breadboard This was used to plug the receiver into while capturing the remote codes. One 3.5mm socket. One 5V power supply. Temporary Items One PC. Building the system The transmitter system
RFLink Wiring Details ⋅ Easy Home Automation RFLink Wiring Details 01 July 2015 Using a seperate RF receiver and RF transmitter: Prefferred are Aurel RF receivers. If building this yourself is too complicated or you dont have the time, then you can also buy a ready made RFLink board / RFLink Shield at the Nodo webshop Receivers and Transmitters: Various receivers/transmitters/transceivers have been tested. If you would like to use the Aurel RTX MID 5v Transceiver the pinout is: Pin 1 = Antenna Pin 2 = Ground Pin 3 = Not Connected Pin 4 = MEGA tx3/Pin 14 (TX Data) Pin 5 = MEGA rx3/Pin 15 (TX Enable) Pin 6 = MEGA Pin 22 (-RX/TX- toggle signal!) If you would like to use the RXB6 receiver the pinout is: RXB6: Pin 1 = Antenna Pin 2 = Not Connected / Ground Pin 3 = Not Connected / Ground Pin 4 = Not Connected Pin 5 = MEGA tx2/Pin 16 (RX VCC) Pin 6 = Not Connected Pin 7 = MEGA rx1/Pin 19 (RX Data) Pin 8 = Ground The above diagram also has some interesting improvements courtesy of Snips. IMPORTANT NOTE about the well-known cheap Chinese set:
Interface with Remote Power Sockets – Final Version « Rayshobby In previous blog posts, I’ve described two ways to use an Arduino to interface with an off-the-shelf remote power sockets / switches. The first method uses transistors to simulate button presses. It involves some soldering and hacking the remote control unit. The second method uses an oscilloscope to sniff the signal sent by the remote control, and then simulates the same signal using an RF transmitter. But what if you don’t have an oscilloscope, or don’t know where to place the probe to take the measurement? To get started, I picked a set of indoor wireless power sockets from Amazon. RF Sniffing Circuit Ok, here is the fun part: how can we sniff the signals sent by the remote control to the sockets? This is by no means a new idea. The picture on the left is my implementation of the circuit. Record the Control Signals I used the open-source Audacity software in Linux to record the signals. Basically when you press a button, the same sequence is sent multiple times. Download What’s Next?
AVR Tutorial - AVRDUDE OK now you have a target board and a programmer next you will use the software you installed in step 2 to talk to the chip. This software is very powerful but its also difficult to use the first time. However, you should persevere and after a few times it will become (easier) to use. Comments? Avrdude is a command line program, so you'll have to type in all the commands (later you'll find out how to shortcut this with a Makefile) Under Windows, you'll need to open up a command window, select Run... from the Start Menu and type in cmd and hit OK. Under MacOS X, you can use the Terminal program to pull up a command line interface, its in the Utilities folder Now in the new terminal window type in avrdude you should get this response, which is basically a simple list of what avrdude can do... There are a lot of options, lets review them quickly. : This is just to tell it what microcontroller its programming. The ones you'll use 99% of the time are highlighted in red. C:\>avrdude -c asdf
Sniffing the Air (RF controlled lights) | A Pi in the House Introduction I put some lights on timers whenever we travel. A few lights in the house are on permanent timers (I had bought Aube TI035/U timer switches for the outdoor lights – they work nicely), but most of the indoor lights only need to be on timers when we’re away. You can buy fancy digital temporary light timers, but we have the old mechanical types. So instead, I thought it would be interesting to have the Raspberry Pi control some lights using RF controlled light switches. The remote works at 315 MHz. Sniffing the codes There are several online articles that describe sniffing RF codes. The basic idea is that you have to buy a 315 MHz transmitter/receiver set. What you need to buy Here’s what I bought to make this work, all from Sparkfun. WRL-10535 315 MHz RF Link Transmitter (don’t need this yet)WRL-10533 315 MHz RF Link ReceiverPRT-08032 3.5mm Audio JackCAB-08566 Male to male 3.5mm Audio Cable At the time of this writing, the total cost for the above is about $12. Wiring it up
Suivre sa consommation d’eau : domotisation d’un compteur d’eau à l’aide d’un arduino | Connecting Stuff Bonne année à tous (mieux vaut tard que jamais :). Pour commencer cette année, un petit article sur le relevé automatique de la consommation d’eau. Le montage utilise un compteur d’eau banal du commerce (sans capteur donc) et ne nécessite pas son démontage. [adsGrandRectangleTexte] Relever sa consommation d’eau : les différentes solutions Pour faire du relevé de compteurs d’eau, il n’y a pas 36 solutions. Les solutions commerciales, « plug&play », fiables … et pas trop bon marché Il existe des compteurs avec une sortie pour un capteur à impulsion? On le trouve chez planète domotique par exemple : La solution du pauvre, play&plug ;), aussi fiables et pas chères ! Comme d’habitude je suis parti sur une solution la moins chère possible et sans sacrifier la fiabilité. Domotisons un compteur d’eau classique Là aussi, il existe plusieurs solutions. Fonctionnement du CNY70 :
Rogier's Tinker Projects: Control lights with an Arduino remotely with 433Mhz I wanted to use Arduino's for a domotica project. The main purpose is to control the lights in my livingroom, using a web-interface. This way I can switch on and off my lights with my mobile phone, iPad, etc. even when I am not home (over the internet)! Because making elektrical connections with Arduino's and the outlet power supply went wrong one time earlier (blew all the fuses!) This is a set containing of one transmitter and a couple receivers to wirelessly switch lights (plugged into the outlets) on or off. The Arduino has a 433 Mhz transmitter and receiver. I used my Arduino to "sniff" the sent signal from the transmitter to the receiver switching the lights. The Arduino is also equipped with an ethernet shield, so I can host a litte web application on it. So I have: An Arduino that "understands" the remote control and can learn from it;The possibility to send signals myself as well;A small web application running on the Arduino. Useful links
Secret Arduino Voltmeter – Measure Battery Voltage A little known feature of Arduinos and many other AVR chips is the ability to measure the internal 1.1 volt reference. This feature can be exploited to improve the accuracy of the Arduino function – analogRead() when using the default analog reference. It can also be used to measure the Vcc supplied to the AVR chip, which provides a means of monitoring battery voltage without using a precious analog pin to do so. I first learned of this technique from these articles – Making accurate ADC readings on the Arduino, and Secret Voltmeter. In this article, I have incorporated some additional improvements. Motivation There are at least two reasons to measure the voltage supplied to our Arduino (Vcc). A common assumption when using analogRead() is that the analog reference voltage is 5.0 volts, when in reality it may be quite different. double Vcc = 5.0; // not necessarily true int value = analogRead(0); double volt = (value / 1023.0) * Vcc; // only correct if Vcc = 5.0 volts How-To Usage where
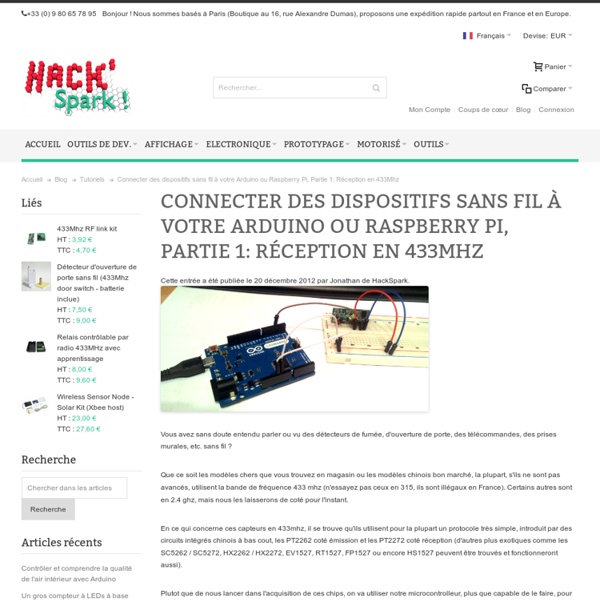
Decoding 433MHz RF data from wireless switches | Tinkerman [Update 2013-03-01] I have added more documentation on the codes these remotes use in a different post. I’m starting to move towards not only gathering information but also acting. My first project in this subject will be controlling some lights and the house heaters. So last week I visited the urban market of “Els Encants” in Barcelona and bought some very cheap wireless outlets. I bought two sets of three wall plugs, each set with it’s own remote. They all transmit in the 433MHz frequency and I already had a set of transmitter and receiver for that frequency so as soon as I had some time I started trying to intercept and reproduce the codes the remotes were sending. Sample outlets from each set plus remotes In the image above you can see an outlet and the remote for each of the sets. The right one is branded “Avidsen” and rated 1000W, just below the consumption of my house electrical heaters, but good to control lights and other appliances. Then I moved to the other set of outlets.