
Sac japonisant Voici le tuto en pas à pas et photos pour un sac japonisant souvent appelé « Japanese knot bag« . Le sac se ferme en passant la grande anse dans la petite et se porte au poignet. Le sac est doublé et comporte 6 petites poches à l’intérieur. Ce sac fait un très joli cadeau, et Noël approchant, je suis sûre que vous penserai bien à quelqu’un à qui il pourrait faire plaisir Le patron gratuit utilisé ici n’est pas de moi. Il est très semblable au patron payant Vogue 7354 que j’utilise habituellement pour faire des petits sacs de se type. Pour le tuto présenté ici du patron gratuit de All people Quilt, j’ai suivi les instructions en anglais à la lettre avec donc les poches mais j’ai omis la triplure. width: 209px" class="wp-caption aligncenter"> Une face Sac fermé en glissant la longue anse à travers la petite Cliquez sur les photos pour les agrandir width: 235px" class="wp-caption aligncenter"> Patron assemblé La patron Le patron est téléchargeable ici sur le site de All People Quilt Les tissus 1.
Rock n' Roll Tote Bag Remember the Super Hero tote I made Jude? Well the totes were a 3 pack so I had fun making another tote. This time I used out another new product that Fashion Art Projects Sent me. It's called Zip Screens and they are awesome! Simple and easy screen printing right at home. A little pleated detail up at the top added some feminine touch and the bag was a perfect gift for my soon to be sister in law. I started with my tote from fashion art project. colored the lines in with the markers and then did the same to the other side so the lines go all around the bag. Next I grabbed the Zip Screen and special Zip Screen all in one paint and applicator. Stick the Zip Screen sticky side down where you want the design. Then I used painters tape to tape around the edges incase of any paint run off. Then take the Zip Paint. Then with scissors cut the top off. Then with the paint side down slide from top to bottom applying some pressure to the underside so the paint comes out.
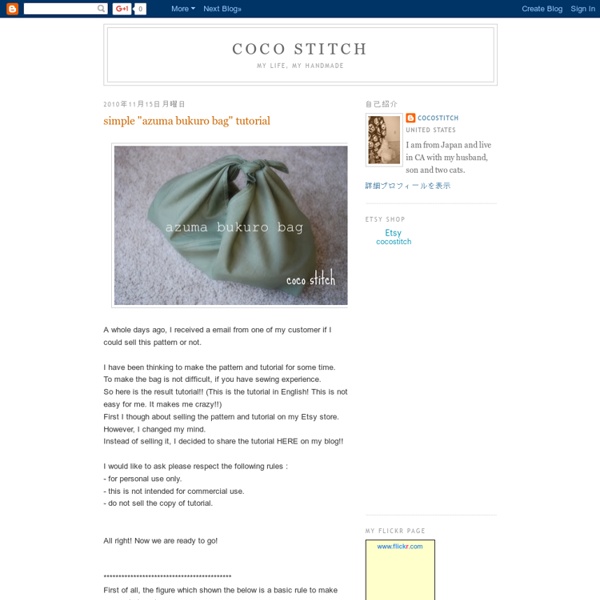
Making reversible bag from top of straps to bottom of bag: 50 cm / 20 inchesheight: 28 cm / 11 incheswidth: 40 cm / 16 inches I don’t know because I used leftover fabric for my bag. You can print the pattern and place it on your fabric to make an approximation. It is only one piece of pattern. Fort similar bag, you can check Charlie bag by Burdastyle ($1.99). Please go to the bottom of this post to download the PDF pattern and tutorial. Disclaimer: You may use the finished products for both personal and commercial use (craft shops or markets only – no mass production). 1. 2. If you use my pattern, sew the darts before sewing the bottom and sides of bag. 3. 4. 5. Pull out each of the remaining straps. 6. 7. 8. 9. 10. A reversible bag! Thank you for reading and I hope this post is useful for you! Click to download:
Sac besace Featured: Messenger Bag by Ecolution Originally created for hard-working couriers, the classic Messenger Bag has been in circulation for several decades. Known for its long-lasting rugged durability and distinctive “envelope” styling, the classic Messenger has been adopted around the world as the everyday all-purpose carryall. You will need: 1 ¼ yds. [1.2 m] of hemp or organic cotton canvas, 54″ [137 cm] wide.½ yd. [0.5 m] of cotton sateen lining, 54” [137 cm] wide1 ½ yds. [1.4 m] of fusible interfacing, 45″ [114 cm] wide.1 closed zipper, 12” long *1 buckle slider, 2” inner dia. *1 belt tip hardware, 2” wide *matching cotton threadgrid paper * Match zipper to colour/metal of hardware. BAG DIMENSIONS: approximately 4″ x 11.5″ x 14″. [10 cm x 29.5 cm x 35.5 cm] Scale: 1 square = 1 inch (25mm) Add seam allowances to all pattern pieces. Bag Body – cut 1X self; cut 1X fusible Shoulder Strap – cut 1X self Strap Tab – cut 1X self Flap – cut 1X self; cut 1X fusible Bag Lining – cut 2X lining 1. 2. 3. 4.
Un grand sac boule Matériel Tissu extérieur : 1m (par 1m50) Evite les tissus trop épais ou extensibles. Je te conseille du coton.Tissu pour la doublure : 50cm (par 1m50)Tissu intermédiaire : 50cm (par 1m50) On ne le verra pas alors tu peux prendre un vieux tissu tout moche. Tutorial Etape 1 : Le patron du sac ! J’utilise du papier spécial mais si tu n’en as pas, tu peux utiliser du papier journal par exemple ou une nappe en papier. Petit patron : Il servira pour le tissu intermédiaire et la doublure. Grand patron : Il servira pour le tissu extérieur. Trace les formes sur le tissu : on trace deux petites formes dans la doublure, deux petites formes dans le tissu intermédiaire, puis deux grandes formes dans le tissu extérieur. Tu obtiens alors : On va maintenant découper une pièce de tissu pour faire la poche, dans le tissu extérieur pour faire un rappel sympa ! Etape 2 : faire une poche Maintenant que l’on a tous nos morceaux de tissu, on va s’occuper de faire la poche dans la doublure. La poche est cousue ! Bravo !
Full and Textured Fabric Flowers We can never seem to have enough flowers in our house. Or fabric. So, to satisfy both things……..I made some new fabric flowers. But easier and less uniform. They are a bit rugged. . But my first thought……..is always in the hair. There’s something about the texture of the fabric. (And yes, the edges are raw……but they’re made with a bunch of circles and this helps keep the fabric from fraying very much. But if it does fray a bit, it only adds to the charm.) I’m even crazy about them on my littlest one’s head. And just for fun…….here’s a zoom out of our photo shoot. If he’s home, he makes the best assistant. Thanks baby girl. Would you like to make a few fabric flowers? To begin, decide on how big you want your flower to be. To make a flower that size, I cut out a circle that was 1 3/4 inches in diameter and used that as my circle pattern piece. I cut some strips of fabric that were about 2 inches wide (just a bit wider than my red circle pattern piece)…… And that completes the flower.
Les sites pour apprendre à coudre / patrons de couture gratuits | Madame Choup Apprendre à coudre sur Internet : des sites qui regorgent de conseils, tutos et patrons. Leçons, conseils couture Petit Citron: toutes les techniques de couture en image, des conseils, patrons…L’Atelier de Couture Husqvarna Viking : les base avec des vidéos explicatives pour coudre des poches, faire un ourlet, poser une fermetureCoupe Couture : « Le blog qui vous apprend à coudre ». ce blog est une mine d’informations pour nous les débutantes (et aussi les confirmées), des explications claires et illustrées pour faire des doublures, coussins…Leçons de couture : un blog qui recense les blogs couture avec des tutos. Classement par catégories : accessoires, jupe, hauts, pantalons… Patrons de couture gratuits Toujours plus haut : site qui liste des patrons de couture gratuits sur Internet. WordPress: J'aime chargement…
Wallet-to-Tote On the Go ~ Tutorial Lorraine from ikat bag is a favorite around here… She has tons of fun tutorials on her blog and she’s joined us before with this wonderful Back to School Pencil Case tutorial. Today Lorraine shares a tutorial for a new summer essential, the On the Go Wallet-to-Tote! Construction includes three main parts: Assembling the Wallet, Assembling the Outer Bag and Making the Lining. From Lorraine: Hello, Everyone. These little bags have been around for as long as I can remember, and I thought they’d be a useful addition to the arsenal of summer gear I stash in my car and/or purse. I have three little girls, aged 3,4 and 6, and we’ve found that summer always takes us on adventures we hadn’t planned for– detours to farmer’s markets, dancing in the rain or treasure hunting en route to the park. We always appreciate an extra bag or two for our loot (and wet clothes)! Part One: Assemble the Wallet:You will need: Note: Please see Part Two & Part Three for a full list of supplies. The bag is completed!
4 Hour Slouchy Summer Hobo Bag I thought it would be fun to do a Slouchy Summer Bag – and this one is super quick!! I did it in under 4 hours – so you could make up your bag in the morning and carry it to your beach party or picnic that evening! It’s a cute lace Hobo bag with a fun bright orange lining and tabs for the strap. I used a bright pink zipper for contrast – I think it’s so fun! Ready to get started on your own? 2/3 yd lace2/3 yd fabric for lining22″ zipper2 D Rings18″ of webbing for strap UPDATE: Click here to Download the Free Pattern if you’d like to use mine. Start by drawing out your pattern. Fold your outside lace fabric in half with the selvedges together. Center the zipper along the top curved edge, between the right side of the lace and the right side of the lining. Here’s what the right sides will look like after you sew that seam. Repeat this step for the other side of the zipper, and the other curved edges of the lace and lining. Open up your zipper before this next step, it’ll be easier.
Cours Gratuit de modelisme - Corsage de base Pour Femme A - Mesures Nécessaires : (Taille 38) 1/2 Tour de poitrine = Tp = 43 cm1/2 Tour de taille = Tt = 33 cmLongueur taille dos = 40 cmLongueur taille devant =37 cm1/2 écarts poitrine =9,5 cm1/2 carrure dos = 17,25 cmLongueur d’épaule = 12,5 cm B - Construction du cadre :AT = 40 cm = longueur taille dos, c'est la ligne du milieu dos DFAP = hauteur poitrine = 1/2 longueur taille dos + 1 cm = 20 + 1 = 21 cmAA1 = 1/2 carrure dos + 0,5 = 17,75 + 0,5 = 18,5 cmA1A’1 = 1/20Tp – 1,5 = 0,65 cmP1P3 = 1/4Tp + 0,5 = 10,75 + 0,5 = 11,2 cmP1P4 = 1/2P1 P3 = 5,6 cmP3P2 = 4 x 1/10Tp + 1 = 17,2 + 1 = 18,2 cmAa = 1/10Tp + 2,5 = 6,8 cmaa1 = 1/20TpA’P = AP + A A’ = 21 + 2,43 = 23,45 cmP2A2 = A’P + 1 = 23,45 + 1 = 24,45 cm c'est la ligne de Milieu devant DF C - Tracé du contour : 1 . • Taille dos : Tour de taille dos = 1/2 Tour de taille dos – 0,75 = 15,75 cm Dimensionner le corsage sur la taille dos : mesurer la profondeur de la pince : pp1 = pp2= 0,5 cm. Joindre arrondie a2 G ; mesurer G G1 = 3 cm.