
Made By Rae: (Free!) Buttercup Bag Sewing Pattern This pattern uses a mere fat quarter of fabric for the outer + a little less of another fabric for lining. If you’re using quilting cotton for the outer fabric, I recommend using a fusible interfacing to strengthen it. You’ll also need a magnetic snap and (optionally) a couple of buttons, although it looks pretty cute without the buttons too. I think this would also look great with some piping or ric-rac over the pleats…I can’t wait to see what y’all do with this one! While I appreciate links to this post (but not directly to the pattern), please don’t “borrow” my pictures without permission. Thanks and enjoy! TERMS OF USE: This pattern is offered for free with the understanding that my readers will use it for personal use only. ARE YOU A HOME SEWIST WHO IS INTERESTED IN SELLING BUTTERCUP BAGS? WOULD YOU PREFER TO PURCHASE A BUTTERCUP BAG FROM A TALENTED LICENSED BUTTERCUP SELLER? After reading the Terms of Use (above), This blog is proudly sponsored by Smaller Buttercup’s measurements:
Circle Zip Earbud Pouch Tutorial - Dog Under My Desk I use a little zippered pouch to carry around my earbuds since they are the fancy microphone ones and I don’t want them to break or get tangled. Some of you have commented that you are looking for some small, simple gift ideas. This is definitely simple to make, and a little more fun than the typical rectangular zippered pouch! I can see these as the perfect gift for teenage cousins or nieces or girlfriends or even teacher gifts. Fun, quick, and cute! UPDATE: I have completely re-written this tutorial with twice as many bright, clear photos and more detailed instructions and it is available as a pattern in my pattern shop. First, download the pattern template HERE. Cut from main fabric: 1 circle 2 half circles 1 tab Cut from lining fabric: 1 circle 2 half circles Cut from batting (or medium weight interfacing, if you prefer): 1 circle 2 half circles You will also need a 1″ wide nylon 5″ or longer zipper. Place one lining half circle right side up and place the zipper right side up on top.
DIY Pantone chip magnets I try to keep loose Pantone chips in an envelope for future projects, but these nice colors escaped and attached themselves to my file cabinet. If you happen to own a Pantone chip book or can beg a few chips from someone you know, here's how to whip up some little candy-like magnets. Cut small pieces of bookboard or other thick cardboard with an X-acto knife. Attach the chip to the cardboard. Then cover the face of the chip with paper glaze. Finally, attach a magnet to the back. Quilted Tablet PC Cover Hi Everyone! I had the opportunity to be a Creative Guest at Ucreate last month. The tutorial I shared was for a Quilted Tablet PC Cover. A Tablet PC has been on my wish list for quite a while. I've bought a few accesories for my tablet. I looked around on Amazon, but I wasn't finding anything I liked online. Here is how I made the tablet cover: Material needed : -2 Fabric pieces, one for the outside and one for the inside. First, you need to determine the width to cut your fabric. width of the device + the depth of the device + 2.5 inches For me those numbers were 10.25 + .5 + 2.5. I could give you a long mathematical computation for the length of fabric needed, but it will be a lot easier if you just cut the fabric to 3.5 times the length of your device. I didn't take a picture of this process, but here is a close up of how mine looks in the pocket and with the flap folded over: The total fabric dimensions I used for a Galaxy Tablet was 13 3/4 wide by 22 7/8 long. Ta da!
Purse Week I know, the name has been taken about 500 times over, but seriously, this is all I could come up with (and before I searched and found a million others called the same thing, mind you!). Don’t let the pleats scare you (or the length of the tutorial—I just included a LOT of pictures to explain things clearly). The cutting takes more time than the actual sewing does, in most cases! Let’s get started! First, print and cut out these four patterns: one, two, three, four. What You’ll Need: fabric for outer fabric for lining and band 20” piping, cut into two 10” pieces 9” zipper interfacing (all seams are 1/4”) Cut out your fabric and interfacing according to the pattern pieces you printed off. Take one of your band pieces and line up the raw edge of the piping. You’ll want to stitch just to the left of the stitching already on the piping. Next line up the band with the 10” edge of one of the outer pieces of fabric, like this. Press the seam down towards the body of the purse. NOT like this: Almost done!
Convertible Grocery Tote/Backpack A few weeks ago, I made myself a bag that converts from a shoulder/tote bag to a backpack. I've used it for a variety of things including shopping, school and traveling. One of my friends saw the prototype for this bag and commented that she'd love one in a sturdier fabric to use when she rides her bike to the grocery store, as it can be easily worn either as a messenger style or backpack when her small bike basket is full. At this point, I had already nearly finished the gift I'd been planning to make her for the holidays, a padded case for her new GPS. Then I saw this challenge and decided to make the bag to wrap the GPS case. This bag has a zippered pocket on the outside, a flat patch pocket on the inside, boxed corners and zips closed on top. As a shoulder bag, more like the typical grocery bag As a backpack And here's how I used it to wrap the GPS case.
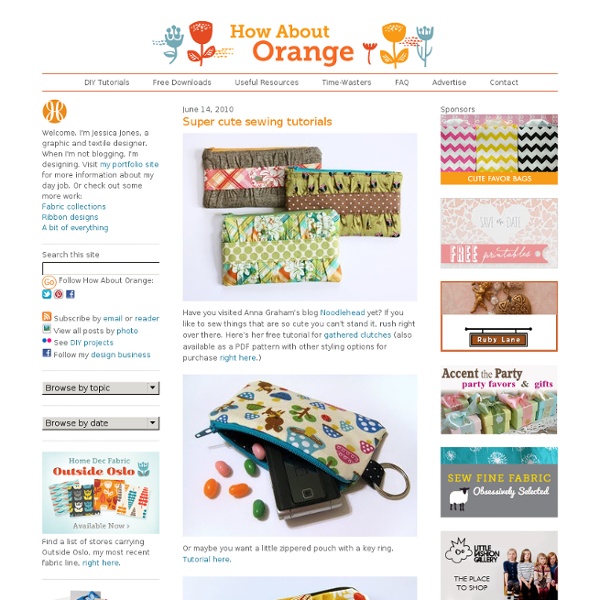
Zippered iPhone Wallet - tutorial Do you ever go out and all you want to take is your phone and maybe your keys and a credit card? But you don't have any pockets? This little wallet is the solution. It snugly fits your iPhone and a couple of cards, and I added a handy little clip for my keys. I originally made this to clip to the Ergo when I go out for a walk, but it's really handy so I've been using it for more than just that. It's such a quick project that I've been making them up for friends too! You can see I've put different straps on each of these. one has an elastic wrist strap and the other has a snap fastened strap so that I can hook it on the Ergo. Zippered iPhone Wallet You'll need: Main fabric - 2 pieces (10 x 15 cm, 4 x 6 inches)* Lining fabric - 2 pieces (10 x 15 cm, 4 x 6 inches)* Interfacing (optional) - 2 pieces (10 x 15 cm, 4 x 6 inches)* Zip - (15 cm, 6 inches) Key ring clip Your choice of strap** Use the measurements above to cut out your pieces for the wallet.
Paper Starburst Pendant Light So I had a different project that I was going to post today, an update version of my Book Pages Pendant Lantern from Project 19, but then I started working on this light idea, and I am so excited by the results I just couldn’t wait to show you guys! My inspiration and guide was this light from Design*Sponge, that I spotted on Pinterest. I really liked the idea, and I had a roll of white vellum lying around left over from college that I thought would look beautiful. So I started cutting triangles. And then I started glueing. And cutting more and glueing more. The roll of vellum that I was using was 24 inches long. I think I glued the pieces on much closer than they did in the Design*Sponge tutorial, but I wanted a really full look. All in all I think the light is pretty awesome, and I can’t wait to post it on Etsy, though I’m a little bit worried about shipping. Ciao, Allison Like this: Like Loading...
Re-purposing: Tshirts into 5-strand-braided-headbands I was walking through Target a few weeks ago and noticed this little knit fabric headband that was not just braided together…….but woven. I decided they were charging way too much for something that could be made with t-shirt scraps. And that means free. So there you have it. (Or you may need one for working out. I kinda love it on my little girl . She always has little hair fly-aways that get into her face…….and this helps with that problem. It even works great with her hair down…..and keeps that hair tucked behind her ears. And yep, good for me too. Thanks little t-shirt scraps. Want to make your own? First, find some old t-shirts. Then, cut your fabric into long strips. Next, stack your 5 strips on top of each other and sew together at one end. Now, pull on each strip of fabric so that they kind of curl on the edges. Now, to create this 5 strand braid……..you’ll kind of be braiding on the left side and then braiding on the right. But let me explain a little better. And that’s it.
Grecian Draped Tank from Skirt (with tutorial). Hey, I'm feeling long winded tonight, so I thought I would over-explain something. Yay! First off, here’s the shirt hanging on my closet door with a monster fur scarf that you can barely see. Anyway...the trick to this shirt is to use a skirt that really hangs well. This is what I did... (Yeah, my tutorial consists of tiny, ghetto, mouse-drawn pictures, and for that I apologize.) You'll probably want to use a shirt that fits well as a guide, but you guys already knew that. See, it looks all toga-ish, like a Grecian statue. Here I am in the bathroom mirror, so you can see the nice draping. This is my favorite reconstruction so far -- and I can even wear it to work.
Saltwater Kids: RETRO DUFFEL bag TUTORIAL Boys, boys, boys. The silly things they say and do keep me laughing all the time. In fact, as I was working on this post my three year-old came blasting by, one arm outstretched, clutching his toothbrush, shouting (in a deep manly voice) "Oh, Mr. My favorite part of making this tutorial, by far, was the photo shoot. I am so excited to share this project with you because it is as fun as my two silly boys. The design of the RETRO DUFFEL is based on the original Duffel Bag - the manliest of all the bags in the luggage family. This is a miniature version of the typical duffel bag, perfect for an overnight stay at Grandma's, hauling gear to the big game, or for storing my all-time favorite gift - the FORT KIT! OK, lets get started! Materials: 1/2 yard Fashion Denim (or similar fabric) 16” SEPARATING zipper* (the key to this project is the separating zipper)Jean/denim sewing machine needle 76” of 1½” wide webbing OR make your own (77” X 6” white fashion denim, or similar fabric) Cut: Pin and sew.
V and Co. how to: gathered heart pillow last week was butt freezing cold here. like in the negatives. so i needed something to keep me busy and happy in the house. and well valentines being around the corner...well when you are a crafter and trying to create things for the holiday... it's right around the corner.this little pillow is fast and easy and well, a happy maker in freezing temps.lets get started: materials needed:a strip of pink or red fabric approx size of 6" by 12"two squares of muslin (i used sandcastle fabric i had on hand in my stash) cut to around 10" by 10". okay now lets get started with the sewing: first you are going to put your machine on the running stitch. mine is a #5.sew a 1/4" seam along both of the long sides of your pink fabric. do the same thing to the other side. here is what your gather should look like. next you are going to take your muslin square next sew on your heart line. now to make sure you don't cut any part of your gather, gently separate your muslin from the gathered fabric behind it.
The Madeleine Mini Bloomers Hello! I keep forgetting to post this so here it is. I've been wanting to sew a romper (or few) for this summer but I figured I should start with the shorts and once I had those down, graduate to the romper. So I started with these guys, and then I did non-pajama shorts, so I guess the romper is next! These were incredibly easy and gave me the courage to keep going. p.s.