background preloader

Ingenious DIY Idea: How to Declutter a Desk or Workspace

Ingenious DIY Idea: How to Declutter a Desk or Workspace
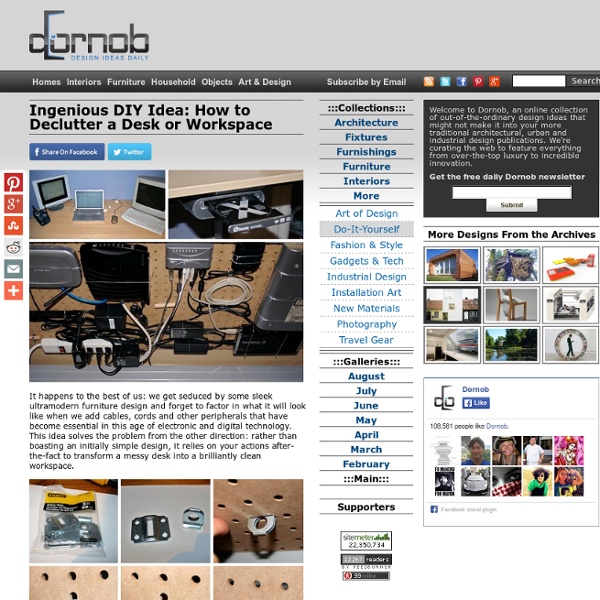
It happens to the best of us: we get seduced by some sleek ultramodern furniture design and forget to factor in what it will look like when we add cables, cords and other peripherals that have become essential in this age of electronic and digital technology. This idea solves the problem from the other direction: rather than boasting an initially simple design, it relies on your actions after-the-fact to transform a messy desk into a brilliantly clean workspace. Van Mardian may have been the first to publicize this simple DIY desk organizing idea, but many people have since (and likely before) come to the same conclusion: a simple piece of composite pegboard mounted underneath a work surface makes it easy to use wire, zip ties or whatever other fasteners you may have handy and attach all your necessary-but-ugly essentials so they are not seen from above.

DIY Continuous Ink Printer = Unlimited Free Printing Instead of paying for absurdly priced printer cartridges, build yourself a Continuous Ink Printer (CIS) which can be made by hacking an old printer to suck ink from external reservoirs. You can get the raw ink for dirt cheap so it’s essentially like unlimited printing for free (besides the paper). So now you can actually print your collection of pirated books! A CIS is relatively easy to create, just take an Epson Stylus 760 (a surprisingly hard to find printer) and make a few modifications to it. More Printer Hacks:

All Wired Up: Old Beads Made New: | The Design Tree by Greentea Design Chokers and bracelets get old and unstrung; earrings get lost. It’s a fact of life that I have a lot of experience on. I’m pretty clumsy, and absent-minded too, which doesn’t bode well for accessories that come in pairs or come in strings. I have a box of these lost and lonely little rocks and resins to prove it. I’ve forged a certain affinity for wire a while back — when I thought I wanted to be a sculptor. Just want to share: A dusty old wire and resin project from years ago. I’ve skimmed through quite a number of websites that’s dedicated to the craft of wire jewelry, and found a ton of ideas and inspiration. All I needed were the most basic materials and tools. Quickie pendant The sites I mentioned above also provide not just inspiration, but a lot of very useful tips and a bunch of awesome projects that users can download for free. Pendant with a "woven" cage. The finished pendants! These are what the pendants look like when they're strung up.

Black Labels, Bright Lights: 5 DIY Wine Bottle Lamp Projects Admire the label art, open the bottle, drink the wine, put a stopper in, then consume the rest later … and then what? While a true collector might still keep the empty glass around, most of us then dispose of the leftover container and move on. Here are some illuminating reasons to think twice before recycling them right away. More than decor, candles can add nice mood lighting to a space – particularly when filtered through dark greens and browns of a glass wine bottle. Lamps are an obvious choice for useful and display purposes, and by preserving the full bottle intact they can also let the labels remain (or add your own drawing or image) if you prefer to have a bit more decor than a simple colored glass object. Wine bottle lights like these are also quite attractive hanging from the ceiling, providing soft lighting like an antique chandelier – just be sure to attach them tightly as they would also surely hurt (and possibly shatter) were they to drop.

How to Recycle Magazines into Jewelry September 23rd, 2010 Email 419 users recommend Experiment with various coil sizes, and even glue coils together! Diane Gilleland Magazine paper lends itself well to this colorful little project. This pendant is made with parts of three different pages. There are tons of design possibilities... Photo: Diane Gilleland 1 | 2 | 3 | 4 | 5 | 6next> View all Before you recycle those old magazines, turn some of their pages into pretty coiled pendants. What you'll need: Magazine pagesScissorsBone folderThin wooden skewerLow-temp glue gunWhite craft glueEye pinBlank cardstockClear acrylic sealerJump ring A note on glue: After much testing, I've found that my low-temp hot glue gun works well for this project. As an alternative, you can glue your coils with white craft glue, but you'll have to hold the work in place for a few minutes to let the glue set. First, you'll need several magazine pages. View 3 member project galleries posted in: necklace, paper, recycled magazines Find us on:

My Flour/Sugar Drawers (Note: If you missed the KitchenAid winner results, you can find them here.) When Marlboro Man and I kicked his parents out of their house on the ranch so we could live there instead, I didn’t want to do a thing to the house. It was 30 years old, lived in, exceedingly comfortable, and I loved everything about it. The ceilings needed a fresh coat of paint, though, so after we kicked his parents to the curb, we decided to have it painted before we moved in. The day after the painter started, Marlboro Man said, “Why don’t we just go ahead and re-do the kitchen as long as we have this mess in here?” Six months later, we moved into the house, which by then had a brand new kitchen. And okay, we didn’t kick Marlboro Man’s parents to the curb. I asked my mother-in-law to help me figure out the design of the new kitchen because she’s good at that type of thing and she’d lived in the house for thirty years and knew all about the air and the light there. I’m happy with the way it turned out.

It's a Book! It's a Bag! For today’s DIY I’m gonna show you all how to make a book bag. Now, when I say book bag I don’t mean a bag to carry your books around in. I mean an actual book made into a rad and totally useable handbag. Sound cool? Here’s how it’s done! You’ll need: A hardcover book (preferably with a pretty cover). Making the Purse Base: 1. 2. 3. Cutting out the pieces for the lining: 1. 2. After cutting all of your lining stuff out you should have five pieces in all: one book-size rectangle and four trapezoidal side-panel pieces. Assembling the side panels: 1. 2. Adding the straps: 1. 2. Also, if your straps are leather (or pleather, vinyl, or any other thick/heavy material), you’re likely gonna need to weigh them down with something (weights, heavy books, etc.) while they dry. Making your book look less ugly (aka it’s time to get our deco on): This part of the tutorial is for those of you who weren’t able to get your hands on any books with neat-looking covers. For decoupaging you’ll need: 1. 2. 3. 1. 2.

crafty jewelry: wire wrapped ring – how to make a wire wrapped button ring Style HaNi design: dress for beachFigure knitting braids Crafts for Spring : colorful hat, crochet pattern If you want to have any crochet products and translate patterns to English , please order, you can see more products in my shop. Thanks. Crochet Ornament craft: cute motif crochet Ornament craft: cute motif crochet Crochet rabbit patterns Crochet fish patterns Crochet butterfly patterns Crochet snail patterns Crochet duckling patterns Crochet ladybug patterns Crochet flowers patterns Crochet apple patterns Crochet cupcakes patterns Crochet owl hair Animal Scarf Crochet Patterns, OOAK Animal ScarvesAnimal Scarf Crochet Patterns, OOAK Animal Scarves Cat Cuddler Scarf - Animal Pet Warm DIY Fashion Tutorial Winter Fall Autumn The Cat Cuddler Scarf Pattern.

Fancy Fabric Embellishments: Stuffed Yo-yos for Pinning or Wearing - Quilting Daily - Blogs I have quite a stash of hand-dyed silk ribbon, beads, buttons, and trims that I could use to embellish a quilt. The trouble is, aside from my small fabric collages, I haven't been making embellished quilts recently. Then I remembered Michelle Muska's Embellished Stuffed Yo-yos from the first season of "Quilting Arts TV." Michelle makes the yoyos out of scraps of cotton, velvet, or silk. Embellished Stuffed Yo-yosBy Michelle Muska Directions: 1. 2. 3. 4. 5. 6. If you can bear it, stick pins and needles into your new pincushion. I'm so glad I have all 13 seasons of "QATV." P.S.

Boost Your Income: How to make money on side There are scores of legit ways to add to your income, whether selling stuff, working from home or going online. After all, no matter how good a MoneySaver you are, a bit more money's always useful. This guide to how to make money, possibly gaining £1,000s of extra cash, is designed to work alongside your tips in the forum. Too many of us let cash languish in accounts or in products paying rotten returns. Give yourself a 25% pay rise There's nowt more powerful than sorting out your own finances. How much? How do I do it? Make your credit card pay you Cashback credit cards pay you back a proportion of what you spend each time you use them. Set up a direct debit to pay the card off in full each month, so there's no interest cost, and you can earn £100s/year. How much? How do I do it? Get Our Free Money Tips Email! For all the latest deals, guides and loopholes - join the 10m who get it. Don't accept pitiful savings rates Make sure you're getting the most out of your savings. How much? Baby-sit

How To Make Biodegradable Mini Planters From Toilet Paper Rolls - Plant Care Today Discovering New Plants, Ideas and Uses Everyday How To Make Biodegradable Mini Planters From Toilet Paper Rolls Don't miss a thing! If you plan on starting your own vegetable and flower seeds, you can get a little more mileage out of that toilet paper roll. Make Biodegradable Mini Planters Sign Up Now for Free Updatesand Exclusive Content: Sign Up Now for Free Updates and Exclusive Content: Discover new varieties, get the latest info on plant care, "How To" videos, articles and more by entering your email below: Follow Us! Search Categories Service Latest Post Return to top of page Copyright © 2014 · +Gary Antosh · PlantCareToday.com · Privacy Policy · Site Map Close Please support the site By clicking any of these buttons you help our site to get better

DIY Stylish Bracelets I don't know about you, but I'm an accessory fanatic! Bracelets are my go-to accessory and I'm usually covered in them! I've always drooled over all the amazing and fashionable pieces of jewelry that I see in magazines or in-store, but unfortunately my wallet can't afford to buy them all. Little did I know that you could make them all at home! 1. Rocker chic is always in fashion so why not rock a few of these awesome handmade pieces?! Combine different textures and colors with this awesome DIY tutorial found here. 3. Add a Greek, rustic feel with this beautiful chunky bracelet. 4. Can you believe you can make these at home!? 5. There's nothing more glam than the combination of these two materials. 6. Ever since you were young you and your friends probably had some sort of friendship bracelet; whether it was store bought or handmade. 7. Chunky accessories are all the rave right now and this one has the impact of a store bought one, for a much less cost! 8. 9. 10. 11. 12. 13. 14.

Icy Earrings From... Bubble Wrap?! I've been experimenting with fused bubble wrap this past week, something I've wanted to try ever since I spotted this awesome bubble wrap pendant over on Craft:. Here's what I came up with: Snowflakes! In June! There are lots of fused plastic and bubble wrap tutorials out there you can Google, but fortunately the process is really simple: just sandwich your plastic between two sheets of parchment paper and iron the bejeepers out of 'em. The resulting fused plastic is relatively smooth, but has a nifty crackly look to it, almost like frosted ice. Maybe in small quantities it's more pearl-ish. Anyway, after brainstorming a while I decided to take advantage of the icy look with snowflake earrings. They're pretty shiny when the light catches them, which adds to the ice illusion. These were made with four layers of fused bubble wrap, but I'd advise only using three layers if you try this yourself, since my poor punch almost didn't make it through the thick plastic.

Related: