
How to make gift bags from newspaper When I bought something at a store recently, the clerk handed me my purchase in a bag made from a newspaper. I liked it very much and had to make some more—thus today's DIY recycled newspaper project: gift bags made from the Wall Street Journal. You can vary the dimensions, of course, but here's what I used to create a bag that's 5" tall, 4.5" wide, and 3" deep. Stack two sheets of newspaper on top of each other. This will be a two-ply bag for extra sturdiness. Cut out a rectangle that's 15.5" wide and 8.25" tall. Fold a flap 1.25" down from the top. Cut two pieces of cardstock or chipboard to 4.25" x 1", then glue them on the widest two panels just under the top fold. Put glue on the outside of the 0.5" tab and bring the left-most panel over to form the body of the bag, aligning the cut edge of the panel with the folded edge of the flap. Upend the bag so the 2" flap is now up. Put glue on both flaps and fold them inward to form the bottom of the bag.
Dandy the Lion Wool Felt Designer Plush Doll by nonesuchgarden V and Co. how to: gathered heart pillow last week was butt freezing cold here. like in the negatives. so i needed something to keep me busy and happy in the house. and well valentines being around the corner...well when you are a crafter and trying to create things for the holiday... it's right around the corner.this little pillow is fast and easy and well, a happy maker in freezing temps.lets get started: materials needed:a strip of pink or red fabric approx size of 6" by 12"two squares of muslin (i used sandcastle fabric i had on hand in my stash) cut to around 10" by 10". okay now lets get started with the sewing: first you are going to put your machine on the running stitch. mine is a #5.sew a 1/4" seam along both of the long sides of your pink fabric.**while you are sewing your running stitch, hold slightly your thread up above, by the spool of thread. this will create your gather as you go. do the same thing to the other side. here is what your gather should look like. next you are going to take your muslin square all done!
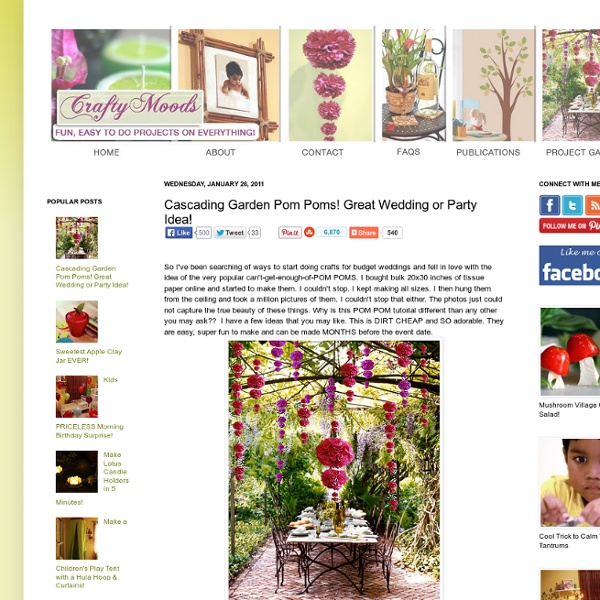
Paper Starburst Pendant Light So I had a different project that I was going to post today, an update version of my Book Pages Pendant Lantern from Project 19, but then I started working on this light idea, and I am so excited by the results I just couldn’t wait to show you guys! My inspiration and guide was this light from Design*Sponge, that I spotted on Pinterest. I really liked the idea, and I had a roll of white vellum lying around left over from college that I thought would look beautiful. So I started cutting triangles. The roll of vellum that I was using was 24 inches long. I think I glued the pieces on much closer than they did in the Design*Sponge tutorial, but I wanted a really full look. All in all I think the light is pretty awesome, and I can’t wait to post it on Etsy, though I’m a little bit worried about shipping. So I know I need to get back to my 30x30x3 projects, but this light took me by surprise with its shape and fantastic outcome, and I just couldn’t wait to share! Ciao, Allison Like this:
Super cute sewing tutorials Have you visited Anna Graham's blog Noodlehead yet? If you like to sew things that are so cute you can't stand it, rush right over there. Here's her free tutorial for gathered clutches (also available as a PDF pattern with other styling options for purchase right here.) Or maybe you want a little zippered pouch with a key ring. Maybe you want that zippered wallet to have some adorable detailing. Or maybe you want to sew a bike basket, a diaper keeper, a mail organizer, or a host of other useful things listed on Anna's blog. To see the lovely things others have made from her tutorials, like Yellow Poplar's pouches above, visit the Noodlehead Tutorials Flickr pool.
DIY Pantone chip magnets I try to keep loose Pantone chips in an envelope for future projects, but these nice colors escaped and attached themselves to my file cabinet. If you happen to own a Pantone chip book or can beg a few chips from someone you know, here's how to whip up some little candy-like magnets. Cut small pieces of bookboard or other thick cardboard with an X-acto knife. (Bookboard is likely available at your local art store or PaperSource.) Make the pieces exactly the size of the Pantone chips. Attach the chip to the cardboard. Then cover the face of the chip with paper glaze. Finally, attach a magnet to the back. tutorial tuesday: fabric flower garland « Sarah Nielsen This is fabric flower garland is pretty simple. I made the flowers out on the deck while the boys played in the backyard. Later that night I made it into a garland. + fabric of your choice cut into circles (3″ diameter) + needle and thread + hot glue + twine or ribbon STEP 1: Fold one circle in half. STEP 2: Put a little stitch in the bottom. STEP 3: Take another circle and follow steps 1 & 2. STEP 4: Decide the length of your garland and space out your flowers. STEP 5: Hang it where you can enjoy it! Be Sociable, Share!
Tiny Polaroid Magnets | { Ambrosia Girl } Hi there! It’s felt like forever since I’ve last blogged, and has felt like an eternity since I’ve done anything crafty and nifty. Since my morning sickness has gone into full speed (yes, we’re expecting our third this fall!) I came across these DIY Pantone chip magnets on How About Orange and wanted to do something similar. You will need: Cardboard (mine was the backing of a sketchbook — much thicker than the back of a regular spiral bound notebook) or 2-3 sheets of white cardstock or poster board spray-mounted together to use as a sturdy backing to the magnetsOpaque white marker (necessary only if your cardboard is not white) Craft knife Metal straight edge/ruler Clear packing tape or frisk film. Step 1: Download a Photoshop file of the Polaroid frames below. Step 2: Print out photos onto photo paper. Step 3: Spray the back of your sheet of photos and also the cardboard with spray mount. Step 4: Trim out photos with craft knife. 487 Comments
Free Crochet Pattern – Easy iPhone Sleeve « Roses n Lilies Here is a sample of some of the iPhone sleeves I have made, to give you a little inspiration. They were all made using my free pattern. The pattern is very easy, and you can use any yarn you choose. These were made using Veronica in Burgundy and Veronica in Denim from Lincraft (10 wraps/inch) and a 7/0 crochet hook. Luscious Cookies and Cream Both ‘Strawberries and Cream’ & ‘Cookies and Cream’ were made using one strand of Fairy Floss in Cream from Lincraft and one strand of Double Kniting (DK) acrylic yarn from Lincraft (15 wraps/inch) with a 6/0 hook. Decadent Strawberries & Cream The red sleeve in the first picture is the one currently on my iPhone. I also had a pleasant surprise while working with the fluffy cream yarn. Happy Crocheting! Like this: Like Loading...
Think Crafts Blog – Craft Ideas and Projects – CreateForLess » Blog Archive » How to Make a Cool Button Pendant Welcome Guest Blogger, Diane Gilleland, from the Blog and Podcast “CraftyPod”. CraftyPod is made by me, Sister Diane – aka Diane Gilleland. I’ve made things my whole life, and would gladly give up most household chores for an afternoon of serious crafting. When I’m not crafting, I producepodcasts, and make zines, and write and blog about crafts. I live in Portland, Oregon – the coolest city ever. How to Make a Cool Button Pendant How to Make a Cool Button Pendant at ThinkCrafts.com Here’s what we made at Church of Craft yesterday: Button Pendants. So, you begin with some small pieces of plastic canvas. Next, gather some cool buttons. Okay, now we’re going to wire these buttons to the plastic canvas. Take about an arm’s-length piece of wire. Poke the leading end of the wire back down through the other set of holes – again, passing through both the button and the canvas. Now, here’s something to watch out for as you pull your wire through the canvas: it will want to twist up. . . . See?