
Create a 3D Text Effect Using Photoshop Layer Styles Photoshop layer styles are the first tool beginners learn to enhance text effects. In this tutorial I’m going to show you how powerful and flexible this tool is. We will go beyond the overused gradient overlay and 1px stroke effects. We will use patterns and some useful tricks to create a 3D text effect! Preview: Click to enlarge Close-up For Mac users: ctrl=cmd Step 1 Create a new document in Photoshop. I want to create a grunge background for the text. Today, I will use a pattern. Step 2 Create a new layer, set black as the foreground color, grab a large soft brush with hardness 0% and gently paint over the edges of the canvas. Step 3 We need a bold font with keen forms/edges. Step 4 From the layers window, right-click on the text layer and select Blending options. The first thing to do is add a gradient overlay going from a dark purple (#700760) to a lighter one (#b827a2), just to give it some color. Now select Satin, set its blending mode to overlay to add a glowing effect to the text: Step 5
28 Fresh Photoshop Text Effect Tutorials Editor’s note: For a newer, updated version of this post, check it out here. Thanks to the generosity of graphic designers, we have featured more than 150 text effect Photoshop tutorials in the past for you to enjoy carving out very cool typography for fun or career use. However, we’re very shocked to see that more and more quality text effect tutorials came up these months, so we decided to not only give you a showcase, but impress you with a collection of very high quality text effect Photoshop tutorials, we called them kick-ass tutorials. Yes, in the following round-up we have set up 28 rare and professional Photoshop tutorials on creating extremely appealing text effects. If you’re interested to check out our collections of 150+ text effect Photoshop tutorials, here are them for you! Recommended Reading: More Photoshop Text Effects! 28 New Text Effect Tutorials Create a Yummy Cookies Text Effect in Photoshop. Create an Eye Catching 3D Tech Style. Create an Extremely Glossy Text Effect.
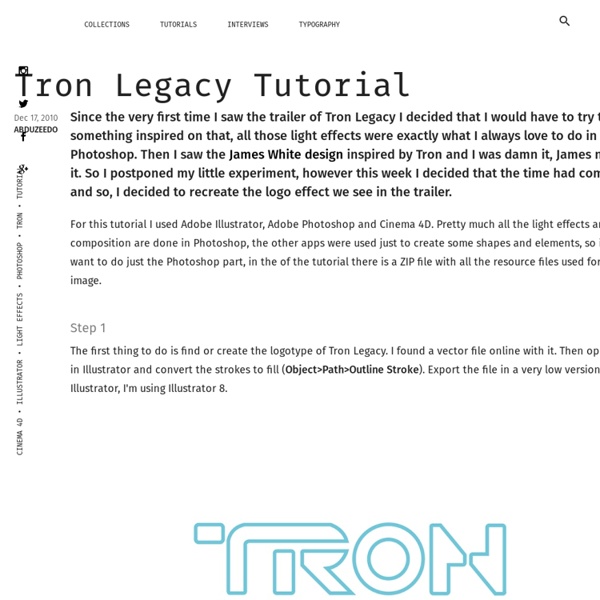
Create Enigma Typography Poster Using Photoshop Published on Thu, Feb-24-2011 by Nikolai In this tutorial we will go through the process of making this typography poster called “Enigma” only using Adobe Photoshop. You will have a basic look into the 3D-Tool of Photoshop, how to texture and stylize your 3D Typography and how to make a shiny space background to create your own space-inspired text. This is my first tutorial and I hope you guys will enjoy it! You May Be Interested In The Following Posts Note: This Tutorial is more for the advanced Artists, so if you are a beginner you should practice until you feel comfortable with photoshop and its tools. Note 2: Of course you can do this tutorial with other Photoshop Versions, but for this one CS5 is very recommended, because it has got functions which are not in other versions. Final Image Preview Stocks Used: Step 1 – Starting Creat a new document in Photoshop: 1680 pixels width and 1050 pixels high at 72 dpi, but If you would like to print out your works you should use 300 dpi. -Curves:
How To Create Dirty Dancer Composition in Photoshop Published on Thu, Sep-01-2011 by Pablo In our new tutorial you will learn hot to create dirty dancer composition in Photoshop. For this tutorial you need basic Photoshop knowledgeable, as we will work with basic Photoshop tools, like burn tool, brushes, filters and others. As you can see from the preview, with the basic knowledge and a little effort, we will be able to create a stunning effect. So, lets start to work. You May Be Interested In The Following Posts Final Image Preview Stocks Used Step 1 First create a new document in Photoshop – Width 1000px Height 1500px and 300dpi. Step 2 Create a Radial Gradient Overlay, Gray (#4e4f50) to White (#ffffff). Step 3 Open the render and paste in the center. Step 4 Open the picture of the women. Use the Burn tool we used earlier with the same parameters. Step 5 Duplicate the render, put it above the layer of women, then add a layer mask, delete with a solid black brush some parts of the render to look like this: Step 6 Step 7 Step 8 Step 9 Download Psd file
Create An Elegant Vehicles Web Layout With Light Effects in Photoshop Published on Mon, May-16-2011 by Michaellee In this tutorial I will teach you how to create an elegant vehicles web layout with a light effect using Photoshop. You will learn how to use different settings to fill out your canvas with nice lightning and blending modes using different stock images to create good light effects. You May Be Interested In The Following Posts Final Image Preview Stocks Used: Step 1 – Creating a new file Open a new document on Photoshop – 1200 pixels width, 1500 pixels height and 300dpi with white background color. Step 2 – Create Background Open the Background Stock, then drag it into the middle of the canvas after placing it into the canvas we are going to Desaturate the Background Stock by pressing CTRL+SHIFT+U. Open the C4D Stock and drag it to the middle of the Nebula Stock then change the Blend Mode into Overlay. Duplicate and Resize the C4D Stock to add more elements to our web template background. Add a Gradient Fill to add more depth using these settings.
DIY: Make your own Halloween dinnerware So now you've seen my interpretation of a Raven themed dinner party, I wanted to show you how I made the dinnerware. If you are like me you probably oogle over the holiday themed dishes but quickly shy away since you don't want to shell out for a whole set just for one celebration. (I don't even have real china so I think its safe to say I won't be buying any themed kind either) So when this idea of making my own for next to nothing came to mind, I just had to try it. Obviously this interpretation is quite macabre but you could totally mix it up to make it your own - think nursery rhymes for baby showers, holiday song lyrics for christmas, bible passages for easter, dirty doodles for hen nights... I could go on and on. Start off with plain white plates of your choosing (available cheaply everywhere), a porcelain 150 pen, some blue masking tape and a small stencil (optional). Now on to the little plate. I added the 'nevermore...' under the bird and the hard work was over.
A Singular Creation Art Community • Tutorial: Painting Realistic Eyes We would like to ing you this feature tutorial by Linda Bergkvist, renowned in the digital arts community for her gorgeous portrayal of characters. In this tutorial, Linda shows us step by step how she paints realistic eyes. About Linda Bergkvist Linda Bergkvist is a renowned digital artist who currently lives in Sweden. Achieving a Vintage Look Through Color Tones in Photoshop CS by Guest Contributor Anna Gay Photographers are often striving for a “vintage” look in their photos, and even though there are endless ways of achieving a vintage look, there are a couple of characteristics to keep in mind. First of all, the color tones in a vintage photo often lean towards either a blue or a red hue, or a cross-processed look. Vintage photos also have an element of noise or grain that can be achieved through textures, and also a certain amount of vignetting around the edges of the photo. This photo is the result of adjusting the color curves, adding two vignettes, and a color fill, which we will walk through step-by-step. First, open your photo in Photoshop and make sure your foreground color is set to white in your side tool bar. You will see the above dialogue box. As you can see here, there should be three layers – your Background image, then your two gradient layers. Now, let’s adjust the color curves. Use the drop down menu to adjust each color channel.
16 Ways to Promote your Website Many people spend their time maintaining their websites these days. Some even consider this as their primary source of income. There are so many websites which deals with various topics. When one makes a blog or a website, the next thing to worry about is how to promote it and how to let other people know you exist. 1. Image: NVasion Blogging is one effective way to reach other people. 2. Image: skippydogdesigns Since using social networking sites is a trend today, make use of it to promote your site. 3. Image: jonna_Asher Connect with people and meet new ones whom you could talk about your field. 4. Image: graphiccompetitions You can have contests in your website. 5. Image: ehow Directories can be found in the web where people will search certain articles for they are kept in one website. 6. Image: haiderali This is a common way to post your articles for free and reach millions of people. 7. Image: koisnake Join forums by answering questions, posting questions or commenting on posts. 8. Ads