
Tuto rosace (pas en français ni anglais) Etter at flere har ønsket seg denne oppskriften har jeg etter nøye overveielse bestemt meg for å legge den ut her på bloggen min. Den kommer opprinnelig fra et gammelt heklehefte som Solberg garn i sin tid ga ut. Såvidt jeg vet eksisterer ikke Solberg garn lengere, så da tar jeg sjansen på å presentere den her. Uansett har jeg skrevet om oppskriften, slik at det ikke skal være en direkte kopi..., håper ingen "arresterer" meg for dette!Jeg har forenklet, noe som kanskje har gjort det litt vanskligere hvis du ikke har heklet noe tidligere. Vikle garnet 8 ganger rundt pekefingeren. 2. omgang: Hekle 1 st i hver fm (28 st) 3. omgang: skift farge på garnet og hekle kun i bakerste maskeledd. 4. omgang: Hekle i bakre maskeledd, *3 hst, 2 lm 3 hst*. Skift farge. 5. omgang: hekle rundt neste lmb - 1 fm, 2 lm, 1 fm - , 2 lm hopp over 3 m. 6. omgang: *hekle 2 hst, 2 lm 2 hst, 2 lm*, gjentas rundt hele. 7. omgang: *3 hst, 2, lm, 3 hst, 2 lm* gjentas rundt hele Lykke til!
Pretty Little Petals [Free Pattern] Strictly speaking, this post was intended to be the "Part Two" section of the Granny Oblong saga. Except that I went on a frogging spree, and now the whole thing is sitting in the "in progress" box (which has a lid, so I don't have to look at them for a while! :P) But since you were promised a pattern, and since this is called "eggbirddesigns" not "eggbirdthefrog", a pattern ye shall receive!! I hope you like it :) Pretty Little Petals ETA: You can now link to this pattern on ravelry here Notes sp - space sl st - slip stitch sc - single crochet dc - double crochet ch - chain The pattern is written in American terms, however if you prefer UK terms there is a fab 'translator' here. To Begin: create a magic loop (if you're unsure how to do this, click here). Round 1: Ch1, 2sc into each space around. Round 2: Ch1, *2sc in next sp, 1sc in next sp* - repeat between * 6 times [18 sts total] Round 3: Change colour. Round 4: Ch3 (counts as first dc), 5dc in the same space.
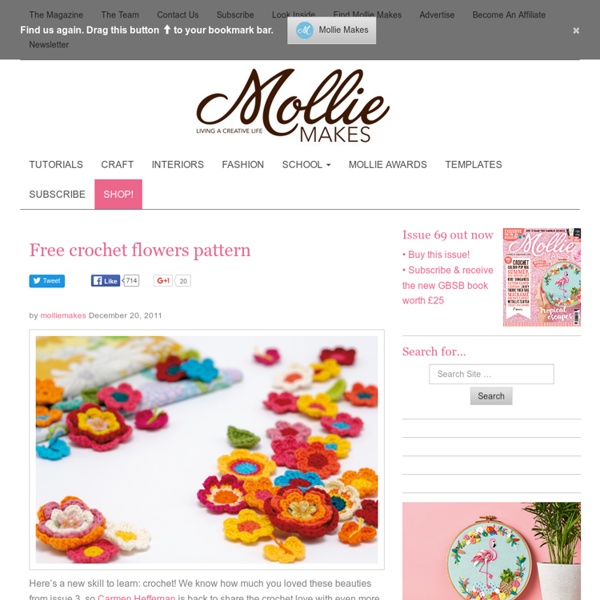
How to make colourful crocheted flowers These tiny flowers are sweetly adorable, totally thrifty and really easy to do. In mere minutes, you can whip up a rainbow bouquet from scraps of your leftover yarn. And when you're done growing flowers you can gift them to all the crafty folk you know. Materials:• Cotton DK yarn in various colours• 3.5mm (UK9/US E4) crochet hook• Tapestry needle AbbreviationsUK terms are used in this pattern:ch – chaindc – double crochethtr – half treble crochettr – treble crochetdtr – double treble crochetrep – repeatsl st – slip stitchst – stitch If you'd like to use a different weight of yarn, just check the label for the recommended crochet hook size and use that. Row 1: ch 3 Round 2: 11 tr into 3rd ch from hook, join with sl st to top of beginning ch 3 (12 tr made) Round 3: Join 2nd colour into top of any tr st from last round. Round 5: sl st into 1st ch space. (2 ch, 3 tr, 2 ch ) over each 4 ch loop space. Round 7: sl st into 1st chain space (2 ch, 4 tr, 2 ch ) over each 5 ch loop.
Tuto bracelet crochet 23 octobre 2012 2 23 /10 /octobre /2012 04:19 Bonjour tout le monde , aujourd'hui j'ai pensé à vous concocter quelques liens pour faire des accessoires au crochet , et donc je vous propose des modèles des bracelets au crochet trouvés sur le net .. Dans mon autre blog , vous trouverez des gifs Mardi pour vos blogs Si ce bracelet au crochet vous plaît vous trouverez les explications par ici Et voici un autre modèle de bracelet au crochet vous trouverez son pas à pas ainsi que des explications par ici Si ce joli bracelet au crochet vous plaît , vous trouverez son tutoriel ou le pas à pas ici et voici un joli bracelet au crochet avec des perles , vous trouverez son tutoriel ou le pas à pas ici Merci pour vos visites et vos commentaires..
Here goes a free pattern for a Croco-Flower. It’s... Teeny Tiny Flowers This is a very simple little crochet pattern for small five-petalled flowers and leaves.I love making crochet flowers. I love the decorative nature of them, that they can be used to embellish all sorts of crochet, knit or fabric garments and objects. They can be used to decorate a bag, a hat, a cushion, a coat. First a word about yarn thickness and hook size.Below are three flowers made using the exact same pattern, but with different yarns and hooks.On the left, Rowan DK handknit cotton, on the recommended 4mm hook.In the middle, the same Rowan cotton, but on a 3.5mm hook.On the right, Rowan DK wool on a 3.5mm hook. I prefer to use a slightly smaller hook size than usual so that the flowers come out tighter/smaller (as in the middle flower). The pattern is written in UK terms, the stitches as follows :: sl st :: insert hook, yarn over, pull the loop back through the stitch, then through the loop on your hook. For US peeps: UK dc = US sc UK htr = US hdc UK tr = US dc Round 1 :: Round 2 ::
Tuto bracelet crochet Alors voici mon mini tuto pour confectionner ce bracelet au crochet vous aurez besoin de : - Du fils de coton - Un crochet. J'ai utiliser un crochet de grosseur 1.6mm - Une attache à bracelet - De la petite chaîne en métal - De la colle à tissus ( assez liquide et transparente) Commencer par faire 3 cercles au crochet comme ceci: Faire un anneau de 8 ml 1er tour: 12ms ds l'anneau, 1mc ds la 1ère ms. 2ème tour: 1ml, 1ms dans la ml, 2ms ds chq ms suiv, 1mc ds la 1ère ms. 3ème tour: 4ml,[1br,1ml] 23 fois, 1mc ds 3ème ml. 4ème tour: 2ml, sauter 1ml, 1ms ds ms suiv, [1ml,sauter 1ml,1ms ds ms suiv] 22 fois, 1ml, sauter 1ml 1mc ds 1ère ml. 5ème tour: 3ml, sauter 1ms, 1mc ds la ms suiv, [3ml, sauter 1m, 1mc ds la m suiv] 22fois, 3ml sauter 1m, 1mc au pied ds 3ml du début du tour. Une fois mes 3 cercles fait, je les ai assembler ensemble en me servant du bout de fils que j'avais laisser à la fin de mon ouvrage à l'aide d'une petite aiguille J'espère que cela vous à plu A+
Red Irish Rose Free Pattern Easy Skill Size:About 4" diameter. Materials:Size 10 Crochet Cotton Thread: Red and Green Crochet Hook:Size 7 (1.65 mm). Abbreviations When instructed to join with sc, begin with sl knot on hook, insert hook in st or sp indicated, yo and pull up a loop, yo and draw through both loops on hook. General Starching Directions Cut a piece of cardboard larger than the article to be stiffened. Lay the article on the plastic, stretch out and pin into the correct shape. Generously spray with heavy spray starch. This method allows for washing and re-starching whenever necessary. Rnd 1:(Right Side) Starting at center, with Red, ch 6, sl st in first ch to form ring; ch 1, [sc in ring, ch 4] 6 times; join with sl st to first sc. (6 ch-4 lps) Rnd 2:Ch 1, (sc, 7 dc, sc) in each ch-4 lp around; join. (6 petals) Rnd 3:* Ch 5, working behind petals, sl st between next 2 petals, rep from * around. (6 ch-5 lps) Rnd 4:Ch1, (sc, 9 dc, sc) in each lp around, join. Rnd 6:Ch 1, (sc, 11 dc, sc) in each lp around; join. Leaves
Do you like free crochet patterns? Hi there , sometimes, you wrote me, that when you would like to open some of my free pdf crochet patterns - that it says to you, that the file could not be opened... well - I think that it is something what I can not able to know why it is happening... so I made a big decission :-) and I decided to write my free patterns directly on the blog and to pdf's files too :-).. What do you think about it? And what about to begin right now? With hmmm ...... Flower Applique ? OK, let's begin :-) Make a cup of coffee or tea, take a hook 3 mm and some rest of 100% cotton, 5 ply weight yarn, maybe you find some buttons and I know, that you find some beads in your sewing's suitcase too :-) I choosed the colors of chakras: 115 red, 281 orange, 208 yellow, 205 green, 165 light blue, 124 indigo blue, 113 violet and 114 cyklamen Material I used: 100% cotton - Catania Solids by Schachenmayr SMC Abbreviations used: Chain (CH) Slip stitch (SlSt) Single crochet (SC) Half double crochet (HDC) Double crochet (DC) Petal:
Tuto bracelet au crochet October 10th, 2008 Email 131 users recommend Plastic rings, covered with single crochet, make for bold, modern jewelry. Diane Gilleland Plastic rings, which are also sometimes called bone rings, are available in the home-decor or crochet section of your craft store. It's easy to join the rings together—just a couple of stitches does it. Photo: Diane Gilleland You can usually find bone rings in the home-decor or crochet section of your local craft store. What you'll need: Cloth measuring tapePlastic bone ringsUS size 8 steel crochet hookScissorsPearl cotton embroidery floss or crochet cottonCrewel needle22-gauge craft wireWire cuttersNeedle-nose pliers (optional)Begin by measuring your wrist, wrapping the measuring tape snugly. Reach the hook through the center of the ring and pull a loop back through. Yarn over and pull the first loop through the second. When you've crocheted about 10 stitches over the loose end, cut the end off close to your work. Stitch the two small rings together as shown.