
Super Slick Dusky Lighting Effects in Photoshop One of the best sites around for desktops has to be Desktopography. I've been inspired by their amazing work, so today we are going to put together a sunset image mixing some vector shapes and dusky lighting effects to produce a slick image that would make a nice album cover for a chillout mix! Steps and Assets As always you can download the PSD file to follow along at the bottom of this tutorial. Step 1: So here's our original photo from iStock. Step 2: First off we duplicate the photo, press Ctrl-Shift-U to desaturate the image to Black and White. Step 3: Now go to Filters > Blur > Gaussian Blur and apply a mild blur of 2px. Step 4: Now we set the blurred black and white layer to blending mode Overlay and Opacity 50%. Step 5: Now the lighting is pretty nice already, but I'd like some pinkish hues in the image as it makes the image a lot warmer than bluish colors. So in a new layer, use the Paintbucket to fill with a bright pink color. Step 6: Here's the image after adding the pink. Step 7:
Luminescent Lines Written by RossJune 17, 2008 Here we will create some thin flowing lines that look as if they emit light. This technique is fairly simple and is a great way to create an abstract wallpaper or looks good integrated into another image. This tutorial will mainly explore the brush engine and you will also learn how to create custom brushes and use them effectively, combined with some interesting layer styles. Tutorial Files If you are a PSD PRO member then download the PSD file and much more by going here. Final Image This tutorial will show you how to create an image similar to this: Step 1 Start by creating a new document, here I used 1024x768px and 72dpi. Step 2 Now hold Ctrl and click on the layer with this curve in it, in the layers panel, this should make a selection around the line. Step 3 Create a new layer to hold our lines. Step 4 Now we will make the lines glow so right click on this layer in the layers panel then select blending options. Step 5 Step 6 Step 7 Step 8 Step 9 Similar Tutorials:
Awesome digital bokeh effect in Photoshop Our last Wallpaper of the Week was an image I had created using Pixelmator, and I really liked the outcome. The best part about it was that it was pretty easy to accomplish in Pixelmator, but I decided for perspective's sake to create the same effect in Photoshop. The process is easy as well, but with a few extra steps. As in the previous tutorial, I will show you how to create a digital bokeh effect, but this time in Photoshop. The process is very easy and we will be using the super powerful Brush Engine, one of the coolest things in Photoshop. Step 1 Create a new document in Photoshop. Step 2 Select the Ellipse Tool (U), and create a circle. Step 3 Select the ellipse and go to Edit>Define Brush. Step 4 Go to Window>Brushes (F5). Step 5 Before we start painting our bokehs let's create a new layer and fill it with a colorful gradient. Step 6 Let's create a new Folder in our Layer Palette. Step 7 Go to Filter>Blur>Gaussian Blur. Step 8 Create another layer and paint more brushes. Step 9 Conclusion
Advanced Glow Effects In this tutorial, we're going to create some really sharp-looking glow effects using a combination of layer styles, the Pen Tool and Color Blending. The end effect is quite stunning and hopefully you'll pick up some tips you didn't know before. As with pretty much every tutorial I've ever written, we begin with a radial gradient. This one is pretty harsh and goes from a reddish brown color to black. Here are the exact color codes: Foreground color - #922f00 Background color - #000000 In this tutorial, we actually need a pretty intense center, so what we'll do is duplicate the layer we just made and set the one above to a blending mode of Color Dodge. Now in our glow effect, it helps to have a nice textured background. Then go to Filter > Render > Clouds. Now set the opacity of your layer to Overlay and 30% transparency. So go to Filter > Sketch > Chrome and use default settings of 4 and 7 for detail and smoothness respectively. In fact all we want to achieve are some nice curves.
Really cool Eclipse Effect in Photoshop In this tutorial I will show you how I created the Abduzeedo's footer. Some of the techniques I used here I took from other tutorials and also from another tutorial I wrote some time ago for PSDtuts Mix Cool Retro Curves Into Your Photographs. Besides, the design is inspired by the amazing work of James White, so I highly recommend you to check his work out. As I said before I used some techniques we saw before, from other tutorials. But one of the ideas of this tutorial is learn how to apply what we have learned from this tutorials, and create different effect. Step 1 Open Photoshop and create a new document. Step 2 - Brush This is exactly what we saw on the other tutorial I wrote, there are just a few differences. 1 - Add a new layer and fill it with gray. 2 - Go to Edit>Define Brush Preset... 3 - Rename your brush to "Rec Brush". Step 3 Now let's edit our brush, to do that go to the Brush Engine, Window>Brushes (F5). Step 4 The last thing here is to repeat this step 2 more times. Step 5
How To Create a Retro Grunge Apple Wallpaper in 5 Easy Steps in Photoshop Everybody loves the Apple logo, especially retro striped logo from 1977. In this tutorial I will show you how to create, a retro grunge Apple wallpaper, in Photoshop, just by following this 5 simple and easy steps. We will be combining Apple stripe logo with nice grunge texture and grunge brushes to create this beautiful wallpaper. Here is preview of what we are going to create. Let’s start by creating new document in photoshop with size 1920x1200px. Since the Apple retro stripe logo is made from 6 stripes, we’re going to create background with same 6 stripes. Create new layer. Fill this layer with following color: #009edc. Repeat this steps for the next 5 colors. Download the Apple logo in all its exact proportions as an EPS file from Brands of the World. Open it in photoshop and drag it to the centre of the document. Open layer styles for logo layer and add a Bevel and Emboss effect to give a semi three-dimensional appearance. Then add Drop Shadow effect And Voila! Hope You all enjoy it.
Cross Processing in Photoshop - color negative art effect See more Sample Recipes from the Photoshop Cookbook Series. Creative Cloud Discount - Adobe Creative Cloud 40% Off Discount Current Creative Suite users - Save 40% off the first year on Adobe Creative Cloud. With Adobe Creative Cloud, a simple monthly membership gives you the entire collection of CS6 tools and more. Exclusive 15% Discount On All Topaz Plugins - Use Coupon Code PHOTOSHOPSUPPORT - Includes Bundles And Upgrades Enter our exclusive discount coupon code PHOTOSHOPSUPPORT during the checkout process at Topaz Labs for an instant 15% discount on any Topaz product, including bundles and upgrades. Topaz Labs Photoshop plug-ins are specifically designed to expand a photographer's creative toolbox by harnessing powerful image technology developments. Learn more about the Topaz Photoshop Plugins Bundle. Exclusive onOne Software 15% Instant Discount Coupon OnOne’s new Plug-In Suite solves six of the most frequent problems photographers will encounter in Photoshop. Color Efex Pro Viveza
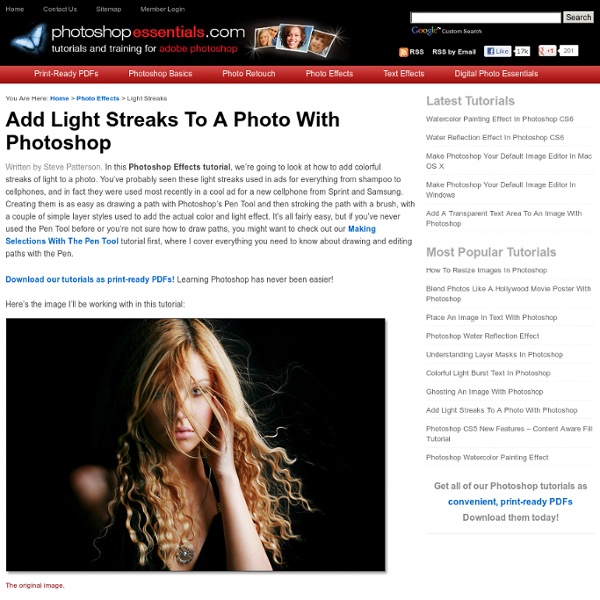
Photoshop Frenzy - Made for faster learning! » Blog Archive » Dramatic Gritty Effect Posted in Photo Effects on December 6th, 2007 with 77 responses . In this tutorial we’re going to show you how to add a dramatic, gritty, bronzed effect to your images. We’ll convert our subject image as follows: 1. Open our project image and immediately duplicate the background layer by right clicking the background layer and selecting ‘Duplicate Layer’. 2. 3. 4. 5. Our effect looks like this now: 6. And voila…our dramatic gritty effect is complete! Adobe Photoshop Tutorial: Extreme Contrast Photo Effect - Learn Adobe Photoshop Written by Steve Patterson. In this Photoshop Effects tutorial, we’re going to learn how to use layers, layer blend modes, some noise, a little sharpening, and a simple adjustment layer to easily give a photo an "extreme contrast" effect. Here’s the photo I’ll be using for this tutorial: The original image. And here’s the “extreme contrast” effect we’re aiming for: The final result. Let’s get started! Step 1: Duplicate The Background Layer The first thing we’re going to do is duplicate our Background layer. Photoshop’s Layers palette showing the original image on the Background layer. We’re going to duplicate it, and for that, we can use the keyboard shortcut Ctrl+J (Win) / Command+J (Mac). The Layers palette now shows the duplicate of the Background layer, named “Layer 1″, above the original. Step 2: Desaturate The New Layer We’re going to quickly remove the colors from our new layer to create a black and white version of the image. Step 3: Duplicate The Desaturated Layer And there we have it!
Photoshop Effects Soft Focus Glow Tutorial Written by Steve Patterson. In this Photoshop tutorial, we’ll look at how to quickly and easily add a soft focus and glow effect to a photo, which also happens to do a nice job of boosting the image’s contrast and color saturation. I’ve been using this technique with my photos for years and it’s still just as popular today. Whether you’re a wedding photographer, nature photographer or you simply enjoy taking photos of family and friends, give this effect a try and see if it doesn’t make your images look a bit more magical. Here’s the photo I’ll be working with in this tutorial: The original image. And here’s how it will look after adding our soft glow: The final result. Let’s get started! Step 1: Duplicate The Background Layer With our image newly opened in Photoshop, we can see if we look in our Layers palette that we currently have one layer which is the Background layer. Photoshop’s Layers palette showing the original image on the Background layer. The Layers palette now showing two layers.
Streams of dusty light Photoshop tutorial Streams of dusty light tutorial by Battle Farm We will use this picture that I took in the Arlington Cemetary for the tutorial. Step 1: Go to Select>Color Range Step 2: Make sure you have the Selection Radio button selected, select the sampled colors box, and choose highlights. Click ok Step 3: Hit Ctrl + J (This will make a new layer by grabbing only what was selected in the previous layer) Step 4: Hit Ctrl + J again or just duplicate the top layer. Step 5: With the top layer selected, go to Filter>Radial Blur. Step 6: Take the amount all the way to 100, select Zoom, and select Best quality. Step 7: Now hit Ctrl + F (This is a shortcut that applies the last filter to the layer) 2 more time, or simply repeat the previous step 2 more times. Step 8: With the top layer still selected, Hit Ctrl + J 2 more times, or simply duplicate the top layer 2 more times. Step 9: Merge all of the 3 zoomed layers into one. Step 11: Select a radius of 1.5 and click ok That’s it, you are done.