Piratecore: How to make a Soft Cover Wrap Around Notebook
How it was done:1.Cut the 25 sheets of paper to 5 x 8 inches. Put them into 5 stacks, with 5 sheets in each stack.2.Using the bone folder, fold each of the stacks in half.3.Using the sewing machine on the widest stitch setting, sew down the center of the crease on each of the five plies.4.This is what each of the piles will look like. 5.Fold the pages in half again and pile them up neatly, with the sewn side facing out.6.Using a press, or something to keep the pile of sewn papers together, put an old board on either side of the pile and insert it all into the press.7.You can see here the paper clamped inside of the press with the two pieces of scrap board on either side.8.With a brush, spread a generous amount of glue across the paper. 11.Now cut two pieces of card stock that measure 5 x 8 inches.
Make Your Own Moleskine-Like-Notebook
What we'll make: Your very own Moleskine-like-notebook/journal/sketchbook. The one we'll be making is 3.5 x 5.5 x .5 inches. I use this size because it fits nicely into my back or front pants pocket. Don't be put off by the many steps involved. This particular notebook was developed over many years of feeble attempts to organize my thoughts, appointments and small sketches. I hope you enjoy making and using them as much as I have. Table of Contents: Page 1. Materials Needed: 24 sheets of paper 8.5 x 11 inches (use 20# bond at first then you can try other types of paper) One 8.5 x 11 inch sheet of a "special" paper . Tools Needed: A bookbinders needle . Step 1. Take a sheet of your paper, t-square, triangle and pencil and mark your cut lines as shown. Step 2. Now you have 26 sheets of paper (folios), 24 for your pages and 2 for your endpapers. Step 3. Collate six of your folios into a signature as shown then flatten them. Step 4. This is how the spine should look after it's jogged. Step 5.
notebook
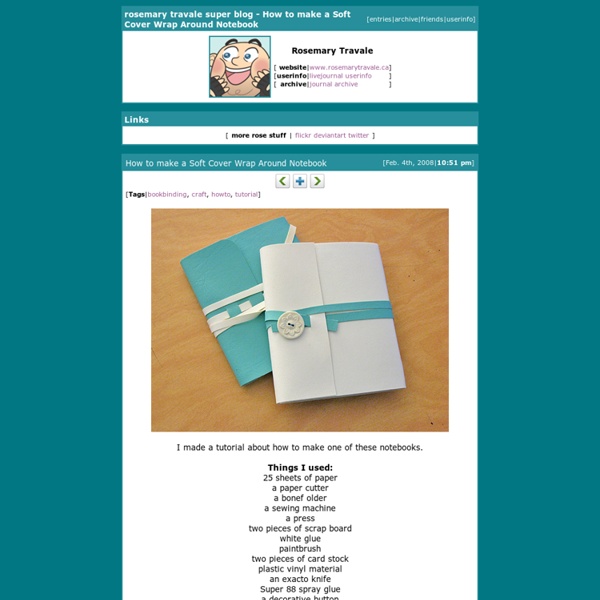
Here's another DIY project from our sweet friend, Sasha - from the The Gilded Bee. Be sure to check out her awesome shop full of handmade packaging lovelies. Thanks for being here with us Sasha! I'm delighted to share my book tutorial with you today: Supplies you’ll need to make this project: • One—8.5 x 5.5 sheet of cardstock • One---1/2 x 3 inch piece of cardstock or paper • Two---2 5/8 x 3 1/8 inch pieces of cardboard, chipboard or matboard (not corrugated) • Hot glue gun and glue sticks • 25---3 x 5 inch ruled or blank index cards • Two---3 x 5 inch sheets cardstock • 2 rubber bands • Pencil • ¼ inch wide Ribbon: One-6 inch piece, plus two-1 inch pieces To make the page block: * 1. * 2. * 3. * 4. * 5. * 6. To make the cover: * 1. Make a little mark at the center of each side of your paper (4.25 inches on center). On each side of those center marks, draw three lines paralleling each other (6 lines total): 5/16”, 5/8”, 13/16” inch from the center mark. * 3. * 4. * 5. * 6. * 8. * 9. * 10.
How to bind papers without staples or clips [2]
Lately my new found alternative to hold 2 or 3 sheets, usually printed articles or clippings of all sorts, is to dab a little glue or paste double-sided tape at the corner of each page. Both ways work out great! Next I came across this clever tip for making a simple booklet without needing even glue, tape or thread! The method consists of 2 parts. Part 1 (the base): fold paper in half. Part 2: fold a new sheet in half and unfold. I made a blank notebook with a fancy (and thicker) cover at the front and back. [Check out part 3!]
how to make a staple-free matchbook notepad.
In an effort to use up the damaged & small surplus of 2010 calendars I have on-hand, I've been experimenting with ways to repurpose them. These matchbook notepads were this week's project. They are easy to make .... and adorable ... and completely practical. I'll be making these to drop into my customers' packages as a token of thanks. The paper is from the offcuts of my shipping labels. Cut cardstock into 9" lengths and whatever width you desire. Cut sheets of paper into 4-1/4" lengths and the same width as you chose for your cardstock. Make a 5/8 - 3/4" creased fold on one end of your cardstock. Tuck a stack of 10 pieces of paper into the fold. Sew or handstitch across this edge, leaving a 3/8" seam allowance. Tip: I experimented with various thread weights and needle sizes. Fold opposite edge of cardstock over the paper, aligning fold with edge of paper. Tuck the edge of your cardstock under the lip of your sewn edge. These are so simple and fun - try it out!
Related:
Related: