
how to make a piano shoulder bag The piano tote is one of my bestsellers. It may sound completely irrational but I’m thinking of letting this particular bag design retire. So to celebrate, I made a piano bag tutorial. Happy sewing! 1. 2. 3. 4. NOTE: Don’t forget 1/2-inch allowances for all sides of all pieces. 5. 6. 1. 2. 3. 4. 5. 6. 7. 8. 9. 10. Congratulations, you just made a piano bag! For store-related news, I will be making piano slings and piano pouches.
tutorial: how to sew a simple maxi dress The Plan. Fabric. You will be making a maxi dress so buy fabric accordingly. I stand 5′ tall (I know, I know, I am tiny) and I needed 2.5 meters of fabric with a 45-inch width. Preparation and Cutting. Sewing. Don’t forget the banana. Instructions for making the rosettes are HERE. Make Alpaca Wool Sweater into Felted handmade Bag tutorial - The Inadvertent Farmer I paid $3.00 for the sweater... I found two sweaters with this tag...lucky me! Start by cutting off the sleeves just inside the arm-hole seams Next cut at the neck... I lined up a straight edge across the bottom of the armpits to make sure my neck cut would be as deep as my arm cuts. Try to make the arm curves and the neck curves match...I had to fool with it a little after these pics to get them even. These will be your handles After you cuts are made shift the sweater around till the handles line up. Next is the bottom of the bag...you don't have to do this, you can just sew the bottom together straight away but I needed the extra room. I used one of the sleeves I cut off for this. Turn your sweater inside out and at the bottom edge of the sweater pin your bottom piece, right sides together. Now how does one fit a square cornered bottom piece into a curved sweater hem? Well I put a little tuck in the corners of the bottom piece...all pointing in...to make it match up better to the sweater.
tiny happy: shoulder bag tutorial Here's a rough pattern and guide for making a shoulder bag like one of these, as promised. These are really easy to make, and I always have so much fun choosing fabrics and buttons for them. I have to warn you however that i'm not very good at explaining things in words, so I hope you can understand my general meaning in these directions! Please email me if you need further instruction, and I'll be happy to help! Once you've drawn and cut out your pattern, cut two from your chosen bag fabric, and two from your lining fabric. 1. 2. 3. 4. 5. 6. 7. 8. 9. 10. 11. 9. 10. p.s. please email me a picture if you try this out because I'd love to see it!
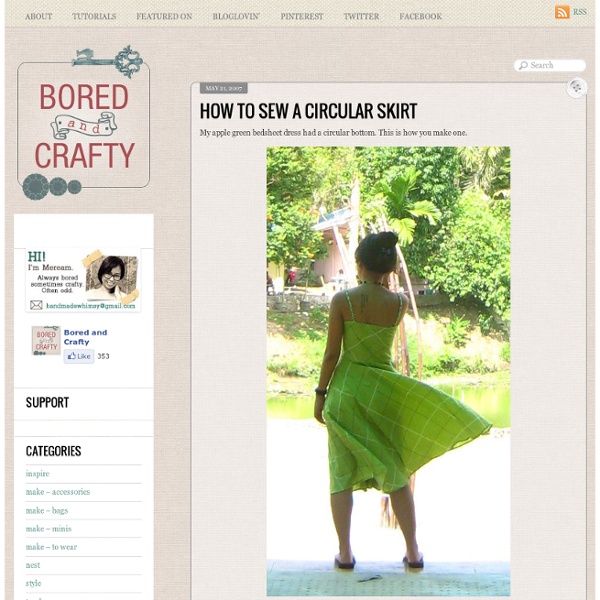
tiny happy: a dress for hot weather Here are the instructions for making your very own Beach Dress, as promised yesterday. It really is a dress for hot weather- mine is made from lightweight fabric, is knee-length and ties up at the nape of the neck. But I think you could also make it from a stretch jersey cotton or a fine wool fabric and wear it over warmer layers if you like. Ironically, today is the darkest and rainiest we've had this summer- so I'm sorry that some of the photos are rather dull. Hopefully you get the picture anyway. You will need: a length of lightweight fabric- cotton voile or lawn work especially well. sewing thread to match a spool of shirring elastic. a length of narrow elastic scissors, sewing machine, pins, etc. 1. Basically, you'll just be cutting 2 rectangles or squares of fabric, exactly the same dimensions, plus two long straps to make your sundress. First of all, determine how long you'd like your dress to be. Next, work out how wide you'll need to cut the fabric. 2. 3. 4. 5. 6.
tiny happy: shoulder bag tutorial Here's a rough pattern and guide for making a shoulder bag like one of these, as promised. These are really easy to make, and I always have so much fun choosing fabrics and buttons for them. I have to warn you however that i'm not very good at explaining things in words, so I hope you can understand my general meaning in these directions! Please email me if you need further instruction, and I'll be happy to help! Once you've drawn and cut out your pattern, cut two from your chosen bag fabric, and two from your lining fabric. 1. 2. 3. 4. 5. 6. 7. 8. 9. 10. 11. 9. 10. p.s. please email me a picture if you try this out because I'd love to see it!
Embroidered Felt Brooch Project Melissa (from tiny happy and our board) has made some lovely embroidered brooches in past months. Today she shows you how to them too. Pin one on your jacket, give one to a friend… You’ll want to make several. From Melissa: I’ve been enjoying making these little pins by hand, late in the evening while listening to music or watching a DVD. 1. 2. Here is a picture of some of my embroidered pins, a couple of geometric designs, a pine branch and some daisies: I don’t use patterns or transfers for any of my embroideries, and I encourage you to just start stitching and see where your thread takes you. For a quick reminder about chain or other embroidery stitches you can print our Pocket Stitch Book, or there are also some good diagrams here. 4. Pin your finished brooch to your coat, bag or cardigan and admire your handiwork! « August 31 ~ Hand Sewing Photo of the Day A Month of Hand Sewing in Review »
How to make a simple (reversible) tote bag Here is a simple way to make a tote bag. The best part it is even reversible. You might also like to make a zippered pouch to go with your new tote! You will be surprised at how easy it is to put in a zipper with this zippered pouch tutorial. You will need: 2 pieces fabric 13 1/2 inches X 14 inches (outside) 2 pieces fabric 13 1/2 inches X 14 inches (lining) 1 piece 4” X about 44″ long 1. 2. 3. 4. Cut four pieces fabric 13 1/2 inches X 14 inches. Sew lining fabric right sides together on three sides and also outer fabric right sides together on three sides. 3. 4. 5. 6. 7. 8. 9. Finished! You might be interested in making a matching pocket tissue holder and zippered pouch to go with your tote! The fabric is from Heather Bailey.