
How To: Create a Paper Cut Map of Your Favorite City Just Crafty Enough I have a thing for maps, especially city maps. I love the way that admiring a map instantly reminds you of the myriad of reasons you love the city you live in. It can also quickly take you back to an incredible journey you took long ago, or catapult you forward in a longing reverie of a far-away place yet to be visited. Like most things, I think I'll enjoy this paper cut map even more because I'll have made it myself, so I plan to give this project a try. This bright orange DIY map of Amsterdam from Just Crafty Enough has inspired me and the steps look simple enough: 1) Find a detailed (but not too detailed) map of your city of choice. 2) Use a thin black marker and a ruler to emphasize the lines that you are going to cut out. 3) Scan the map (with your markings) onto your computer and flip the image (so that the correct side will be outwardly facing when you mount it.) 4) Grab your exacto knife and cut away! 5) Spray adhesive onto your freshly-cut map and mount it.
Make Your Own Knitting Nancy There are all sorts of gadgets to create your own knitted chains or I-cords using a knitting mushroom, knitting tower, knitting spool/cork, knitting Nancy (or a knitting Ned) and so on that it makes your head spin! For my first grader’s beginning handcraft unit we began with braiding, knot-tying and finger knitting and worked our way towards using a Knitting Nancy. I realized the day before the lesson that I had neglected to purchase a Knitting Nancy ahead of time and it would be a week or longer before we would have one in our possession. A quick Google search brought up an easy one made from a toilet paper roll and four popsicle sticks or pencils. I was thrilled to stumble upon this version of the Knitting Nancy for many reasons: :: It used resources we have readily available in our house. :: It is easy to construct. :: It is durable and long lasting. Sweet! Materials A wooden spool (any size will do though I found the smaller ones split when nailed in to) A hammer A large needle
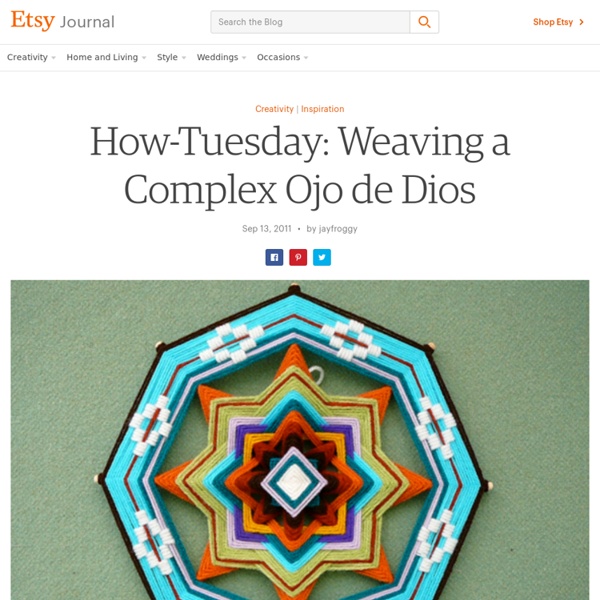
Ojo de Dios / God's Eye - Art Bar This summer has been flying by! We haven’t made much of a dent in our summer crafts list, I’m afraid. There is still time, though. One craft we did make, though, are these God’s Eyes. This post contains affiliate links. Here’s what you need: ~ 2 sticks (from nature, or store bought) ~ Yarn ~ Good sharp scissors Process: ~ The trick is all in the beginning. ~ When you want to change colors, tie the new color onto the back and keep going. While my two older girls (9 and 12) had fun with these, my little guy (6) found it a little challenging to keep the yarn straight as he went around. We now keep them on our mantle along with our other summer craft collections. xo, Bar UPDATE! Here is a photo of their work.
Low-cost Spherical Speaker Array The goal of this project was to be as cheap as possible. You'll want eight (8) loudspeakers. I would have used these speakers: $5.50 speaker but All Electronics was out of them. $7.50 speaker The important considerations were an impedance of 8 ohms (which is normal for home stereo speakers) and good frequency range. While at All Electronics, get some Speaker Terminals. I used four (4) "quad" terminals, but the four-pair ones look good. (NB: If all electronics doesn't have these anymore. The other major elements in this project are the bowls. Reda Bowls Insanely cheap. UPDATE: These bowls are no longer sold by IKEA. Finally, the miscellaneous hardware. 8 speakers x 4 mounting holes = 32. Also: - weather stripping - speaker wire ( I had some 18 gauge stuff lying around the house, the project only needs a few feet.) - heat shrink tubing
I ♥ mathematics {platonic solids garland} Oooh….it’s been I while since I last posted. We had a smashing Christmas and new year. Hope you all did too! My computer died just before Christmas and it’s taken my hubby and I a while to bring it back to life…which is why it’s been a bit quiet. I lost 3 months worth of work (new years resolution no.33 = backup files more regularly!). Now seems like a good time to thank all you lovely lot for visiting minieco over the last couple of years. In between posts I regulary use pinterest so do pop over and check it out if you haven’t already. There seems to be a bit of a Polyhedra craze going on at the moment. I have put together some templates for a ‘platonic solids‘ garland. Simply chop, score and glue together. Don’t forget to thread your cotton in whilst glueing the pieces together….I forgot! I’ll try to get a better photo of it in situ…our conservatory is really bright and sunny but the rest of the house is pretty dark (especially in this miserable weather).
Embroidered Cork Jewelry Pop open a bottle of wine and have a jewelry party with us! Macedonia-based artist Maya Kuzman, a.k.a sewella, shows us how to make textural jewelry with cork and embroidery floss in this week’s How-Tuesday post. You will never look at a wine cork the same way. I’m incurably in love with crafts. To mark the advent of spring and show awareness of our beloved Earth, I have prepared a cute recycling project consisting of cork embroidered discs. Materials Needed: Cork Embroidery thread Embroidery needle Thimble Scissors Directions: 1. As you can see, they are all different. The outer surface of the cork does not reveal the inside, so cut a thin slice to see if it is the type you need. 2. 3. 4. 5. 6. back front 7. 8. Below are some of the pieces I have made. Thank you to Maya Kuzman for sharing this project with us. More Things to Make | Jewelry on Etsy
Tutoriel : comment préparer son papier pour cyanotype • Tout pour le cyanotype Conservation du mélange pour cyanotype : le mélange se conserve jusqu’à quelques heures à l’abri des rayons du soleil. Le mieux est donc de préparer le mélange au moment où vous en aurez besoin. Assurez-vous également de préparer la juste quantité dont vous aurez besoin, afin de ne pas gâcher de produit. Au-delà de quelques heures, il peut se former un dépôt solide dans le fond du récipient. De plus, le mélange risque de s’abimer et les cyanotypes que vous obtiendrez risquent de ne pas très bien fonctionner. Vous aurez par exemple un contraste moins marqué, ou bien un changement de couleur moins visible. 3. A l’aide du pinceau ou du pinceau mousse, appliquez le mélange sur le papier. Si vous voulez un cyanotype à la couleur homogène, essayez de répartir le produit de manière homogène. En revanche, si vous voulez au contraire accentuer l’effet de textures sur votre papier cyanotype, vous pouvez jouer avec les coulées, les gouttes et le nombre de passages !
Keyboard Cat Have you looked at your desk latley and said.... this clearly doesn't accuratley reflect my sheer nerddom? Well, let your desk reach new nerd heights. Presenting... the unholy fusion of longcat and keyboard cat, with a little extra nerd thrown in for good measure. And it keeps your wrists comfy! Hand embroidered and made out of a tea towel. Longkeyboardcat is loooooooooonnnnggg. This guy was actually a birthday present for my geeky husband, so he's sitting on his desk now. Keyboard cat is pretty easy to make. Here's the basic idea of him. Kitteh embroidereh! Cut out his head, make him some dorky ears, and stitch that kitty together. Stitch and turn that kitty some legs and a little tail, and the fill them up with just a little bit of rice each. Give that kitty some legs! Turn that kitty right side out, fill him nice and plump with rice, and stitch that edge shut. Congratulations.
Inkling: paper bird centerpiece It was time to get serious about a spring table centerpiece and after much thought or at least five minutes of thought - I decided I needed some blue birds. To make these little paper birds, you will need: Paper to form the bird (I used kraft paper) Masking tape Pretty paper to cover the birds (I used blue rice paper) Glue Start by forming a shape of a bird with the kraft paper. Cut strips of your pretty paper and glue to your bird shape leaving the beak area uncovered. Use your birds to add a touch of spring to your craft projects or home décor. I have a feeling I’ll be making more of these little birds and adapting them for all of the seasons. This project is entered in the CSI Easter Challenge …………………………………………………………………… This project is linked at the following: And other link parties that I participate can be found here.
How to Make Leaf Skeletons I wanted to share with you a project from one of my readers who shares with us how to make leaf skeletons. I LOVE this! I have several leafs in various forms displayed in my home and knew I needed to make some of her leaf skeletons to add to my decor. I love how a pattern of leaves can enhance the beauty in your home. So I asked Heather if she would mind sharing her project with you. You can find more great projects from Heather at her blog The Other White House. I have spent hours and tried various ways of making these. You need washing soda, not baking soda! Gather your leaves. Washing soda is a strong base so you may want to wear gloves when handling the leaves. You will add 3/4 cup of washing soda and 4 cups of water to your pot of leaves. Keep going, you will need to add more water so your pan doesn’t dry out. When 1.75 hours are up fill a glass baking dish with cool water. I carefully removed them and rinsed with water and added clean water to the pan. 37.1Kstumbleupon
{DIY} une lampe avec des assiettes en carton! - Initiales GG ... bricolagedécodécorationdesignDIYdo it yourselftutoriel17.2.14 Voici encore une idée d'upcycling étonnant, puisqu'il s'agit de fabriquer une lampe avec des assiettes en carton! Il vo... Voici encore une idée d'upcycling étonnant, puisqu'il s'agit de fabriquer une lampe avec des assiettes en carton! Il vous faudra une lampe avec un abat-jour blanc, et un paquet d'assiette en carton, pour réaliser ce luminaire design et juste fabuleux! Fournitures : - des assiettes en carton (diamètre 18cm) - une lampe avec abat-jour uni et pied chromé - un pistolet à colle Pliez une assiette en carton en 2, dépliez la, et tracez 2 lignes espacées de 0.5 cm de la pliure : ça donne 1 ligne au crayon - 0.5cm - la pliure centrale - 0.5 cm - 1 ligne au crayon. Découpez ensuite les 2 moitiés d'assiettes qui vous serviront de patron. Pour chaque assiette, utilisez vos patrons afin d'obtenir un bord central plat, qu'on viendra coller sur l'abat-jour, à l'aide du pistolet à colle. Source
Modular Cat Ladder (or shelves) My cats are bored. If you're honest with yourself, yours probably are, too--let's face it, the average urban dwelling doesn't offer much in the way of excitement for felines genetically predispositioned to hunting in the jungle. So, in order to give them some exploration options (and because I thought it would be adorable), I decided to give them access to the top of my entertainment center from the back of one of my couches via a series of shelves spaced on the wall at with cat-navigatable spacing, aka a Cat Ladder. (couch on the left, entertainment center on the right) My requirements for this cat ladder were: 1. Some internetting turned up some interesting homebrew results using Ikea components, so I decided to go to Ikea and see what I could see that matched up with my requirements. Ikea Materials list: Optional mounting supplies: Stud Finder/Level/Drill with screw attachement Directions: 1. 3. 4. 5. 5. 7. 8. 9. Install in the location of your choice by whatever method you want.
A Rose is a Rose? Here's a new one! When is a rose not a rose? When it is picnic spoons. Really! These are fun and amazing. Materials: heavy duty plastic spoons pin back (optional) Goop glue (optional) Tools: candle ceramic tile (optional) garden clippers pliers Hold a plastic spoon about an inch above a lighted candle; bowl facing down. Place them together and melt the handles just under the buds. When the handles melt, pull them off of the rose bud and push the bud onto a ceramic tile to flatten the melted area. Melt the rest of the spoons but this time heat the underside of the bowls. Snip off the handles with garden clippers. Hold the tip of the petal with the pliers and heat the place on the spoon where the handle was until it begins to melt. Here you have a glossy, porcelain-looking rose. These spoons came from Wal-Mart (next to the paper towels). Hot glue silk rose petals to the base of the rose if you wish. There is a slight stinky melted plastic smell so you may want to open a window.
Fabriquer sa pierre d'argile, le nettoyant écologique Voilà une recette sympa que j'utilise depuis un bon moment : la pierre d'argile (ou pierre blanche, ou encore pierre d'argent). Elle ressemble à un bloc de craie blanche. Elle est très efficace pour récurer et dégraisser : - dans la cuisine : évier inox, vitrocéramique, plan de travail, - dans la salle de bain : robinetterie, vasque, baignoire, céramique, douche... Partout ailleurs : vitres, miroir, placards, porcelaine, plastique, carrelage, chaussures de sport, chaises en plastique de jardin, porte de four, grilles de barbecue… Le côté « faire soi-même » est très économique, pour moins de 2€ les 100g, contre 15€ le gros pot en magasin. Les ustensiles : Un pot (avec une ouverture assez large, de récup;) et avec un couvercle, un fouet, un saladier, une spatule Les ingrédients : - 50g d’argile blanche en poudre : agent légèrement abrasif, absorbe les graisses, anti-septique. - 25g de liquide vaisselle ou savon liquide (fait maison, par ex : suivre le mélange 40g savon dans 1l d’eau bouillante)