
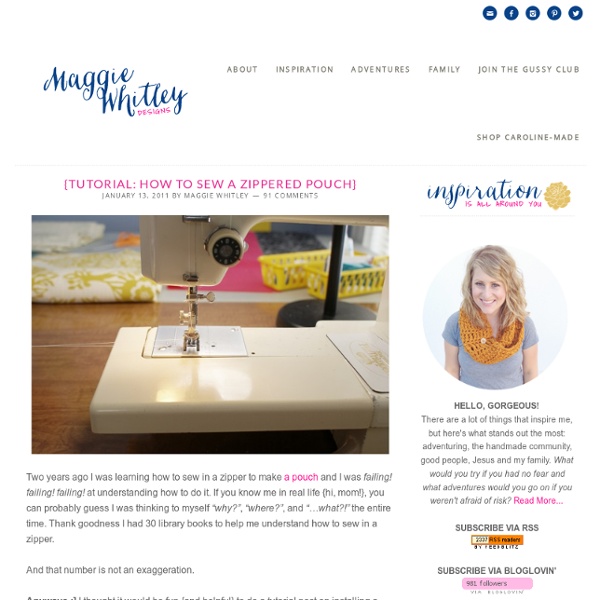
elm street life: DIY: Bow clutch sewing tutorial. And fiiiinally... the tutorial you've been waiting for. This is my first real sewing tutorial - which scares me a bit, because I've never actually taken a sewing class, so I don't know all the terminology. What I do know is that I've learned to sew lots of things by reading tutorials, so hopefully I can make this simple enough that even you beginners can feel confident making a bag. And yes, a bag with a zipper! It can be done, I promise.There are plenty of photos, so hopefully that will help. **Also, please note except where I say, "Sew close to the edge," I am using a 1/2" seam allowance throughout. Ok, let's get started! Supplies you'll need: 1/2 yard exterior fabric* 1/4 yard interior fabric (I recommend a quilting cotton) 9" zipper that matches your exterior fabric 1/4 yard #808 Pellon Craft Fuse interfacing Sewing thread that matches your exterior fabric Sewing machine Scissors Pins Iron & ironing board *I recommend a medium to heavier weight cotton for this. 1. 2. 3. 4. 5. 6. 7.
Top 50 Stylish DIY Blogs | Careers in Fashion Sewaholic Here you'll find "sewing projects, tips, and inspiration for the modern seamstress." Check out recent posts Bound Buttonholes: My Favorite Method , Underlining and Marking the O Dress , and Tracing an Unprinted Vintage Pattern . The Sew Weekly Mena started this blog to document her attempts to make all her own clothes, and now she has expanded her focus to trying to inspire others to make their own clothes, as well. Sew Mama Sew You'll find lots of tutorials, patterns and ideas on these comprehensive sewing blog. Sew Chic Mom and daughter Ruth and Jessica share their sewing projects and inspirations through this joint blog. Gertie's New Blog for Better Sewing "This site is all about tutorials, tips, inspiration, and lots of spirited discussion about sewing as it relates to fashion history, pop culture, body image, and gender," explains Gertie, a "sewing enthusiast" from Queens. La Sewista Bunny is a "passionate sewist" who has been sewing since she was a child.
MADE: TUTORIAL: the Circle Skirt I used to think that a gathered skirt was the easiest skirt to sew. But I may have changed my tune. A circle skirt is possibly even easier!….especially if you leave the elastic exposed. If you’ve ever made a poodle skirt before, it’s the same concept. Once you’ve created your pattern, you can whip up 4 skirts in an hour! Okay, let’s get started. What you need (for a little girl’s skirt): * about 1 yard of fabric* appx 3/4 yard of 2-inch wide elastic FABRICS to use:* Rayon* Polyester Charmuese* Simple Cotton* Thin Corduroy* Lightweight WoolMany fabrics will work for this project. ELASTIC:Wide elastic from fabric stores typically comes 2 inches or 3 inches wide; white or black in color. If you’d like to add a colorful twist to your skirt, check out our easy Tutorial for Dyeing Elastic HERE. Measure around your waist. PATTERN:This requires a bit of geometry but don’t worry, we’ll break it down for you. You need to figure out the radius so you can easily draw a circle. draw another 1/4 circle:
SEW Hip! Slouchy Slippers...completed! - Sewing Daisies SEW Hip! Slouchy Slippers (issue 20) have been made... The SEW Hip! pattern is advertised as a beginner's pattern, and I wholeheartedly agree. The Slouchy Slippers are incredibly easy to make. If you are short on Christmas gift ideas and you fancy 'making' your loved ones a present, then this pattern is for you. Being Spring 'down under' I adapted the pattern a little... Instead of using fleece on the inside of my Slouchy's, I went for Osnaburgh Cotton; it's lightweight and works well with every colour imaginable. plus I have loads of it ... Of course, being Spring doesn't alter the fact that I need non-slip fabric for the underside of my slippers. Non-slip fabric is something I have never had to buy before... and judging by the look on the face of the assistant at my local 'you want it, we've got it' store, neither has anyone else in Sydney. It's interesting how much a blank look can convey. Not being one to give up at the first hurdle, I scuttled off to find something I could use instead. Hmmm...
» DIY: Tank Dress with Pockets! academichic At long last, I present a tutorial for the tank dress I made a few weeks ago before the end of the semester blindsided me. I’ve been seeing these tank+patterned skirt all over the place lately, but frequently they were too short or too short-waisted for my particular proportions. After some googling, and studying the really excellent skirt tutorial and t-shirt dress tutorial at Ruffles and Stuff and the skirt with pockets tutorial at Freshly Picked, I decided that even my fairly rudimentary sewing skills could handle this project. And since I celebrated my height yesterday for Dress Your Best week, it seems appropriate to post a sewing project prompted by my need for a longer-than-in-stores dress. Supplies: a tank top2 yards or so of patterned fabricscraps of a coordinating fabric for pocketsmatching threaddisappearing fabric pen or chalk Steps: 1. 3. 4. Pin and cut out a pair. 5. 6. 7. 8. 9. 10. 11. 12. 13. 14. 15. A note of warning. I can imagine so many fun variations on this.
Zipper Card Pouch Have you ever had too many cards that your wallet can handle? Be selective and get only those cards that you might be using in a particular shopping mall but end up they were the wrong one? Or, may be just forgot to “update” the cards in the wallet on your next trip? Can’t find the cards you thought you have already put into your wallet? Sounds familiar….. I am not a big fan of big wallet, with the increasing numbers of cards that I have, my decent size wallet is no longer able to buckle up. This zipper pouch can hold up to 30 plastic cards (similar to credit cards), and more for thinner cards, business calling card for example. Get the pattern and tutorial to sew one yourself after the jump and don’t have to struggle with the cards anymore. {Get pattern and tutorial on next page.} Pages: 1 2 Get all updates via email: Highlights from Our Partners
pretty fabric bin organization Here are 10 terrific ways to make fabric containers, baskets and buckets. These fabric storage basket tutorials will get you organized in style! 1. Fabric Storage Bin Tutorial 2. 3. 4. 5. 6.Fabric Scrap Baskets 7. 8. 9. 10. Reusable Cloth Snack Bags [ Close Privacy Policy ] Privacy Policy / Your California Privacy Rights Revised and posted as of March 4, 2013 Prime Publishing, LLC ("Company," "we" or "us") reserves the right to revise this Privacy Policy at any time simply by posting such revision, so we encourage you to review it periodically. In order to track any changes to this Privacy Policy, we will include a historical reference at the top of this document. This Privacy Policy will tell you, among other things: Your California privacy rights. ACKNOWLEDGEMENT/YOUR AGREEMENT Company websites are not intended for use by individuals under the age of 18 or those who are not legal residents of the United States. HOW DO WE COLLECT INFORMATION AND WHAT INFORMATION DO WE COLLECT? Distribution Partners Website operators that license our ad serving technology pass information to us so that we may serve advertisements to you. Website Registration Forms We collect information about you when you register on one of our websites.
Milanese Stitch Pouch Metallic copper accents set off a monochromatic zip pouch that’s the perfect size for business cards, ID/credit cards, cash, or coins. It zips on two sides so you have much easier access into it than you would otherwise. The triangular pattern shown is traditionally known as ‘Milanese Stitch’ and is a common stitch in Berlin Work. Supplies: - 14 count white Aida cloth - embroidery floss in 2 colors (2 skeins per color) - metallic machine embroidery thread – this is copper colored Gutermann and I love it - 7″ zipper - fray check - lining fabric - sewing thread - needle with large eye - ordinary sewing needle To accommodate a 7 inch zipper I made my pouch 4 inches by 3 inches. The fabric is folded in half, so it needs to be 8 inches by 3 inches, plus seam allowance. Fray Check the edges so they don’t unravel as you work. Place pins at the corner 1/2 inch or 7 threads from the corner so you know where to start stitching. All of the stitches are worked diagonally.
{5 Maxi Skirt Tutorials i would ♥ to sew} Maxi skirts, do you remember them back in the old days? Well I do because they were my favorite fashion item to wear in my teens i was obsessed with them, i had them in all colour ranges some were plain other were printed (told you obsessed) I wish that i had kept them because…. like with most fashion items they always tend to make a come back and they are now everywhere Want to know what i did last night….well i didnt get to sleep until 3am this morning because i was searching for tutorials on how you can make your own {I know, i know…you can thank me later} hee hee Lets get started then shall we? I feel in love with this skirt tutorial from {Lorenna Buck} and cant wait to make one or two! Click HERE for PDF Pattern Can you imagine making a skirt in an hour? Another skirt i loved is this jersey skirt by {Megan Nielsen} Couldnt resist not sharing sharing this tiered maxi skirt tutorial by {Sew Much Ado} And that sums it up my lovelies my five favorite skirts that i would LOVE to sew.. comments
make a fabric tissue case with finished corners — insatiable need I made the tissue cases for the first time for the Richmond show this year, and at every show since then, people have gone wild for them. So many people told me that they’ve been looking for something like this but can’t find it anywhere! I thought that need, combined with the fact that they are easy peasy to make, made them a great candidate for my first tutorial. I do desperately want feedback, though. My goal when I sat down to draft this pattern was to make it as easy as possible to make – no lining, no interfacing, no closures – but still make it attractive. 1. 2. 3. 4. 5. 6. Now you have a flat, 2 sided rectangle with the seam in the exact center. 7. Center the overlapped edges on the seam. Then pin the overlapped edges in place. 8. 9. When you remove your hand, turn the tissue case over so the side seam faces away from you, and the fabric will form a triangle with a little flag. 10. Once all four corners are sewn and trimmed, turn your tissue case right side out et voila!
Un carnet sans pages Read this post in: Anglais Aujourd’hui, comme promis, un tuto pour ces deux petites bourses en cuir. Elles sont très faciles à faire (aucune couture !) et bien pratiques pour ranger monnaie, bijoux, pinces à cheveux et élastiques… Et tous ces trucs de fille qui traînent au fond des sacs ! On peut les faire avec ou sans pompons, en cuir ou dans d’autres matières (mais je déconseille le tissu fin parce que c’est trop mou, ça n’a plus de forme). Alors alors, les instructions : Matériel : - Du cuir ou simili (on trouve de très beaux cuirs sur ebay. - Du tissu pour faire un essai avant (histoire de ne pas se louper sur la taille) - Une perforatrice pour cuir (environ 10 € sur eBay, et ça ressert tout le temps ! - Une bonne paire de ciseaux - Du lacet (cuir, ruban, ce que vous voulez) - De la colle pour cuir, si on choisit de faire les pompons 1) télécharger le patron. 2) découper suivant le patron et percer les trous. 3) Faire passer le lacet dans les trous.