
How to Design a Flower in a Geometric Style Vendors who are part of the IAB TCF938Reject allAccept all Purposes (Consent):Store and/or access information on a deviceCreate profiles for personalised advertisingUse profiles to select personalised advertisingPurposes (Legitimate Interest):Use limited data to select advertisingMeasure advertising performanceUnderstand audiences through statistics or combinations of data from different sourcesDevelop and improve servicesSpecial Purposes:Ensure security, prevent and detect fraud, and fix errorsDeliver and present advertising and contentSave and communicate privacy choicesCategories of data:IP addressesDevice characteristicsDevice identifiersProbabilistic identifiersBrowsing and interaction dataUser-provided dataNon-precise location dataUsers’ profilesPrivacy choicesData Retention Period:31 daysYour Consent:Consent expiry: 5 years 1 dayCookie expiry may be refreshed during the lifetime.Tracking method: Cookies onlyShow details
50 Beautiful Retro and Vintage Photoshop Tutorials Six Revisions Skip site navigation 50 Beautiful Retro and Vintage Photoshop Tutorials May 2 2010 by Tomas Laurinavicius | 29 Comments Retro and vintage designs are valued for nostalgia and sentimental memories. 1. 2. 3. 4. 5. 6. 7. 8. 9. 10. 11. 12. 13. 14. 15. 16. 17. 18. 19. 20. 21. 22. 23. 24. 25. 26. 27. 28. 29. 30. 31. 32. 33. 34. 35. 36. 37. 38. 39. 40. 41. 42. 43. 44. 45. 46. 47. 48. 49. 50. Related Content About the Author Tomas Laurinavičius is a blogger and designer from Lithuania who’s currently studying Multimedia Design & Communication in Denmark. 29 Comments seeshell May 2nd, 2010 Nice work your very talented Richie May 2nd, 2010 Thanks for featuring two of my tutorials. Cheers, Richie Dan May 2nd, 2010 Retro seems to be coming in strong these past few months in web design, I love it! Tom Ross May 2nd, 2010 Great article Tomas! Nikola Lazarevic May 2nd, 2010 Great roundup! Thanks for including my tutorials: - How To Create a Retro Grunge Apple Wallpaper in 5 Easy Steps in Photoshop skyje Andrew
How to Create a Set of Toggle Buttons in Adobe Illustrator Vendors who are part of the IAB TCF941Reject allAccept all Purposes (Consent):Store and/or access information on a deviceCreate profiles for personalised advertisingUse profiles to select personalised advertisingPurposes (Legitimate Interest):Use limited data to select advertisingMeasure advertising performanceUnderstand audiences through statistics or combinations of data from different sourcesDevelop and improve servicesSpecial Purposes:Ensure security, prevent and detect fraud, and fix errorsDeliver and present advertising and contentSave and communicate privacy choicesCategories of data:IP addressesDevice characteristicsDevice identifiersProbabilistic identifiersBrowsing and interaction dataUser-provided dataNon-precise location dataUsers’ profilesPrivacy choicesData Retention Period:31 daysYour Consent:Consent expiry: 5 years 1 dayCookie expiry may be refreshed during the lifetime.Tracking method: Cookies onlyShow details
How to Design a 1980s Movie Poster in Photoshop In this article, we’re going to start by looking at a few inspirational movie posters from the 1980s which we’ll use for inspiration. Then, we’re going to use Adobe Photoshop to create a 1980′s style movie poster for our fictitious film titled “The Designer’s Mansion.” This tutorial is aimed for designers with a fair understanding of Photoshop. If you follow this tutorial, please feel free to post a link to your final product in the comments area below. Let’s get started! Here are 10 inspirational posters from 1980-89. 1980: The Blues Brothers A really lovely and inspirational ’80s poster that uses a limited color scheme and simple shapes to create a poster with a twist. 1981: Chariots Of Fire This poster is brought to life by the purposefully worn and noisy photograph, and it’s finished off with classic typography. 1982: A Little Sex Modern typography was clearly an inspiration in the ’80s! 1983: Scarface This minimal hand-painted piece makes use of color but leaves plenty of white space.
How to Illustrate a Vintage Stopwatch in Adobe Illustrator In today's tutorial, we are going to learn how to create a vintage stopwatch using basic shapes, Blends and Art Brushes in Adobe Illustrator. You'll learn how to use a variety of Illustrator tools. So let's get started! Step 1 To begin you will need to create the main geometry sketch of the stopwatch which is shown in the diagram below. The scaled images of the tiny stopwatch parts are shown below for your convenience. And here is the central button at the top. Step 2 Go to View > Rulers > Show Rulers (Command + R). Using the Ellipse Tool (L), create a circle filled with gray. Go to Object > Transform > Scale so as to decrease the dimensions of the circle, then click the Copy button in the dialog box of scaling, and change the color of the new circle as shown. Repeat these manipulations in order to create the next circle shown below. Step 3 With the Ellipse Tool (L), create an ellipse over the circles as shown in the diagram below. Copy it and Paste in Front (Command + C then Command + F).
Adobe Photoshop Tutorials from Beginner to Advanced | Psdtuts+ How to Create a Semi-Transparent, 3D Text Effect in Adobe Illustrator In the following steps you will learn how to create a colorful, semi-transparent, three-dimensional text effect in Adobe Illustrator. We'll start with some basic text and several Compound Paths and a built-in Calligraphic brush. Once we get our starting vector shapes we'll add the three-dimensional look using the Extrude & Bevel effect. We'll use some simple vector shape building techniques and masking tricks along with some basic effects and blending techniques to give our three-dimensional shapes a semi-transparent look. Step 1 Hit Command + N to create a New document. Step 2 Using the Type Tool (T), add the "VECTORTUTS" piece of text, set the color at R=39, G=169, B=223 and use the "Doughnut Monster" font. Step 3 Select the text and go to Type > Create Outlines (Shift + Control + O). Step 4 Select the "V", the "C" and the "O" shapes and go to Effect > 3D > Extrude & Bevel. Step 5 Pick the Ellipse Tool (L) and single click on your artboard to open the Ellipse window. Step 6 Step 7 Step 8
Design a Colorful Retro Futuristic Poster in Photoshop The theme of retro futurism combines digitally created graphics and abstract shapes with distressed and aged textures, giving that cool mix of old and new. Let’s take a look at how to create our own bright and colourful retro futuristic poster in Photoshop, using dynamic lines, vibrant gradients and rough textures to build up the design layer after layer. The design we’ll be building is made up of a range of abstract shards that spread across the page at 45 degree angles. Open up Photoshop and create a new document. Fill the background with a dark blue, such as #171a8b. Use a large soft brush to dab two spots of colour onto a new layer. Use the Polygonal Lasso Tool to draw a diagonal rectangle across the width of the document. Change this layer’s blending mode to Soft Light, then double click the layer to open up the Layer Styles. On a new layer, draw a couple more diagonal shards, this time make them slightly smaller in size and overlap them with the original rectangle.
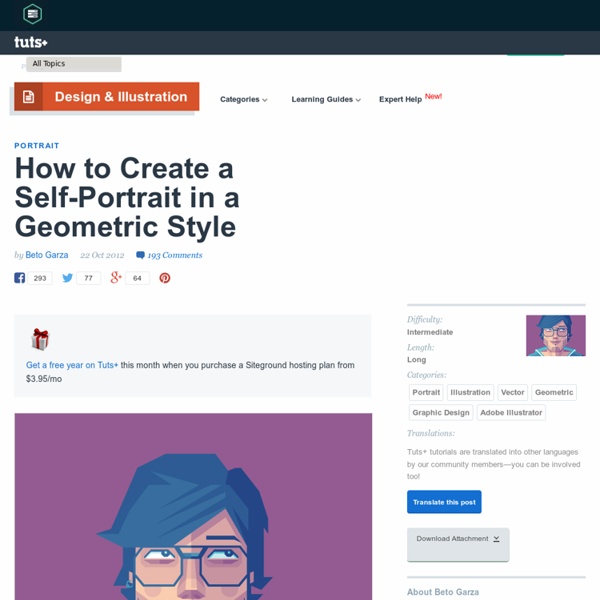
How to Create a Colorful Stylized Portrait in Adobe Illustrator This tutorial focuses on creating a vibrant, poppy portrait in Adobe Illustrator. Using bright colors, transparent gradients, and a sense of whimsy, you'll be constructing facial features and candy hair in no time. Step 1 Get your sketch ready. Either fire up Photoshop or some other drawing program, or scan in some pencils. Step 2 Using the Pen Tool (P), either trace the contour of the face you've drawn, or build it anew with a simple circle and some angled lines to create the jaw. Technically, if you want to create a full head, that circle should be much higher up. Here's how my Layers panel currently looks, with my two shapes for the head and a solid filled Rectangle (M) as the background. Step 3 Ears, neck, hair, and simple background elements. Group like shapes together for easier layer management (Ctrl + G). Step 4 One major component of bright, colorful artwork is deciding if you're using black or not. Start the eyes by outlining their basic shape with the Pen Tool (P). Step 5 Step 6 Step 7
How to Create a Line Art Based Symmetrical Portrait in Adobe Illustrator Vendors who are part of the IAB TCF938Reject allAccept all Purposes (Consent):Store and/or access information on a deviceCreate profiles for personalised advertisingUse profiles to select personalised advertisingPurposes (Legitimate Interest):Use limited data to select advertisingMeasure advertising performanceUnderstand audiences through statistics or combinations of data from different sourcesDevelop and improve servicesSpecial Purposes:Ensure security, prevent and detect fraud, and fix errorsDeliver and present advertising and contentSave and communicate privacy choicesCategories of data:IP addressesDevice characteristicsDevice identifiersProbabilistic identifiersBrowsing and interaction dataUser-provided dataNon-precise location dataUsers’ profilesPrivacy choicesData Retention Period:31 daysYour Consent:Consent expiry: 5 years 1 dayCookie expiry may be refreshed during the lifetime.Tracking method: Cookies onlyShow details