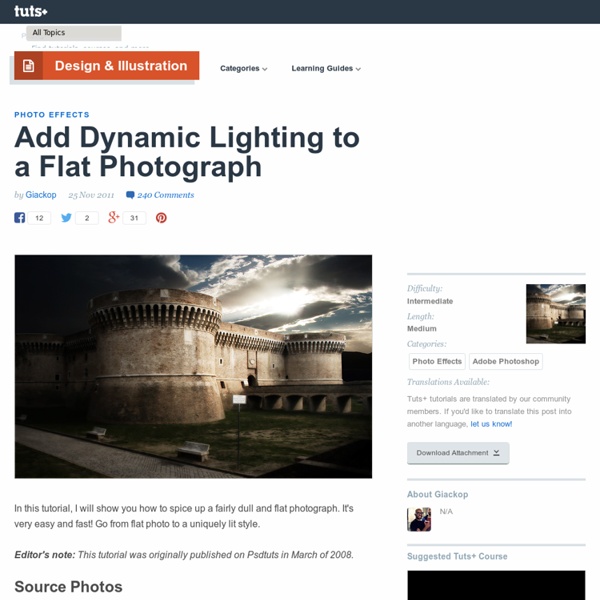
How to create an Impressive New Year 2012 card with Neon text in Photoshop CS5
How to create an Impressive New Year 2012 card with Neon text in Photoshop CS5 November 13th, 2011 by admin Posted in Adobe Photoshop, Designing, Text Effects If you want to learn how to create an impressive card for the holiday, then we have an awesome tutorial for you. I’m going to show you how use brushes and Layer styles in Photoshop CS5 to create eye catching digital illustration with neon text effect. Layered PSD file included. Let’s get started! Final Image Preview Start working by creating a new document (Ctrl+N) in Adobe Photoshop with the size 1900px by 1200px (RGB color mode) at a resolution of 300 pixels/inch. Click in the color bar to open the Gradient Editor and set the color stops as shown. We’ve got the next background: Then we have to represent a plane surface, using the Rectangle Tool (U) draw the next rectangle. Set Fill to 0% for this layer and click on Add a layer style icon from bottom part of the Layers panel to select Gradient Overlay. We’ve got the next result:
How to turn your photo into movie-like effect using Photoshop? « ebin
What you need to have: Adobe Photoshop What you will learn: colour mood adjustments + depth of field effect + film effect PS: ⌘ key for Mac users / CTRL key for Windows users Colour mood adjustments 1. Adjust the Hue/Saturation: ⌘U/CTRL-U 2. Depth of field effect 3. 4. 5. 6. Film effect 7. 8. 9. 10. 11. Cinemascope (optional) 12. You can also add an extra step to twist the colour into this mood by using ‘Color Balance’(⌘B/CTRL-B). I like this post I’d like to donate to ebin.wordpress.com for the contribution.digg Like this: Like Loading...
Claude Raguet Hirst
Claude (born Claudine) Raguet Hirst was a beautifully skilled still life painter active in the late 19th and early 20th centuries. Her intimate, strikingly rendered paintings are considered to be in the American “trompe l’oeil” (fools the eye) style, a genre in which she was the pioneering woman artist. Though she started her career painting still life subjects like fruit, and particularly florals, she shifted her attention to arrangements with subjects common to the genre — pipes, candles, reading glasses and other objects often found on desks. Her best known paintings, however, add to these subjects richly textural representations of antique books. Not just books, but specifically recognizable books, the titles or subjects of which are sometimes featured in her painting titles. Hirst worked in watercolor, an unusual medium for trompe l’oeil, but common among women artists of the time. The best online source I’ve found for her images it on The Athenaeum.
40 FREE Business Card PSD Templates
digg Sharedigg Business card is a necessity for every professional, no matter what kind of business you do. Main goal of the b-card is briefly represent you and convey the message that you want to send to your potential customers, that`s why it is the one of the most important thing of your visual identity. Today we would like to share with you 40 high quality and print-ready business card templates. 1. 2. 3. 4. 5. 6. 7. 8. 9. 10. 11. 12. 13. 14. 15. 16. 17. 18. 19. 20. 21. 22. 23. 24. 25. simple Design business card 26. 27. 28. 29. 30. 31. 32. 33. 34. 35. 36. 37. 38. 39. 40.
Scott Tallman Powers
Originally from Alabama and now based in Chicago, Scott Tallman Powers works both on location and in the studio, painting landscape subjects as well as figurative works. At times he combines both elements in paintings evocative of his travels to China, Guatemala, Mexico, Morocco and other countries. These more complex figurative compositions frequently have something of a narrative feel to them, with subjects of rural village life and reflective portraits of individuals going about their daily chores. In small reproductions his work appears polished, but closer up it’s painterly, richly textured and often suggests more detail than is present. Powers utilizes a variety of palettes, from soft muted hues for misty and overcast days, to bright, vibrantly colored fruit markets and autumn foliage, always selecting a range of colors and values best suited to his subject. His instructional video Scott Tallman Powers: Life in the Market is reviewed on Art DVD Review.
Freebies
Valentine’s Day is right around the corner, making this the perfect time to search out some free Valentine’s Day fonts! These fonts are usually quite romantic looking and riddled with hearts. Valentine’s Day fonts Paris is one of the most well known cities in the world. Not surprisingly, the Eiffel Tower is also one of the most popular tourist attractions in the world as well. Need a quick and easy way to create photo collages with your digital pictures? Facebook, one of the world’s most popular social media giants, introduced the Facebook cover photos feature in the 2011. We put together a collection of 40 Awesome HD Wallpapers that are 100% free for you to use. Back in the old ages of smartphones, when they were still called cellphones, people had to worry about going over their monthly minute allowance and their monthly texting limits. Did you just switch over to an Android phone from the iPhone?
Inspiration Lab
Useful Photoshop Tips And Tricks For Photo Retouching
Advertisement When it comes to designing in Photoshop, there is a myriad of ways one could use to achieve a certain result, especially when it comes to photo retouching. Designers use technique they are most confident as well as comfortable with, which is great because it’s always useful to peek into the workflow of our colleagues and learn new design approaches. We have had articles on cloning1, compositing2, masks3 and obscure Photoshop time-savers4 in the past. I’ll be covering some of the useful techniques and tricks which I’ve learned from my experience. Here is a short overview of the techniques we’ll be covering: Naturally Increased Light The light of the sun creates texture. Increase light on a separate layer. Then use the brush tool with a soft brush, and hold the Alt/Option key to pick up colors from the area that you want to brighten. The blending mode “Color Dodge” creates realistic results. Simulate Infrared Images It’s almost like an infrared image. Levels Sunset Gradient Map