MADE: TUTORIAL: Heartbreaker Valentines Who said valentines were only red and pink? In bright colors, these Heart Breaker Valentines work great for boys and girls. So get out your scissors and stapler, because today, you’re tearing up my heart….. (cue N Sync) Each valentine is stapled together to create a pouch full of secret candies. Skill Level: AnyNeeded: * colorful paper* computer printer* stapler/staples* scissors* candy Start by printing this template from your computer.Two options….1) You can find the PDF file HERE. I chose to print on bright colored paper so the Heartbreakers work for both boys and girls. Another option: print to white paper and let the your kids color the hearts themselves: Most of all, make sure your kids check out what you’re doing. Staple around the outside of each heart, leaving an opening at the top of the heart for inserting candy (or, use your sewing machine to sew around the edge…though it might be more difficult to sew it shut. Then, stuff them with your favorite candy! or big hands to do:
Red Velvet Rice Krispies Treats Hearts for Valentine’s Day You may have noticed I share a lot of Rice Krispies Treats, especially around the holiday. Can you blame me though? They’re sweet, gooey and oh-so-good! If you’re making these to just eat, no need to get fancy but if you’re making them for a special occasion like Valentine’s Day, you’ll want to check out Wilton’s selection of cookie cutters. In a small jelly roll pan you can press the treats thin enough to cut with the heart shaped cutters. With a piping bag (or plastic sandwich bag) you can frost these with pretty designs in a cream cheese frosting that makes them even sweeter. Share ‘em, eat ‘em, whatever you do, don’t leave them unattended and expect to find anything left but crumbs left over. Red Velvet Rice Krispies Treats Hearts Author: Cat Davis Type: Dessert Serves: 8 Ingredients Instructions As a Wilton Mom Brand Ambassador I was provided with the cookie cutters featured in this recipe.
Kool-Aid Dyed Playsilks – Tried and True A couple months ago I came upon a tutorial on The Artful Parent for Kool-Aid Dyed Playsilks. I hadn’t really heard about playsilks before that but upon further investigation found out that they’re awesome. They can be pretty much anything your child wants them to be: capes, dresses, blankets, scenery, tents and the list goes on and on. So, seven of us got together with our seven toddlers (all under 2 years) and dyed 42 playsilks in total. After we did the first batch of Kool-Aid packets, some of the mothers decided to get a bit creative with color combination and as a result we ended up with 14 different color at the end of the day. Edit: Here are a few answers to some of the more popular questions posted in the comments. Where did you get your scarves/What size were they? Will these bleed? Will this process work on other materials (cotton, wool, hair, etc)? I can’t read the color combinations!
Crazy Cat Hat Author Brenda K. B. Introduction You know the look on your cat's face right before it tears through the room, stalking it's invisible prey? P.S. Materials List Materials: One skein (no more than 150 yards) of Lion Brand Homespun yarn in "Edwardian". Finished Size This hat will fit a tween, teen, or adult with a head circumference of up to 22". Gauge To make a gauge circle swatch, work rounds 1-6 of hat pattern. Notes Abbreviations and terms used in this pattern: Ch = chain Dc = double crochet Hdc = half double crochet sc = single crochet st(s) = stitch (stitches) Sc2tog = single crochet 2 stitches together. Sl st = slip stitch Tr = triple or treble crochet The back bump: This is also known as the back, backside, or butt of a chain stitch. Magic Ring: Most of the pieces in this pattern start out with a magic ring. The Pattern Directions: The top of the hat is crocheted in a spiral, starting at the top center. Make Hat Base: Round 1. Round 2. 2 sc into each st around (12 sts). Row 22. Row 23. Row 24.
How to wrap a gift: Use tissue paper for a... Photo by Roberto Caruso I’m giving away trade secrets here. You know those beautiful floral looking decorations you sometimes see in magazines hovering over a festive table?
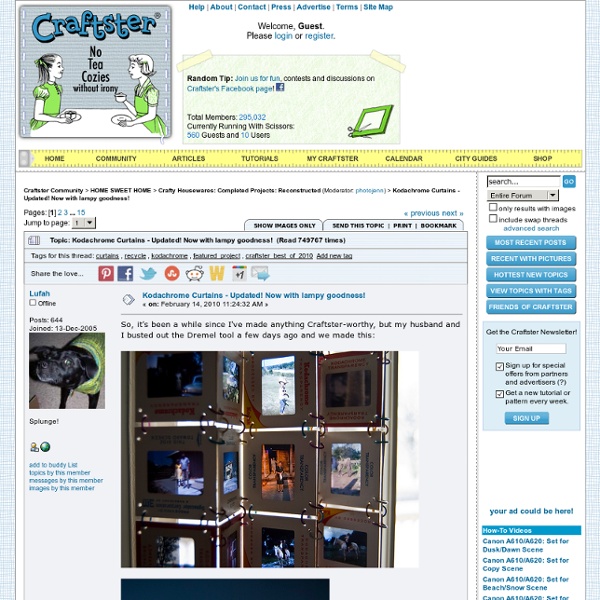
 Or in a kid’s room, re-invented as a mobile? They’re little more than a few sheets of tissue paper and take about ten minutes of your time to create. Here’s a step-by-step guide on how to create your own pretty decoration: 1. 2. 3. 4. 5. 6. At this point, you can either tie it onto the top of a gift for a big impression. Or try hanging it from a ribbon over a Mother’s Day brunch table.
Make coasters from curling ribbon | Chica and Jo Years ago when I was a college student, I had a part time job in a card store. One day on the job, I was fiddling with the curling ribbon we used for balloons. As I twisted and curled it in my fingers, I found myself rolling it into a tight spiral. As it grew and I added more colors, I soon realized I had a really cool design forming, and without too much effort I would have a spiral of color large enough to use as a coaster. I bought some rolls of ribbon and that weekend I sat down and made several fun coasters by carefully coiling the ribbon around itself. Ever since then, whenever I get balloons or gifts that are tied with curling ribbon, I save the ribbon in a special box in my craft room. Selecting the ribbon You probably haven’t been saving up used curling ribbon from balloons and packages (not yet, anyway), so you might need to buy some new ribbon to start on this project. Winding the ribbon Now for the fun part. You can see a lot of potential fun here with patterns and colors.
Turquoise 2010: Ottoman Slipcover Put your feet up and ponder this age-old question: what's the difference between a footstool and an ottoman? Besides the fact that an ottoman sounds way fancier than a footstool, the only real differences are: 1) an ottoman is always upholstered (footstools needn't be), and 2) sometimes an ottoman has another job: large ones fill in as coffee tables and hollow ones can open up and act as storage boxes. Our ottoman was a favorite kitty perch and had definitely seen better days. Why buy new when you can make a simple cover? Before: kitty-ravaged ottoman in need of rescue. This project is a bit more advanced, but as usual, we've included detailed step-by-step instructions and lots of photos. Crisp white cotton duck is paired with striking Joel Dewberry Sunflower accents to give our ottoman a bright and cheerful look. Any Sewing Machine (we recommend the Janome DC2011)Adjustable zipper footPiping foot (optional) Yardages shown are for our sample ottoman which is: 30½" x 25" x 16". Section:
Rose and Feather Hair Clip Tutorial I love this hair pin, so sweet. Fit for tea time, no? Or maybe stopping to smell the flowers… or the blue spruces…whatever suits your fancy. One things for sure, it will surely upgrade any ponytail. You have no doubt seen these everywhere, they are so easy to make. Supplies: fabric at least 25 inches long and 1½ inches wide for one flowerfeathershair clip,hot glue gun The bigger flowers I made were made with 32″ x 1½” pieces of silk, but for the smaller flower that my little one is using I used a 24 inch long piece. Start by folding the strip of fabric in half. Now run a thin strip of glue around one side. Working fast, twist the strip and pull around the hot glue. Now we have a rose. From a piece of scrap fabric cut a circle just smaller than the flower then drizzle hot glue on the back… And press the piece on. Depending on what hair clip you decide to use, you may need to add a little fabric. Using hot glue, open the clip and glue the fabric to the inside… It should look like this. And so cute!
Build/Make/Craft/Bake: How-to: Hammered flower and leaf prints Get out the hammer, it's how-to Tuesday and we have some botanical prints to make! I learned this technique, which makes an image using the natural dyes in plants, from my college roommate Sarah. It's great for making cards or simple botanical prints. Actually, you'll need a little more than just a hammer. flowers or leaves to printwatercolor or other rough, acid-free paperselection of hammers (including ball-peen or cross-peen, if possible)hard work surface (cutting board, slab of wood, etc.)paper towelsscissorspentweezers or toothpicksacrylic finishing spray (optional) Start by going on a walk or visiting your garden to find leaves and flowers to work with. Then set up your work surface. Next, trim any chunky or squishy bits off of the plants and arrange them on your watercolor paper. Cover the plant with 2-3 layers of paper towels. On the paper towels, sketch the borders of the area you'll need to hammer. Start by making small, even taps using the flat side of one of the hammers.
Anleitung: Sunburst Flower Granny Square häkeln « Kasa Amend Geschafft: Meine Foto-Anleitung zum Häkeln der Sunburst Flower Granny Squares für eine dieser tollen Decken, wie sie viele wahrscheinlich von Sandra Juto oder dieser Flickr Group kennen, ist fertig. Für eine Freundin, die heute Geburtstag hat, wollte ich schon längst mal meine kleine Übersetzung dieser englischen Anleitung von MaryjoO abtippen. Nun hab ich mir etwas mehr Zeit genommen, um die Anleitung noch etwas detaillierter auszuarbeiten. Wolle: Cool Wool 2000/ Merino Superfein von Lana Grossa (Das aber nur als Info, ihr könnt selbstverständlich auch ganz andere Wolle nehmen. Häkelnadel: 4,0 (etwas dicker als zur Wolle empfohlen, dadurch wird die Decke schön locker) Bedarf: Etwa 9 g Wolle habe ich pro Granny Square verhäkelt. ::::: RUNDE 1: Der innere Strahlenkreis ::::: Beginne mit einer einfachen Schlaufe und häkel 4 Luftmaschen. Verbinde die Luftmaschen mit einer Kettmasche zu einem Kreis. Jetzt kann es mit den Strahlen losgehen. Doppelstäbchen: ::::: RUNDE 2: Puff-Stiche :::::
DIY Cake Stand It seems as though all sorts of cute party decorating items are “all the rage” these days–cake stands, tiered plates, apothecary jars, hurricane lamps, etc. I love these items, but there is often one big problem! The price tag. Well, thanks to one of the crafty moms in my MOPS group, I now can make my own cake stands for less than $3! Now that is a price that I like. And, not only is the price fantastic, but this might just be the easiest DIY project on the planet. A candle holder, a plate, and some glue! To construct your stand, glue around the rim of the candle holder. You can add a little circle of glue on the underneath side of the plate for good measure. Stick the two together and let dry. Then, voila, an adorable cake stand for next to nothing! How great would these be for a Mother’s Day luncheon/tea?! In addition to the fantastic price & ease of construction, I love that the possibilities are nearly endless! This post may contain a link to an affiliate.
Design*Sponge » Blog Archive » diy project: jessica jones’ office supplies i always have a few small swatches of fabric sitting around the house (i’m a habitual purl soho and repro depot shopper) so this diy project is right up my alley. jessica jones at how about orange sent over her office supplies makeover project and we both thought it would be fun to share here. so, if you’ve got some office supplies that need sprucing up and a little spare time, click here to read the full instruction for this project. happy crafting! [thanks, jessica!] Jessica Jones’ Office Supplies Makeover (via How About Orange) While procrastinating at my desk yesterday, I found myself staring at our letter opener and thinking how plain it looked. Clearly I couldn’t keep using such an abomination. And those clips. Verdict: My interfacing was too thick.
Fused plastic sandwich wraps | Chica and Jo As brilliant an invention as disposable zip-top baggies are, they are potentially very wasteful as well. How many of them do you think we’ve thrown away this year just from lunch sandwiches alone? Ugh, I don’t even want to think about it! Instead, I want to show you how to make a reusable sandwich wrap that not only replaces zip-top bags, but it even recycles some of those pesky plastic shopping bags. The first step is to make some sheets of fused plastic. Okay, have you practiced enough to be confident with the process? Now sandwich the layers between two large pieces of parchment paper. If you don’t have parchment paper, you can use regular white paper (make sure there’s no ink on it) or blank newsprint paper, but parchment paper really works a million times better. Here’s where things are gonna get fun. Arrange your letters in the middle of your fused plastic sheet. Now it’s time to do some sewing. You should have one inch of fabric sticking out on each side of the plastic.