
Pattern and Video Tutorial: Loom Knit Mesh Bag Loom Knit Mesh Bag by Kristen at GoodKnit Kisses 41 peg (or new 40 peg in pink) Knifty Knitter Extra Large Round Loom - Yellow 3 pegs of Spool Loom Skill Level: Beginner, level up Uses: Personal size Mesh bag for the beach or shopping. Yarn: 1 ball nylon crochet thread 90-100 yards 1 ball cotton 90-100 yards *or 2 balls of cotton Abbreviations: EW = E-wrap P = Purl Flat Panel- 1. Building Base bag – 2. Main body of the Bag – 3. 4. 5. 6. 7. 8. 9. 10. 11. 12. 13. 14. 15. Handle for mesh Bag – Spool loom. 2 strands 1.5 times diameter of yellow loom or 52.5-54.5" long depending on material. Weave the icord into the top of the bag between the knit stitch columns. ©2011 GoodKnit Kisses
Bean Bag Looking for hours of entertainment? Meet, The Rollie Pollie bean bag chair. It’s a chair, it’s a toy, it’s your favorite pillow. Made of durable cotton twill or soft vinyl, each bag is actually a slip cover (with another Rollie Pollie inside) then filled with mounds and mounds of soft cluster stuffing. Now, pick your favorite…. Drag it around, Dive right in! Or take a little nap. Build a Rollie-Pollie-man: kick off your shoes: Or do what I love best….find a yummy treat, and just relax, watching your favorite show. Who said you were a couch potato?
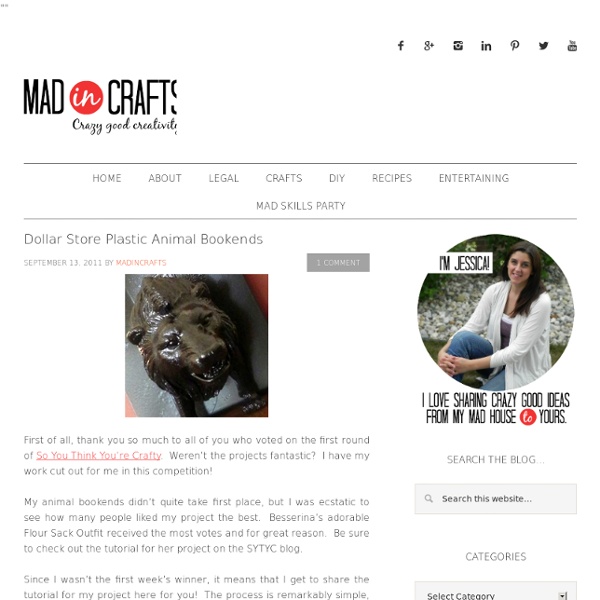
house diorama Left: The actual house, Right: The paper diorama I always ALWAYS forget to photograph these before I put them under glass. Then I have to deal with the ever present glare and reflection of myself in the glass. Erg. Sorry. Our wonderful friends, the Smileys, hosted our family last May at their house near Washington D.C. This is their long-overdue thank you gift. Do you see where I accidentally bent the grass? I used a new glue this time, the MS Crafts Fine Tip Glue Pen. Now I'm ready to replace the snowy bird diorama that has stayed on my mantel all through the summer. Bean Bag Whether it’s extra seating you need or a plush spot to put your feet up, this cozy circular beanbag pouf fits the bill. The playful dot pattern adds retro-inspired whimsy and visual interest. Skill Level: Intermediate Materials: 3 yd fabric; tape measure; water-soluble marker; string and tape (optional); scissors; pins; iron; thread; sewing machine with zipper foot; 20" zipper; 6 yd 3/8" cording; polyester bean filler (we used Poly-fil Beanbag Filler from Fairfield Processing). Directions: 1. 2. 3. 4. 5. 6. 7. 9. 10. 11. 12.
Universal lamp shade polygon building kit I saw a lampshade made out of the shape below at a friend's house, so I traced the shape and made my own. the lamp i saw used thin plastic for the pieces. I believe the original design for this lamp was done over 30 years ago by the firm Iqlight, they sell pre-cut parts in case you do not want to make the parts yourself. Below is the shape as an image, and i've also attached a DXF file. You will need sheets of paper or plastic that allow light to get through. The stiffness of your material determines how large your pieces can be - stiffer material for larger pieces and larger lamps, thinner material for smaller pieces and smaller lamps. (see next step) You will need a lamp fixture - just a raw socket on a cord. I experimented with a number of different plastics and sizes for the parts, here are my results: - HDPE: works well, looks good, cheap and easy to get. - Vinyl: I did not try it, probably want to use thicker pieces since it is not very stiff. but you can use colors! Where to get it:
Adding a Hidden Compartment Adding a Hidden Compartment The current issue of Woodsmith (No. 127) features a drawer with a hidden compartment that's built into the back of the drawer. But there's more than one way to do this. In fact, adding a hidden compartment is a lot easier than you might think. A while back when I was working on some pigeon hole dividers for a desk, I added a simple hidden compartment behind one of the drawers, see photo. To open the compartment, you have to know exactly where to push. There's really nothing difficult about building the compart- ment, but there are a couple of things to keep in mind. First of all, this won't work in every situation. And when building the compartment, it's best to start with the front piece, see Fig. 2. Have a great weekend, Jon Garbison Online Editor, Woodsmith
Tea-time – Tea Steeper Design by Pengtao Yu Timely Steeping I am in love with the Tea-time tea steeper for its intuitive design and simplistic interaction between tea leaves, water and steeping time! A flipping action, akin to starting the timer, sets the tea making process into action. Designer: Pengtao Yu Tea-time is a 2011 Spark Awards entry. Double Dovetail Box After admiring the double and double-double dovetail joints that are capable with the Incra and other jigs, I started thinking, “Why not try this by hand?” So this box is my first experiment with handcut double dovetails. It took me some time to figure out the joinery process, but once I realized a few things about this type of joint, it seemed do-able. In this blog, I’m focusing on the sides of the box, but here’s a few pictures of the nearly completed box - Materials.For this box’s sides I used three types of primary contrasting woods, although there is no real reason to do so. The picture below shows the rabbet joint cut on each end of each side – I set the rabbet depth at 1/8” and cut it on my router table. Below is a top-view picture of the pieces in relation to each other once they become integral to the box. The close-up below shows in more detail. The Tails.Most often I cut my tails first, pins second. These pictures are kind of blurry, but hopefully give the idea – At last!
Super Macro Your Cellphone Camera With A DVD Lens I’ll admit, Super Macro Your Cell Phone Camera With A DVD Lens is one weird title. However, if you just moved to a blu ray DVD player and you’re looking for some good use for your old DVD, cnflikt (who also took the shots for this tutorial) came up with a hack to enable you to take super macro shots with your cellphone. Of course you’ll need a camera phone for that. cnflikt uses the notorious, yet old-skooled K800i, but any camera phone will work here. First thing is to get a lens for your camera phone. Anyhow, if you went against my advice, you’ll find the lens under the place where the disk goes. Ok, I’m only kidding on this one. If you opt for the cardboard option, just make a round hole in the cardboard. Just use some duct tape (as indicated before) to mount your lens directly, use or blue Tack to hold the card mount. WOW.
Charging Cell Phone Holder My husband and I both have cell phones. And both of us have phone chargers. And that means lots of obnoxious cords. You never know when one of us may be moving phone cords around, to give our phones an extra charge while we’re chatting away……… or trying to charge our phones up before running errands or something. (Okay, and how about when you’re in a hotel or visiting family/friends. I was looking around on the internet for a solution and found this. It made the perfect little holder for my cell phone while it’s being charged. Holder for Charging Cell Phone And no more phone hanging down from the outlet while in this room or that room……..the cord and phone are now up off the ground, and tucked away into the little holder, while the phone drinks up a full charge. And of course I couldn’t just leave the poor little holder alone……I had to Mod Podge some fabric right onto it for some kick. If you look closely, you can see that the orange print is fabric. And turns out, it’s pretty useful.
Turn a DVD Lens into a Cellphone Macro Lens Redux So, why exactly do you guys have a case of bullets lying around the office? @Pimanrules: A case? I wish. With ammo prices as high as they are I'd love for a case to just magically appear in the office. Dear Ammo Fairies, I would be very thankful if a whole case of ammo would appear. Love, Jason @ Lifehacker @Jason Fitzpatrick: Thanks to the macro lens it looks as if those are actually reloads, I believe I saw some lands and grooves on the very bottom edge of the slugs. @flyingwolf: I haven't gotten into reloading yet, although I'm seriously considering it. I did most of my bulk ammo purchasing several years ago... then I got busy with a new baby, work, etc. and wasn't going to the range as often as I had been. Reloading .22 isn't really an option so I'll just have to suck it up on those prices, but .40 and .45 are definitely worth the initial expense of setting up a reloading bench.
Piggy Pillow As promised, I have completed the tutorial and the pattern for the “Be My Valentine – Piggy Pillow”, which was published 3 weeks ago. This time I made a pair for my kids, they love it. You may not be able to do it in time for this valentine but as I said, if you have love in you, everyday is valentine. Hope you sew some for your loved ones no matter if it is Feb 14. Besides as a pillow, you can use this pattern to make into other things, for example, pin cushion, smaller softy as gift, or a piggy back pack for little children. Material you need:1. Print out the PDF pattern of the piggy pillow. Use a pencil and trace the pattern onto the cotton fabric. Sandwich the towels in between 2 fabrics. Sew it up on the sewing line, it can be from sewing machine or hand stitching. Turn body, ear and tail inside out. Tie a knot at the tip of the tail as shown, mark a length of 4″ from the tip. Turn the body outside in and position the tail on the top part of the body. Sew the nose onto the body.
Dismount Creative – M&J Challenger 2! Dismount Creative is as a place for people to step out of their day-to-day routine and get together to make cool, modern crafts. Here are the great projects she came up with for the M&J Challenge 2. Project 1: Tie-dye Camera Strap Like many bloggers I carry my camera almost everywhere. Materials:Muslin 3” x 60” RIT Dye String Squirt bottles Hardware store chain 36” Leather: 2 strips 3/8” x 12” Rivets + rivet setting tools Directions Sew along the length of the prewashed muslin strip and then turn it right side out using a safety pin. Project 2: Simple Ribbon Camera Strap My little Diana Mini is way too cute to be carried by the 70’s vinyl strap that came standard. Materials:Split key rings – 2 Ribbon – At least 36” Jewelry Chain – At least 24” Weave the ribbon through the chain and knot on each end to secure.Attach the chain to the brackets on your camera using a split key ring. Project 3: Braided Wrap Bracelet Directions: Project 4: Sparkly Bolo Cord Bracelet Directions: Visit Like this: