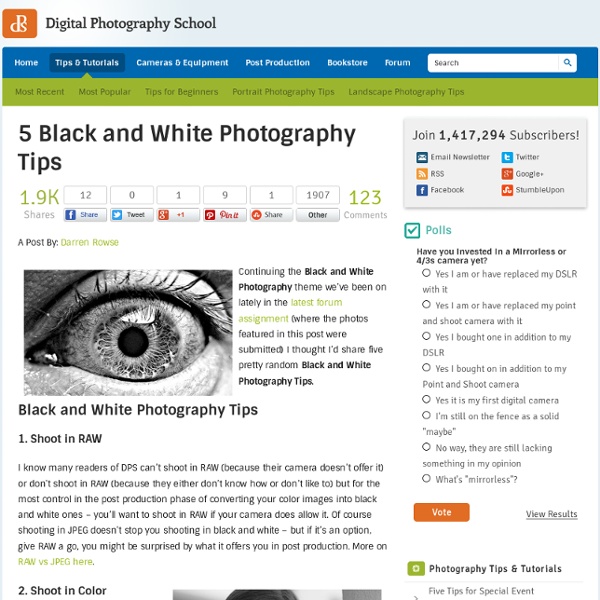
5 Black and White Photography Tips
Digital black and white photography
Black and White image manipulation tools and techniques Topaz B&W Effects A review of the B&W Effects plugin from Topaz Labs. Conversion of colour images to a range of black and white styles. Includes ability to fine tune and mask adjustments [November 2013] Taming contrast enhancement halos with Silver Efex Pro - Although Nik Silver Efex Pro 2 is a great tool for creating black and white images, it's quite easy to generate halos and other artefacts around objects. Nik Silver Efex Pro V2 Review of the latest specialist black and white conversion plugin from Nik Software. Nik HDR Efex pro Review of Nik's HDR image processing software. Using the 7D at night A short article written as part of Keith's testing of the Canon 7D. Producing a black and white print An article describing the full process Keith went through in producing a black and white landscape print. Nik Silver Efex Pro Provides a wide range of colour to black and white conversion options and effects.
How To Color Old Black and White Photos | MadTuts
Color to Black and White in PhotoShop
Digital post-process manipulation is a great way to fix any problems with the actual picture as well as to improve an already existing shot. Color can be changed within seconds, as opposed to minutes and hours in a conventional darkroom. I found digital manipulation to be a great way to learn the basics of color and contrast as well as saturation. Digital was perfect in my eyes until they were opened to the lack of black and white options. The Wrong Way I started to create black and white by going to image>adjustments>desaturate. The Solution After a little more searching I discovered that each Red, Green, and Blue channel created a grayscale image when isolated and each image portrayed the color differently. Here's how I do it. Getting An Idea This step can be skipped but I find it to be useful. Before you decide to change an image you should look at each individual channel representation of the image. Click on each channel and see how it looks. The Actual Conversion Adjustment Layers
Areas of Color in Black and White Photos
This tutorial is to help you learn how to make certain spots color after you have converted a color photo to black and white. Ok after you have the picture that you want to work on open in photoshop: 1. 2. 3. 4. 5. For Further Training on Photo Effects: There is a best-selling eBook on how to do amazing photography tricks and photoshop effects.
How To Add Color To Black and White Photos in Photoshop
NOTE: If the following tutorial feels overwhelming, or you’re just not interested in learning the software and would rather pay a professional, there ARE other options. Head over to ColorAPhoto.com to find out more. For everybody else, here’s how to color your photographs yourself: One of Adobe Photoshop’s best features is the ability it gives you to colorize black and white photographs. With Photoshop you can add color to the entire photo, or just “paint” one part of the image to create a focal point—it’s up to you. Sound interesting? Adding color to a black and white photo First, open the image you want to colorize—preferably a black and white image with a good range of values from darkest black to pure white. Next, go to Image >> Mode and make sure that RGB is selected. Now it’s time to select the area of your photo that you’d like to color—I’ll walk you through the selection method that I prefer. After completely covering the chosen area. . . . . .click on the Quick Mask button again.
Professional Black and White Photo Conversion
Before Changes After Changes This tutorial is to help you learn how to decide which source channels you should accent when converting a photo to black and white. 1. 2. 3. 4. 5. 6. For different photos, the best looking combinations will almost always be different. For Further Black & White Post-Processing Power: Many consider this program (which also works as a plugin for Photoshop & Lightroom) to be the most versatile conversion tool for B&W enhancement: Topaz Black & White Effects
Photo Retouching | Skin Retouching in Photoshop
This tutorial will help you learn how to speed up skin retouching and polish photos in Photoshop using basic techniques. Original Photo Step 1 Duplicate the background image and rename it to Layer 1. Step 2 Go to Filter > Other > High Pass and set the Radius to around 4.5 pixels. Step 3 Change the Blending Options for Layer 1 from Normal to Soft Light and uncheck the eye to make Layer 1 invisible for the next step. Step 4 Duplicate the background image again and rename it to Layer 2. Step 5 As you’ll see the image will be just slightly blurred and smoothen out but not the edges. Step 6 Flatten Image and use the Clone Stamp Tool mixed with a Soft Brush with the Flow set to around 30% to manually select areas next to one another, blend it in as much as you can using this tool to make further improvements to the skin. Step 7 This step here is to quickly balance out the whole lot, to do that we need that extra bit of shadow to be added to the overall image. Final Result
Related:
Related:
