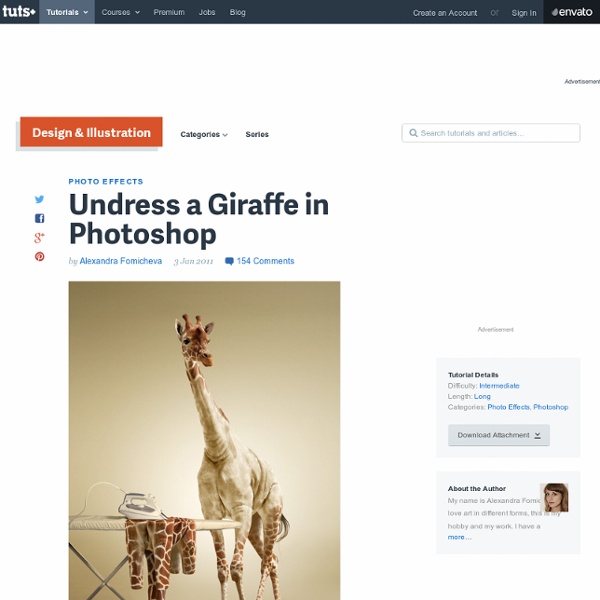
Undress a Giraffe in Photoshop
How to resize multiple images in Photoshop
Here, as part of our beginner's guide to Adobe Photoshop, we show you how to use actions and batch processing to resize multiple images. If you've got a folder full of images that you want to resize, you might be dreading how long it's going to take to open up each image in Photoshop, resize them, resave them and close them all again. However, there is a way to make resizing multiple images in Photoshop really quick and easy, but it takes a bit of work to set up first. First things first, you'll want to make sure all of the images you need to resize are in one folder. Within that folder (or wherever you would prefer your resized images to end up) create another folder called something like "Resized Images". Now, open up one of the images in Photoshop (here, we are using Photoshop CC, but this process will work in older versions of Photoshop too). Create an action Go to the actions panel. Choose a name for your action. Here, choose how you want to resize your images. Click "Save". Worked?
Photo Transfer Edge Effect
Step 1 Welcome back my naughty little monkeys! I was up most of the night with this nasty flu that’s been going around, it’s not even noon and already I’m on my third can of Dragon, so if my writing’s a little off kilter, you’ll understand why. Did I just use the word kilter? Lets get this party started with a visit to iStockPhoto where I found a cool looking stock image of an old medium format film border. Here’s the image I got from iStockPhoto. Step 2 Since I ultimately want to use this image as a mask, lets go ahead and invert the tones by choosing Image>Adjustment>Invert from the main menu, or by simply pressing Command-I (PC: Ctrl-I). Step 3 What I really want from this image is a true black to transparent mask, but what we’re currently working with is a black and white composite. Now click over to the Channels tab in the Layers palette (*note: If your layers palette isn’t open choose Window>Layers from the main menu). Step 4 Step 5 Step 6 Step 7 HERO! Step 8 Step 9 Step 10 Step 11 Step 12
60+ nouveaux tutoriels de qualité gratuits pour Photoshop | Design Spartan : Art digital, digital painting, webdesign, ressources, tutoriels, inspiration
Encore une fois, je vous ai sélectionné le meilleur des tutoriels gratuits pour Photoshop ! La liste ultime de tutos pour ce début d’année. Après en avoir parcouru un nombre incalculable, voici pour vous plus de 60 des meilleurs de ces derniers mois. En quête de perfection, en pleine soif d’apprendre ? Vous êtes à la bonne adresse ! Comme toujours, les tutos de la sélection sont classés en plusieurs rubriques et sont plutôt orientés vers un niveau intermédiaire : Retouche photo3D PhotoshopPhotomanipulationEffets de texteDessin d’icônesWebdesign Il n’a jamais été aussi facile qu’aujourd’hui de se former sur un logiciel et je pense que Photoshop a de loin la palme du tutoriel gratuit sur Internet. Si vous avez des tutoriels à partager qui ne sont pas présents dans cette liste ou une précédente, je vous invite à les partager en commentaire ! Retouche photo 10 astuces et techniques pour retoucher vos photos avec Photoshop Comment créer des reflets de gouttes d’eau réalistes Photomanipulation
Related:
Related:
