Quilted Christmas Ornament Patterns: Deck Your Tree
‘Tis the season for stitching up some quilted Christmas ornaments to adorn your tree or to give as handmade gifts to friends and family. Simply gather up some scrap fabrics and decorative ribbons and use these simple-to-sew Christmas ornament quilting and sewing patterns to make handmade holiday decor that’s sure to be enjoyed year after year! Photo via Craftsy member ornamentgirl Quilted pine cone ornaments The pattern for these lovely quilted pine cones utilizes a neat folded fabric technique and includes a bonus tutorial on how to make a ribbon bow and hanger. Get the Quilted Pine Cone Ornament pattern. Photo via Craftsy member Cosmic Girl Christmas ball ornaments Craftsy member Cosmic Girl designed this fun pattern for a simple Christmas ball, which also requires a Styrofoam ball center. Get the Quilted Christmas Ball Ornaments pattern. Photo via A Quilting Life Simple 9-patch ornaments Here’s how to do it: Step 1: Make mini 9-patch blocks using nine 1 ½” squares. Step 2: Step 3: Step 4:
Measurement Converter: Conversion of Weights and Measures
Stuffed Kangaroo Tutorial
Kangaroos this week... I made this big grey one who looks so huge next to the original (now safely on her way to the US). I promised you all the pattern for this project ~ you can find it here, sorry it is a bit scribbly and there is no scale on it but i don't think it matters too much ~ remember tho the smaller you make it the more fiddly it is. ~Now how to put it together~ The Joey and the mother are made in basically the same way, start with the Joey because you will need to put it in the pouch and sew it in (to make sure it fits) before you finish the adult. Start with your two front sections and sew (I blanket stitched) the centre seam from neck to tail - top to bottom. (this is me sewing in the car while i wait for the big girl to finish her piano lesson) Join in the first main body section starting at the base of the tail. From the base of the tail, sew along the length and keep going up and round its back ~ remember to leave a decent opening for stuffing.
Scalloped Edge Basket Tutorial
Sherri from Thread Riding Hood designed these little baskets, complete with a PDF pattern and full tutorial! They’re perfect for gift-giving, for organizing and we also think they’d make lovely little Easter baskets. Learn more about Sherri in her introduction, and have fun with the baskets! Hi, I’m Sherri from Thread Riding Hood and I’m happy to be here to share this tutorial with you! Your favorite fat quarters can be used to create this pretty zakka-inspired basket. Materials: 1 Fat Quarter ** – Basket Outer *1 Fat Quarter ** – Basket Lining + Scalloped Edge * 4” Square – Outer Base Fabric * 4” Square – Lining Base Fabric * 6”x 12” – Handle Fabric * (optional) ½ yard – Medium Weight Fusible Interfacing (20” wide) 1 Fat Quarter – Low Loft Quilt Batting School Glue Stick OR Basting Spray Ruler, Removable Fabric Marker, Other usual Sewing Supplies Scalloped Edge Basket PDF Pattern Pieces * Quilting cotton is recommended for all fabrics. ** Fabric measurements are generous. Cutting: 2. 3. 5.
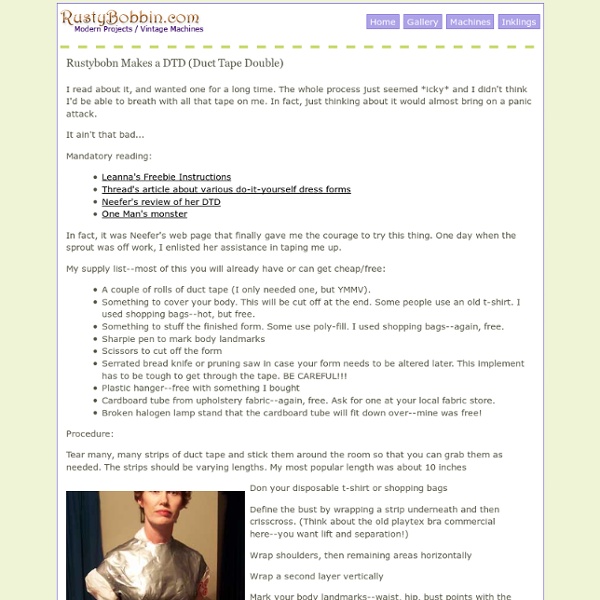
Shirt Darts « SewingArtistry.com
This Burda pattern is really good – if your BWOF goes back to 2008 – Good For You! It’s a great GREAT pattern. What’s hidden in here that you can’t see is a dart on the outside seam of the bib feature. And then the curved under bust seam is just an additional place to do some smart darting. This shows where the darting is done so you can really tweak this little jewel and make a very nice fit. This is the first iteration of this pattern and turned out beautifully – just straight out of the magazine. The difference between the first and second version may seem minor, but see how clean that side line is and how beautifully this fits on the side and just under the bust? This pattern is really a great refinement of the FBA (front bust alteration/dart) and it shows it. Here’s another version just to show you how versatile these patterns can be – this one is washed dupioni and made into a tunic – peplum type look. Starting from the upper left – this is Simplicity 2339. Tacky aren’t I!
Felt Owl Ornaments
I haven’t made that much this Christmas. I might make a few last minute gifts, but I feel I have to get most of the shopping out of the way first... especially the online stuff that needs to be shipped. And no outfits for the kids like last year. But I did do a little felt hand sewing. Anyway, these are the little owl ornaments I made. Download Owl ornament and all you do is cut it out from felt and sew however you’d like. I love ‘em. Enjoy! *****NOTE: I forgot to mention on the pattern about ric rac.
les créations de l'araignée: tuto de l'étoile de Noël en origami
On me l'a demandé ; je m'exécute !...et pourtant, ce n'est pas encore tout à fait la période de préparatifs de Noël ! Mais comme ce bidouillis-là n'était pas clair, j'ai tout refait, avec moultes étapes et détails, pour expliquer cette étoile en origami modulaire, c'est-à-dire à base de plusieurs modules identiques liés.En bonus, ce tuto sert aussi pour fabriquer le moulin à vent traditionnel, une petite réalisation plus de saison ! Tout est expliqué dans les photos... Ouf !! vous êtes arrivés jusqu'au bout ?? Voyons maintenant ce qu'on peut en faire : des mobiles, des guirlandes, un ornement de scrapbooking... D'autres idées ?? Si ça intéresse et sert à quelqu'un, je pourrais faire de temps en temps des tutos d'origami sur ce mode-là...des modèles souhaités en particulier ?
Penguin Pattern
Stuffed penguin which is made of felt. Its eyes are wood beads.8 centimetre tall. Cut cloth without seam allowance. Sew the darts of the head.Only darts are sewed from inside. About sewing, refer to mini Santa.You may use blanket stitch too.If you mind the seam, use a transparent thread. Feet and bill. Sew the bill to the head. Stuff polyester fiberfill. Pattern.
DIY Faux Curled Rosewood Wreath {Made From Rolled Recycled Book Pages}
I have seen various versions of Faux Rosewood Wreaths in just about every store and catalog for the upcoming season; most with a price tag running upwards of $40 or more. Some are crafted of paper and other of real wood shavings. Last year I made a few rolled flower gift toppers from recycled book pages and they remind me so much of the curled wood roses I thought they would make a good substitute. {with a much lower price tag} Materials Needed:Foam Wreath FormRecycled Book PagesLots of Hot GlueRibbon to Hang The full step by step tutorial I posted last year can be found {here}.Basically you layer three book pages together and draw a spiral circle. Starting with the outside of the spiral, roll the paper inward to create the flower shape. Give the wreath form a light coat of white {or light color} spray paint to help camouflage any see-through spaces. It seriously takes quite a few roses to fill the entire wreath, however I think the finished project has such a unique look. {Simply Lovely}
Cat Toy Critters Tutorial
1. Start out by sewing bird belly to one side of bird half and continue up and around over head until you reach the tail. 2. Continue on with the tail in position until the end, knot, then finish the other side of tail. 3. Now go back and finish sewing the other side of the bird belly.
Paper Heart Wreath
Paper Heart Wreath from Arts for Life Because if you have a house full of paper heart chains you will need a paper heart wreath to keep it company. And before you turn these paper hearts into a wreath they make their own fabulous paper heart chain too. If you want to make a paper heart wreath with your kids, you can check out the tutorial over at Arts for LIfe.