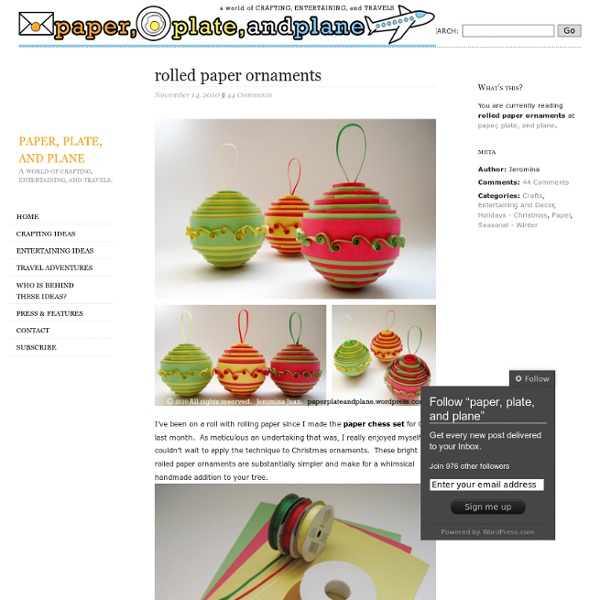
Folded German Bell Tutorial
Isn't this a pretty little ornament? Considering how quickly the days until Christmas are flying by, I bet you'll be happy to hear the directions to make one are surprisingly simple. Becky from North Carolina introduced me to the German bell via the Yahoo Quillers group several years ago... but relax, zero quilling is involved. She suggested using a 5 x 8 inch index card (system card in Australia) because the cardstock weight is just right. After the bell was folded, loop inserted, and top point glued, I applied two coats of antique gold acrylic paint to the surface by dabbing it on with a stubby stencil brush. For something different this year, I thought it would be fun to make bells with some pretty snowflake vellum I had on hand.... it's heavyweight, so is quite stiff. I'm happy to report it folded really well and I love how the translucence of the vellum allows light to shine through. But wait, I'm getting ahead of myself. Instructions:Step 1 Cut a 5 x 5 inch square.
Star Lantern Tutorial
This little project has been on my list of things to make for a very long time. Our friend Emily made them with her classmates a few years ago for her school's Winter Fair. I had a small lantern to set on my nature table since then but I finally broke down and took it apart to figure out how to make one myself. I have looked for instructions everywhere but could not find them so here is my interpretation. If any one knows of an actual printed source please share it with me, because I do not know if I can explain it very well. I am very visual so I will give a photo for each step. Step One: Paint a large piece of water color paper with water colors, I think Wet-on-Wet method looks best, and bolder colors are more stunning (as compared to very pastel). Step Two: Once it is dry rub the back side of the painting with oil, I used canola oil but you could use whatever you have around, I rubbed it lightly using a paper coffee filter or you can use a paper towel. FINAL STEP!!! And Voila!!!
christmas shopping at subtle details «
This afternoon, I’m off to see my dear friend, Karen Pasieka, and her new little bundle of joy. Karen is my muse and happens to be the very talented owner and artisan behind Subtle Details. Li'l Décor ornaments: Trees and wreaths. Photos courtesy of Karen Pasieka, Subtle Details. It is an inspiration every time Karen and I convene. My love-turned-obsession for paper is understood by Karen in her equivalent passion for polymer clay. Li'l Décor ornaments: Sledding Snowmen "1st Christmas Together" and Snowman "Presents for me?". Christmas is around the corner and Karen is just the right person to meet for all the whimsical décor, trinkets, and gifts for some holiday shopping. Li'l Bouquet pendants: Rose Medallion and Butterfly Blooms. Li'l Art: "Poppies Pop!" Li'l ABC's. Like this: Like Loading... Tagged: christmas gift ideas, christmas ornaments, polymer clay art, polymer clay gifts, polymer clay jewellery, polymer clay ornaments
Ozdoby świąteczne - anioły z masy solnej < eko | DZIECI SĄ WAŻNE
Masa solna jest prostym materiałem plastycznym, z którego można wyczarować piękne ozdoby świąteczne. Bawiąc się nią z dzieckiem, możecie tworzyć niepowtarzalne wzory ozdób choinkowych, świeczników, dekoracji do dziecięcego pokoju… Jeżeli zamierzasz pomalować gotowego, wysuszonego anioła, pamiętaj aby użyć bezpiecznych, nietoksycznych farb. Przygotuj masę solną: zmieszaj 200g mąki, 200g soli, 125 cm3 wody (możesz dodać kilka kropel oliwy) i wyrób ciasto. Obetnij brzegi, żeby nadać aniołowi estetyczną formę. Uformuj kolejne elementy i wytnij z nich skrzydła. Przymocuj skrzydła do anioła, mocząc łączące się powierzchnie za pomocą pędzla. Dodaj aniołowi głowę. Następnie dodaj włosy wycięte z innego fragmentu masy solnej. Susz anioła w piekarniku w temperaturze 100 stopni C, przez około 1 godzinę. Autor artykułu: Plastyczka, graficzka, absolwentka ASP w Krakowie.Zajmuje się grafiką książkową, ilustracją dla dzieci, edukacją artystyczną.