
Do-it-Yourself DIY String Wedding Lanterns Yarn Chandeliers Jessica of Wednesday Inc shows us how to make those gorgeous twine chandeliers from the inspiration shoot she shared with us this morning. Using balloons, glue and twine, you can also make these lanterns for your wedding – and then bring it home and use it as your very own mid century lampshade. What you will need are: balloons, glue, yarn, tray for glue, corn starch 1/2 cup of Corn starch, 1/4 cup of Warm water, clear fast drying spray paint, hanging lamp cord or fishing line (depending on your desired final product), and a lighting kit if you’re looking for a fully functional lantern. Jessica recommends using a sharpie to mark on the inflated balloon how much room you need to leave for the lighting cord. She also recommends coating the balloon with vaseline prior to wrapping the yarn coated with glue so it doesn’t stick on the balloon once it’s dry. Are you getting excited to try to do this at home as much I am? Instructions: 1.
How to Make Non-Obnoxious Alphabet Magnets Okay, okay. Non-obnoxious isn’t a word. But neither is unobnoxious. I’ve come to embrace this part of my life where I have a baby and a toddler. There will be toys. A multitude of them. However, for the sake of my sanity, I try to make it look like we all share the space together – adults and tiny ankle biters – as opposed to Jack and me just unrolling sleeping bags in the middle of a Toys R Us. Enter alphabet magnets. Hard plastic. And the floor. Just kidding. But Rembot loves alphabet magnets. A win-win situation: non-obnoxious alphabet magnets. I picked up some flat wooden disks, magnet strips (these work really well, too), and rub-on letters. 1) Spray paint both sides of wooden disks. 2) Lightly spray paint one side with white spray paint. 3) Spray with blue spray paint. 4) Rub letters onto each disk. 5) Take sandpaper – or whatever this thing is called: a sponge wrapped in sandpapery goodness – and roughen up the edges. 6) Cut little magnets out of magnet strip. Like them?
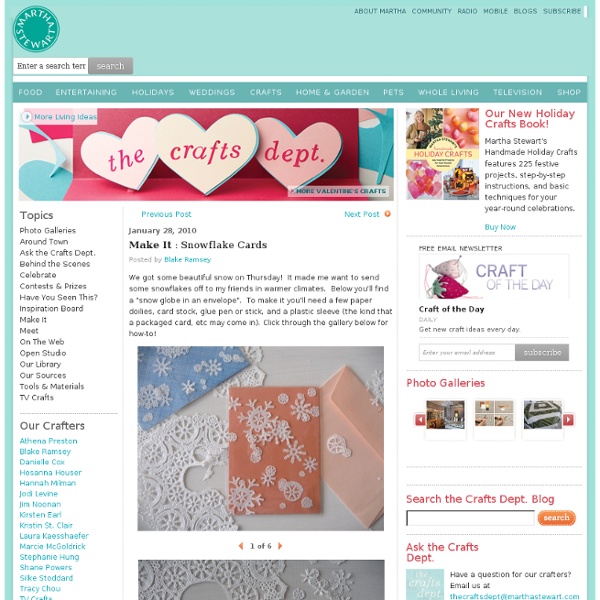
Paper Hearts and Paper Flowers I’ve been so distracted and excited about our new blog design that I completely forgot to post my collection of paper flower and paper heart tutorials! Hopefully I didn’t catch you too late. Run out tonight and grab some paper and make something cool for your mom this weekend. Some of these are for show/inspiration and some you can do for real. Paper Flower Heaven It really is. Barcelona Paper Flowers Found at a market in Barcelona. Helen’s Garden A seriously cute way to do indoor gardening. Heart Paper Chain Normally appropriate for Valentine’s Day but I say hearts are good for any holiday. Origami Hearts I love origami anything. Mexican Paper Flowers Beautiful! Paper Roses Really, easy step by step tutorial for these roses. Hope your mother’s day weekend is beautiful and relaxing! stumbleupon
Sewn paper garland I made this rainbow paper garland on a grey summers day and now the days are drawing in it’s really coming into it’s own and doing a wonderful job of brightening our home up. It’s really easy to make and costs next to nothing but you’ll definitely need a sewing machine and a couple of hours worth of patience. I took hundreds of photo’s of this and none of them do it justice – please believe me when I say it’s stunning! Click the “read more” link below for a really quick how-to. All you need to do is cut lots of strips of paper and sew along the centre point. Mine measured 8 x 1cm. How to You will need: ♥ Paper ♥ Thread ♥ Sewing machine ♥ Craft knife and cutting boards (or scissors) ♥ Ruler ♥ Pencil 1. The paper I used was from a paperchase notebook. 2. paper flowers | Talk Crafty To Me Why not brighten up your gloomy winter day, by making your own paper flowers. This super simple project takes only about 5 mins and is sure to brighten any room. Add them to twigs or branches for an instant bouquet or simply throw them in a bowl. Originally created by Martha Stewart, Wendy from DoziDesign has whipped up a quick tutorial. Head on over there and start making flowers to your heart’s content. Pictures from Dozi & Jen Elisebeth. related posts
Spoutwood Farm Center Tissue Paper &Paper Flowers Tutorial I debated sharing this tutorial for a couple-o-reasons. Reason 1. It's a craft that has been around since before I was born and reason 2... it's a craft that has been around since before I was born. I feel like I might be a 100 years old at this point. Since it's new to me I figure it's got to be new to someone else too so I am doing it anyway! Supplies you'll need to make tissue paper flowers:Tissue paper (seeing as how this IS a tissue paper flower tutorial it would stand to reason that some form of tissue paper will be required)16 HUGS (just checking to see if you are actually reading this)Pipe cleaners or floral wireScissors Extras (for pizzaz): glimmer mist, brads, 2 inch Styrofoam balls, ribbon, more hugs (still checking), a flower girl (seriously), and lastly... As I stated last week, I purchased a Martha Stewart tissue paper flowers kit a few months ago on clearance at Malwart. Let's get started!! ...or... Once you have the entire thing folded up, you will want to fold it in half.
Amazing Paper Made Muscians Amazing Paper Made Muscians posted under Photography on May 8th, 2010 with 29 Comments 8 May 0 Share Related You will love this Loading... 29 CommentsThoughts from the Community Ferg said Mar 1st, 2011Really great...Love the Elvis! sperlingk1 said Nov 20th, 2010"Musicians" .... not "Muscians" clipping images said Aug 31st, 2010really cool... like a dreamy world of lily puts.. tony said Jul 19th, 2010hey man, it seems to me you've got alotta time to spend !! Anum said Jul 9th, 2010KISS! Maggie said Jul 5th, 2010Yes, I agree, do Bowie! MagnetsMan said Jul 4th, 2010Its perfect style! leesh said Jun 28th, 2010@kthxbye I totally agree! Jude LaFontaine said Jun 22nd, 2010yeah The Beatles rule. Add your Comment Please Be Constructive & Insightful Advertisers Their support keeps us going Random Creatives From the Couch On the Couch Past Interviews Interview: Zootool on Design and Development & Business 21,374 Designs7,789 Creatives179 Articles4,806 Critiques340 Collections Thanks to our Sponsors
PA May Faire 2014 PA May Faire Home page Information: Saturday, May 3, 2014 - 11:00 am - 7:00 pm Berks County 4-H Center - County Welfare Rd, Leesport, PA Welcome to the internet home of the 6th annual PA May Faire! The PA May Faire is a family-friendly spring festival located in Berks county, whose purpose is to provide a fun and exciting experience for those following a polytheistic/pagan faith, spirituality, and/or philosophy, as well as welcoming anyone who is generally curious about who we are....or if you just want to get out and enjoy the spring faire! - Crafters, to exhibit their trade (e.g. a blacksmith, glass blower, a spinner, or weaver) - Interactive entertainment - Workshops and discussions - Ceremonial maypole dance with traditional English music - Free table space for local non-profit orgs, covens, groups, and the like to share their work with the community - A pleasant market atmosphere for our vendors, readers, healers, and shoppers Plenty of free parking!
How to make gift bags from newspaper When I bought something at a store recently, the clerk handed me my purchase in a bag made from a newspaper. I liked it very much and had to make some more—thus today's DIY recycled newspaper project: gift bags made from the Wall Street Journal. You can vary the dimensions, of course, but here's what I used to create a bag that's 5" tall, 4.5" wide, and 3" deep. Stack two sheets of newspaper on top of each other. This will be a two-ply bag for extra sturdiness. Cut out a rectangle that's 15.5" wide and 8.25" tall. Fold a flap 1.25" down from the top. Cut two pieces of cardstock or chipboard to 4.25" x 1", then glue them on the widest two panels just under the top fold. Put glue on the outside of the 0.5" tab and bring the left-most panel over to form the body of the bag, aligning the cut edge of the panel with the folded edge of the flap. Upend the bag so the 2" flap is now up. Put glue on both flaps and fold them inward to form the bottom of the bag.
How to Make an Impression: Extraordinary Thank-You Notes January 10th, 2011 399Email 409 users recommend These days, sending any thank-you note will get you noticed, but sending this thank-you note may very well get you hired! Jeff Rudell Try to keep your designs loose and unfussy. A handmade vellum envelope is a wonderfully mysterious way to wrap your note for delivery. Photo: Jeff Rudell One holiday, many years ago, I hand-made ornaments for everyone on my Christmas list. I couldn't fault my friends, of course. My tactic was a bit off the mark, perhaps, but my idea was sound. The great thing about paper is that while it may be temporary, it can also be a tremendously effective medium for memory-making. While I'll probably never tinker with Christmas again, I still try to put this temporary nature of paper to good use as often as possible. Granted, not every note merits the time and energy required for this project. View 4 member project galleries